Netgear RAXE290 User Manual - Page 98
Set up a bridge for a VLAN tag group
 |
View all Netgear RAXE290 manuals
Add to My Manuals
Save this manual to your list of manuals |
Page 98 highlights
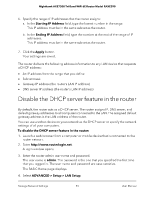
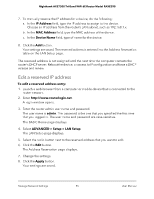
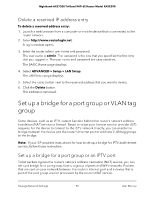
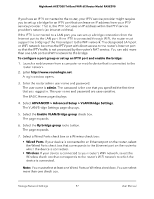
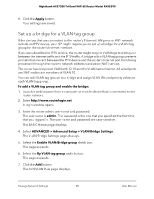
Nighthawk AXE7300 Tri-Band WiFi 6E Router Model RAXE290 8. Click the Apply button. Your settings are saved. Set up a bridge for a VLAN tag group If the devices that are connected to the router's Ethernet LAN ports or WiFi network include an IPTV device, your ISP might require you to set up a bridge for a VLAN tag group for the router's Internet interface. If you are subscribed to IPTV service, the router might require VLAN tags to distinguish between the Internet traffic and the IPTV traffic. A bridge with a VLAN tag group prevents packets that are sent between the IPTV device and the router's Internet port from being processed through the router's network address translation (NAT) service. The router has one preset VLAN with ID 10 and the VLAN name Internet. All wired ports and WiFi radios are members of VLAN 10. You can add VLAN tag groups to a bridge and assign VLAN IDs and priority values to each VLAN tag group. To add a VLAN tag group and enable the bridge: 1. Launch a web browser from a computer or mobile device that is connected to the router network. 2. Enter http://www.routerlogin.net. A login window opens. 3. Enter the router admin user name and password. The user name is admin. The password is the one that you specified the first time that you logged in. The user name and password are case-sensitive. The BASIC Home page displays. 4. Select ADVANCED > Advanced Setup > VLAN/Bridge Settings. The VLAN/Bridge Settings page displays. 5. Select the Enable VLAN/Bridge group check box. The page expands. 6. Select the By VLAN tag group radio button. The page expands. 7. Click the Add button. The Add VLAN Rule page displays. Manage Network Settings 98 User Manual
-
 1
1 -
2
-
3
-
4
-
5
-
6
-
7
-
8
-
9
-
10
-
11
-
12
-
13
-
14
-
15
-
16
-
17
-
18
-
19
-
20
-
21
-
22
-
23
-
24
-
25
-
26
-
27
-
28
-
29
-
30
-
31
-
32
-
33
-
34
-
35
-
36
-
37
-
38
-
39
-
40
-
41
-
42
-
43
-
44
-
45
-
46
-
47
-
48
-
49
-
50
-
51
-
52
-
53
-
54
-
55
-
56
-
57
-
58
-
59
-
60
-
61
-
62
-
63
-
64
-
65
-
66
-
67
-
68
-
69
-
70
-
71
-
72
-
73
-
74
-
75
-
76
-
77
-
78
-
79
-
80
-
81
-
82
-
83
-
84
-
85
-
86
-
87
-
88
-
89
-
90
-
91
-
92
-
 93
93 -
 94
94 -
 95
95 -
 96
96 -
 97
97 -
 98
98 -
 99
99 -
 100
100 -
 101
101 -
 102
102 -
 103
103 -
104
-
105
-
106
-
107
-
108
-
109
-
110
-
111
-
112
-
113
-
114
-
115
-
116
-
117
-
118
-
119
-
120
-
121
-
122
-
123
-
124
-
125
-
126
-
127
-
128
-
129
-
130
-
131
-
132
-
133
-
134
-
135
-
136
-
137
-
138
-
139
-
140
-
141
-
142
-
143
-
144
-
145
-
146
-
147
-
148
-
149
-
150
-
151
-
152
-
153
-
154
-
155
-
156
-
157
-
158
-
159
-
160
-
161
-
162
-
163
-
164
-
165
-
166
-
167
-
168
-
169
-
170
-
171
-
172
-
173
-
174
-
175
-
176
-
177
-
178
-
179
-
180
-
181
-
182
-
183
-
184
-
185
-
186
 |
 |
