Netgear RAXE290 User Manual - Page 14
Rear panel
 |
View all Netgear RAXE290 manuals
Add to My Manuals
Save this manual to your list of manuals |
Page 14 highlights
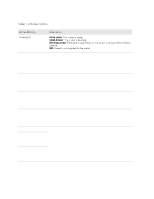
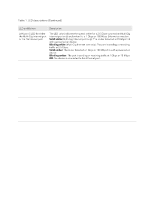
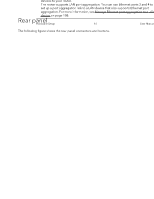
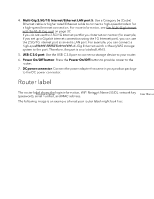
Nighthawk AXE7300 Tri-Band WiFi 6E Router Model RAXE290 Rear panel The following figure shows the rear panel connectors and buttons. Figure 3. Rear panel The rear panel contains the following components: 1. Reset button: Pressing the Reset button resets the router. If the Reset button is pressed for at least 10 seconds and the Power LED blinks white, the router returns to its factory settings. For information about the factory settings, see Factory settings on page 184. 2. 1G Internet port/Ethernet LAN port 5: One Gigabit Ethernet RJ-45 WAN port to connect your router to an Internet modem such as a cable modem or DSL modem. If you do not use the 1G Internet port for your Internet connection (for example, if you set up a Multi-Gig Internet connection using the Multi-Gig 2.5G/1G Ethernet port), you can use the 1G Internet port as an extra LAN port. Therefore, the port is also labeled LAN 5. 3. LAN ports: Use the four Gigabit Ethernet RJ-45 LAN ports to connect Ethernet LAN devices to your router. The router supports LAN port aggregation: You can use Ethernet ports 3 and 4 to set up a port aggregation link to a LAN device that also supports Ethernet port aggregation. For more information, see Manage Ethernet port aggregation to a LAN device on page 108. Hardware Setup 14 User Manual
-
 1
1 -
2
-
3
-
4
-
5
-
6
-
7
-
8
-
 9
9 -
 10
10 -
 11
11 -
 12
12 -
 13
13 -
 14
14 -
 15
15 -
 16
16 -
 17
17 -
 18
18 -
 19
19 -
20
-
21
-
22
-
23
-
24
-
25
-
26
-
27
-
28
-
29
-
30
-
31
-
32
-
33
-
34
-
35
-
36
-
37
-
38
-
39
-
40
-
41
-
42
-
43
-
44
-
45
-
46
-
47
-
48
-
49
-
50
-
51
-
52
-
53
-
54
-
55
-
56
-
57
-
58
-
59
-
60
-
61
-
62
-
63
-
64
-
65
-
66
-
67
-
68
-
69
-
70
-
71
-
72
-
73
-
74
-
75
-
76
-
77
-
78
-
79
-
80
-
81
-
82
-
83
-
84
-
85
-
86
-
87
-
88
-
89
-
90
-
91
-
92
-
93
-
94
-
95
-
96
-
97
-
98
-
99
-
100
-
101
-
102
-
103
-
104
-
105
-
106
-
107
-
108
-
109
-
110
-
111
-
112
-
113
-
114
-
115
-
116
-
117
-
118
-
119
-
120
-
121
-
122
-
123
-
124
-
125
-
126
-
127
-
128
-
129
-
130
-
131
-
132
-
133
-
134
-
135
-
136
-
137
-
138
-
139
-
140
-
141
-
142
-
143
-
144
-
145
-
146
-
147
-
148
-
149
-
150
-
151
-
152
-
153
-
154
-
155
-
156
-
157
-
158
-
159
-
160
-
161
-
162
-
163
-
164
-
165
-
166
-
167
-
168
-
169
-
170
-
171
-
172
-
173
-
174
-
175
-
176
-
177
-
178
-
179
-
180
-
181
-
182
-
183
-
184
-
185
-
186
 |
 |