Netgear RAXE290 User Manual - Page 65
Apply, To specify basic WiFi settings, admin, Wireless, Region, Enable SSID Broadcast, Name SSID
 |
View all Netgear RAXE290 manuals
Add to My Manuals
Save this manual to your list of manuals |
Page 65 highlights
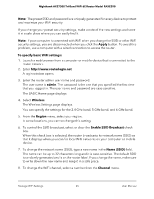
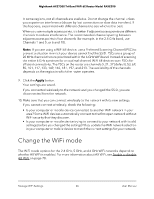
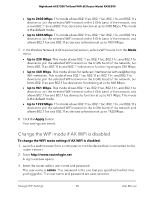
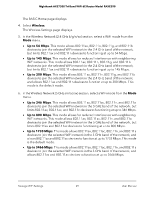
Nighthawk AXE7300 Tri-Band WiFi 6E Router Model RAXE290 Note: The preset SSID and password are uniquely generated for every device to protect and maximize your WiFi security. If you change your preset security settings, make a note of the new settings and store it in a safe place where you can easily find it. Note: If your computer is connected with WiFi when you change the SSID or other WiFi security settings, you are disconnected when you click the Apply button. To avoid this problem, use a computer with a wired connection to access the router. To specify basic WiFi settings: 1. Launch a web browser from a computer or mobile device that is connected to the router network. 2. Enter http://www.routerlogin.net. A login window opens. 3. Enter the router admin user name and password. The user name is admin. The password is the one that you specified the first time that you logged in. The user name and password are case-sensitive. The BASIC Home page displays. 4. Select Wireless. The Wireless Settings page displays. You can specify the settings for the 2.4 GHz band, 5 GHz band, and 6 GHz band. 5. From the Region menu, select your region. In some locations, you cannot change this setting. 6. To control the SSID broadcast, select or clear the Enable SSID Broadcast check box. When this check box is selected, the router broadcasts its network name (SSID) so that it displays when you scan for local WiFi networks on your computer or mobile device. 7. To change the network name (SSID), type a new name in the Name (SSID) field. The name can be up to 32 characters long and it is case-sensitive. The default SSID is randomly generated and is on the router label. If you change the name, make sure to write down the new name and keep it in a safe place. 8. To change the WiFi channel, select a number from the Channel menu. Manage WiFi Settings 65 User Manual
-
 1
1 -
2
-
3
-
4
-
5
-
6
-
7
-
8
-
9
-
10
-
11
-
12
-
13
-
14
-
15
-
16
-
17
-
18
-
19
-
20
-
21
-
22
-
23
-
24
-
25
-
26
-
27
-
28
-
29
-
30
-
31
-
32
-
33
-
34
-
35
-
36
-
37
-
38
-
39
-
40
-
41
-
42
-
43
-
44
-
45
-
46
-
47
-
48
-
49
-
50
-
51
-
52
-
53
-
54
-
55
-
56
-
57
-
58
-
59
-
 60
60 -
 61
61 -
 62
62 -
 63
63 -
 64
64 -
 65
65 -
 66
66 -
 67
67 -
 68
68 -
 69
69 -
 70
70 -
71
-
72
-
73
-
74
-
75
-
76
-
77
-
78
-
79
-
80
-
81
-
82
-
83
-
84
-
85
-
86
-
87
-
88
-
89
-
90
-
91
-
92
-
93
-
94
-
95
-
96
-
97
-
98
-
99
-
100
-
101
-
102
-
103
-
104
-
105
-
106
-
107
-
108
-
109
-
110
-
111
-
112
-
113
-
114
-
115
-
116
-
117
-
118
-
119
-
120
-
121
-
122
-
123
-
124
-
125
-
126
-
127
-
128
-
129
-
130
-
131
-
132
-
133
-
134
-
135
-
136
-
137
-
138
-
139
-
140
-
141
-
142
-
143
-
144
-
145
-
146
-
147
-
148
-
149
-
150
-
151
-
152
-
153
-
154
-
155
-
156
-
157
-
158
-
159
-
160
-
161
-
162
-
163
-
164
-
165
-
166
-
167
-
168
-
169
-
170
-
171
-
172
-
173
-
174
-
175
-
176
-
177
-
178
-
179
-
180
-
181
-
182
-
183
-
184
-
185
-
186
 |
 |
