Panasonic KX-HNC850G HomeHawk Users Guide - Page 130
HD camera device profiles, Network features
 |
View all Panasonic KX-HNC850G manuals
Add to My Manuals
Save this manual to your list of manuals |
Page 130 highlights
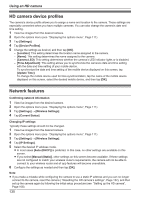
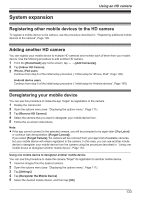
Using an HD camera HD camera device profiles The camera's device profile allows you to assign a name and location to the camera. These settings are especially convenient when you have multiple cameras. You can also change the camera's date and time setting. 1 View live images from the desired camera. 2 Open the options menu (see "Displaying the options menu", Page 111). 3 Tap [Settings]. 4 Tap [Device Profiles]. 5 Change the settings as desired, and then tap [OK]. - [Location]: This setting determines the location name assigned to the camera. - [Name]: This setting determines the name assigned to the camera. - [Camera LED]: This setting determines whether the camera's LED indicator lights or is disabled. - [Time Adjustment]: This setting allows you to synchronize the camera's date and time setting with the date and time setting of your mobile device. To synchronize the date and time setting of the mobile device displayed on this screen, tap [Update Time]. To change the mobile device used for time synchronization, tap the name of the mobile device displayed on this screen, select the desired mobile device, and then tap [OK]. Network features Confirming network information 1 View live images from the desired camera. 2 Open the options menu (see "Displaying the options menu", Page 111). 3 Tap [Settings] ® [Wireless Settings]. 4 Tap [Current Status]. Changing IP settings Typically these settings should not be changed. 1 View live images from the desired camera. 2 Open the options menu (see "Displaying the options menu", Page 111). 3 Tap [Settings] ® [Wireless Settings]. 4 Tap [IP Settings]. 5 Select the desired IP address mode. R In most cases [Auto (DHCP)] is preferred. In this case, no other settings are available on this screen. R If you select [Manual (Static)], other settings on this screen become available. If these settings are not configured to match your wireless router's requirements, the camera will not be able to connect to your wireless router and all app features will become unavailable. 6 Configure the settings as needed and then tap [OK]. Note: R If you make a mistake while configuring the camera to use a static IP address and you can no longer connect to the camera, reset the camera ( "Resetting the HD camera's settings", Page 132), and then set up the camera again by following the initial setup procedure (see "Setting up the HD camera", Page 108). 130
-
 1
1 -
2
-
3
-
4
-
5
-
6
-
7
-
8
-
9
-
10
-
11
-
12
-
13
-
14
-
15
-
16
-
17
-
18
-
19
-
20
-
21
-
22
-
23
-
24
-
25
-
26
-
27
-
28
-
29
-
30
-
31
-
32
-
33
-
34
-
35
-
36
-
37
-
38
-
39
-
40
-
41
-
42
-
43
-
44
-
45
-
46
-
47
-
48
-
49
-
50
-
51
-
52
-
53
-
54
-
55
-
56
-
57
-
58
-
59
-
60
-
61
-
62
-
63
-
64
-
65
-
66
-
67
-
68
-
69
-
70
-
71
-
72
-
73
-
74
-
75
-
76
-
77
-
78
-
79
-
80
-
81
-
82
-
83
-
84
-
85
-
86
-
87
-
88
-
89
-
90
-
91
-
92
-
93
-
94
-
95
-
96
-
97
-
98
-
99
-
100
-
101
-
102
-
103
-
104
-
105
-
106
-
107
-
108
-
109
-
110
-
111
-
112
-
113
-
114
-
115
-
116
-
117
-
118
-
119
-
120
-
121
-
122
-
123
-
124
-
 125
125 -
 126
126 -
 127
127 -
 128
128 -
 129
129 -
 130
130 -
 131
131 -
 132
132 -
 133
133 -
 134
134 -
 135
135 -
136
-
137
-
138
-
139
-
140
-
141
-
142
-
143
-
144
-
145
-
146
-
147
-
148
-
149
-
150
-
151
-
152
-
153
-
154
-
155
-
156
 |
 |