Panasonic KX-HNC850G HomeHawk Users Guide - Page 88
Recording camera images (manual recording), Taking snapshots, Talking to the camera
 |
View all Panasonic KX-HNC850G manuals
Add to My Manuals
Save this manual to your list of manuals |
Page 88 highlights
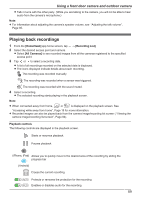
Using a front door camera and outdoor camera Dual images with horizontal viewing Dual images can also be displayed when your mobile device is displaying camera images horizontally. You can move the sub-image by tapping and holding it and then selecting where it will be displayed. The sub-image can be displayed in the 4 corners of an image. Recording camera images (manual recording) You can record camera images while viewing live camera images. Camera recordings are saved on the access point's SD card. 1 View live images from the desired camera. 2 Tap to start recording. R Recordings include both audio and video. To disable audio recording, see "Recording sound", Page 96. 3 Tap to stop recording. Note: R You can use modes to record images. See "Mode settings (overview)", Page 91. R The maximum recording time is 2 minutes. R If [Recording Error (Memory full)] is displayed, the access point's SD card is full and new recordings cannot be saved. Erase unneeded recordings (see "Erasing recordings", Page 90). R For information about SD cards and how recordings are saved, see "Access point SD cards", Page 105. Taking snapshots You can save snapshots (i.e., still images) while viewing live camera images. Snapshots are saved in your mobile device's default photo album app. 1 View live images from the desired camera. 2 Tap . Note: R Snapshot sizes are scaled to fit the width of your mobile device's display. R iPhone, iPad Snapshots are saved as JPEG files in your mobile device's "Photos" app. R Android devices Snapshots are saved as JPEG files in your mobile device's "Pictures" directory. The file naming convention is: device name + the date and time. Talking to the camera You can use your mobile device's microphone and the camera's built-in speaker to talk to someone where the camera is installed. 1 View live images from the desired camera. 2 Tap and hold . R The audio from your mobile device's microphone is played through the camera's speaker until you release your finger. 88
-
 1
1 -
2
-
3
-
4
-
5
-
6
-
7
-
8
-
9
-
10
-
11
-
12
-
13
-
14
-
15
-
16
-
17
-
18
-
19
-
20
-
21
-
22
-
23
-
24
-
25
-
26
-
27
-
28
-
29
-
30
-
31
-
32
-
33
-
34
-
35
-
36
-
37
-
38
-
39
-
40
-
41
-
42
-
43
-
44
-
45
-
46
-
47
-
48
-
49
-
50
-
51
-
52
-
53
-
54
-
55
-
56
-
57
-
58
-
59
-
60
-
61
-
62
-
63
-
64
-
65
-
66
-
67
-
68
-
69
-
70
-
71
-
72
-
73
-
74
-
75
-
76
-
77
-
78
-
79
-
80
-
81
-
82
-
 83
83 -
 84
84 -
 85
85 -
 86
86 -
 87
87 -
 88
88 -
 89
89 -
 90
90 -
 91
91 -
 92
92 -
 93
93 -
94
-
95
-
96
-
97
-
98
-
99
-
100
-
101
-
102
-
103
-
104
-
105
-
106
-
107
-
108
-
109
-
110
-
111
-
112
-
113
-
114
-
115
-
116
-
117
-
118
-
119
-
120
-
121
-
122
-
123
-
124
-
125
-
126
-
127
-
128
-
129
-
130
-
131
-
132
-
133
-
134
-
135
-
136
-
137
-
138
-
139
-
140
-
141
-
142
-
143
-
144
-
145
-
146
-
147
-
148
-
149
-
150
-
151
-
152
-
153
-
154
-
155
-
156
 |
 |