Panasonic KX-HNC850G HomeHawk Users Guide - Page 93
Creating new modes, Camera Sound
 |
View all Panasonic KX-HNC850G manuals
Add to My Manuals
Save this manual to your list of manuals |
Page 93 highlights
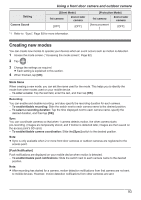
Using a front door camera and outdoor camera Setting Camera Sound [Silent Mode] 1st camera 2nd or later camera [OFF] [OFF] *1 Refer to "Sync", Page 93 for more information. [Protection Mode] 1st camera 2nd or later camera [Announcement ] [OFF] Creating new modes You can create new modes to operate your devices when an event occurs such as motion is detected. 1 Access the mode screen ( "Accessing the mode screen", Page 92). 2 Tap . 3 Change the settings as required. R Each setting is explained in this section. 4 When finished, tap [OK]. Mode Name When creating a new mode, you can set the name used for the mode. This helps you to identify the mode from other modes used on your mobile device. - To enter a name: Tap the text field, enter the text, and then tap [OK]. Recording You can enable and disable recording, and also specify the recording duration for each camera. - To enable/disable recording: Slide the switch next to each camera name to the desired position. - To select a recording duration: Tap the time displayed next to each camera name, specify the desired duration, and then tap [OK]. Sync You can coordinate cameras so that when 1 camera detects motion, the other camera starts pre-recording. (Images are temporarily stored, and if motion is detected later, images are then saved on the access point's SD card.) - To enable/disable camera coordination: Slide the [Sync] switch to the desired position. Note: R Sync is only available when 2 or more front door cameras or outdoor cameras are registered to the access point. [Push Notification] Push notifications are displayed on your mobile device when motion is detected. - To enable/disable push notifications: Slide the switch next to each camera name to the desired position. Note: R After recording has started for a camera, motion detection notifications from that camera are not sent to mobile devices. However, motion detection notifications from other cameras are sent. 93
-
 1
1 -
2
-
3
-
4
-
5
-
6
-
7
-
8
-
9
-
10
-
11
-
12
-
13
-
14
-
15
-
16
-
17
-
18
-
19
-
20
-
21
-
22
-
23
-
24
-
25
-
26
-
27
-
28
-
29
-
30
-
31
-
32
-
33
-
34
-
35
-
36
-
37
-
38
-
39
-
40
-
41
-
42
-
43
-
44
-
45
-
46
-
47
-
48
-
49
-
50
-
51
-
52
-
53
-
54
-
55
-
56
-
57
-
58
-
59
-
60
-
61
-
62
-
63
-
64
-
65
-
66
-
67
-
68
-
69
-
70
-
71
-
72
-
73
-
74
-
75
-
76
-
77
-
78
-
79
-
80
-
81
-
82
-
83
-
84
-
85
-
86
-
87
-
 88
88 -
 89
89 -
 90
90 -
 91
91 -
 92
92 -
 93
93 -
 94
94 -
 95
95 -
 96
96 -
 97
97 -
 98
98 -
99
-
100
-
101
-
102
-
103
-
104
-
105
-
106
-
107
-
108
-
109
-
110
-
111
-
112
-
113
-
114
-
115
-
116
-
117
-
118
-
119
-
120
-
121
-
122
-
123
-
124
-
125
-
126
-
127
-
128
-
129
-
130
-
131
-
132
-
133
-
134
-
135
-
136
-
137
-
138
-
139
-
140
-
141
-
142
-
143
-
144
-
145
-
146
-
147
-
148
-
149
-
150
-
151
-
152
-
153
-
154
-
155
-
156
 |
 |