Symantec 10521148 Implementation Guide - Page 152
Using the compact flash for backup and restore, For the Hex Code, type
 |
View all Symantec 10521148 manuals
Add to My Manuals
Save this manual to your list of manuals |
Page 152 highlights
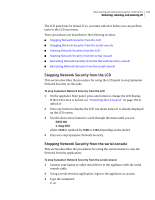
144 Maintaining and administering the 7100 Series Managing log files and backups fdisk /dev/sda using the device name for your adapter. 4 To print out the current partitioning, type p. 5 To delete all existing partitions, type d one or more times, once for each partition on the card (up to four). 6 To create a new partition, type n. 7 At the prompt, to select Primary Partition, type p. 8 For the Partition Number, type 1. 9 For the First Cylinder, press Enter to select the default. 10 For the Last Cylinder, press Enter to select the default. 11 To change the type of the partition, type t. 12 For the Hex Code, type L. 13 To select a FAT32 partition, type b. 14 To check the resulting partition, type p. 15 If the partition is marked as bootable, with a * under Boot, type a to toggle the bootable setting to non-bootable. 16 To select partition 1 as the non-bootable partition, type 1. 17 To write the configuration to the CF and quit fdisk, type w. 18 At the shell prompt, to format the partition, type: mkdosfs /dev/sda1 Using the compact flash for backup and restore The compact flash provides a removable media option for storing backups of your configuration. You can use the Network Security console to backup to or restore from compact flash. If the compact flash is mounted as a filesystem when a backup is initiated, it is automatically used for storing the backup file. You are prompted to choose the file name, to which the date is automatically added to ensure uniqueness. The backup file is not encrypted. If the compact flash card is too full to hold the backup file, you will see an error message on the console. A typical backup file may be 10 to 20 MB in size. During the restore process, files on the compact flash are displayed for selection if the compact flash is mounted.
-
 1
1 -
2
-
3
-
4
-
5
-
6
-
7
-
8
-
9
-
10
-
11
-
12
-
13
-
14
-
15
-
16
-
17
-
18
-
19
-
20
-
21
-
22
-
23
-
24
-
25
-
26
-
27
-
28
-
29
-
30
-
31
-
32
-
33
-
34
-
35
-
36
-
37
-
38
-
39
-
40
-
41
-
42
-
43
-
44
-
45
-
46
-
47
-
48
-
49
-
50
-
51
-
52
-
53
-
54
-
55
-
56
-
57
-
58
-
59
-
60
-
61
-
62
-
63
-
64
-
65
-
66
-
67
-
68
-
69
-
70
-
71
-
72
-
73
-
74
-
75
-
76
-
77
-
78
-
79
-
80
-
81
-
82
-
83
-
84
-
85
-
86
-
87
-
88
-
89
-
90
-
91
-
92
-
93
-
94
-
95
-
96
-
97
-
98
-
99
-
100
-
101
-
102
-
103
-
104
-
105
-
106
-
107
-
108
-
109
-
110
-
111
-
112
-
113
-
114
-
115
-
116
-
117
-
118
-
119
-
120
-
121
-
122
-
123
-
124
-
125
-
126
-
127
-
128
-
129
-
130
-
131
-
132
-
133
-
134
-
135
-
136
-
137
-
138
-
139
-
140
-
141
-
142
-
143
-
144
-
145
-
146
-
 147
147 -
 148
148 -
 149
149 -
 150
150 -
 151
151 -
 152
152 -
 153
153 -
 154
154 -
 155
155 -
 156
156 -
 157
157 -
158
-
159
-
160
-
161
-
162
-
163
-
164
-
165
-
166
-
167
-
168
-
169
-
170
-
171
-
172
-
173
-
174
-
175
-
176
-
177
-
178
-
179
-
180
-
181
-
182
-
183
-
184
-
185
-
186
-
187
-
188
-
189
-
190
-
191
-
192
-
193
-
194
-
195
-
196
-
197
-
198
-
199
-
200
-
201
-
202
-
203
-
204
-
205
-
206
-
207
-
208
-
209
-
210
-
211
-
212
-
213
-
214
 |
 |
