Symantec 10521148 Implementation Guide - Page 162
Using the LCD run menu
 |
View all Symantec 10521148 manuals
Add to My Manuals
Save this manual to your list of manuals |
Page 162 highlights
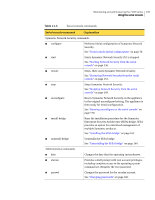
154 Maintaining and administering the 7100 Series Using the LCD run menu Using the LCD run menu After the 7100 Series appliance is initially configured and rebooted, the LCD panel provides a run-time menu with seven commands: Table 11-2 LCD run menu LCD menu command Explanation 1. Lock LCD 2. Change IP 3. Stop SNS 4. Start SNS 5. Shutdown Host 6. Restart Host 7. Unconfig SNS Locks the LCD panel so that the secadm password is required to unlock it. The password must be entered using the LCD panel buttons. LCD locking must be enabled in the Network Security console before this menu item will work. See "Unlocking the LCD panel" on page 155. See "Enabling or disabling LCD locking" on page 156. Allows you to change the IP address of the appliance. You must reboot the appliance before the change takes effect. Also, exit your Network Security console and restart it using the new IP address. See "Changing the IP address" on page 156. Stops the Symantec Network Security application. See "Stopping Network Security from the LCD" on page 149. Starts Symantec Network Security if it is currently stopped. See "Starting Network Security from the LCD" on page 150. Shuts downs and powers off the appliance. See "Powering off the appliance from the LCD" on page 152. Reboots the appliance. See "Rebooting the appliance from the LCD" on page 151. After confirming your choice, resets Symantec Network Security to the original unconfigured setting. The appliance is then ready for initial configuration. See "Running Unconfig SNS on the LCD" on page 169.
-
 1
1 -
2
-
3
-
4
-
5
-
6
-
7
-
8
-
9
-
10
-
11
-
12
-
13
-
14
-
15
-
16
-
17
-
18
-
19
-
20
-
21
-
22
-
23
-
24
-
25
-
26
-
27
-
28
-
29
-
30
-
31
-
32
-
33
-
34
-
35
-
36
-
37
-
38
-
39
-
40
-
41
-
42
-
43
-
44
-
45
-
46
-
47
-
48
-
49
-
50
-
51
-
52
-
53
-
54
-
55
-
56
-
57
-
58
-
59
-
60
-
61
-
62
-
63
-
64
-
65
-
66
-
67
-
68
-
69
-
70
-
71
-
72
-
73
-
74
-
75
-
76
-
77
-
78
-
79
-
80
-
81
-
82
-
83
-
84
-
85
-
86
-
87
-
88
-
89
-
90
-
91
-
92
-
93
-
94
-
95
-
96
-
97
-
98
-
99
-
100
-
101
-
102
-
103
-
104
-
105
-
106
-
107
-
108
-
109
-
110
-
111
-
112
-
113
-
114
-
115
-
116
-
117
-
118
-
119
-
120
-
121
-
122
-
123
-
124
-
125
-
126
-
127
-
128
-
129
-
130
-
131
-
132
-
133
-
134
-
135
-
136
-
137
-
138
-
139
-
140
-
141
-
142
-
143
-
144
-
145
-
146
-
147
-
148
-
149
-
150
-
151
-
152
-
153
-
154
-
155
-
156
-
 157
157 -
 158
158 -
 159
159 -
 160
160 -
 161
161 -
 162
162 -
 163
163 -
 164
164 -
 165
165 -
 166
166 -
 167
167 -
168
-
169
-
170
-
171
-
172
-
173
-
174
-
175
-
176
-
177
-
178
-
179
-
180
-
181
-
182
-
183
-
184
-
185
-
186
-
187
-
188
-
189
-
190
-
191
-
192
-
193
-
194
-
195
-
196
-
197
-
198
-
199
-
200
-
201
-
202
-
203
-
204
-
205
-
206
-
207
-
208
-
209
-
210
-
211
-
212
-
213
-
214
 |
 |
