Symantec 10521148 Implementation Guide - Page 164
Enabling or disabling LCD locking, Changing the IP address
 |
View all Symantec 10521148 manuals
Add to My Manuals
Save this manual to your list of manuals |
Page 164 highlights
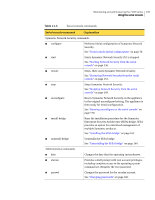
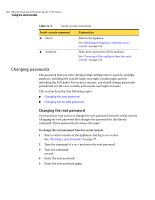
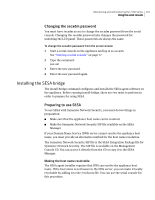
156 Maintaining and administering the 7100 Series Using the LCD run menu Enabling or disabling LCD locking Before the Lock LCD menu item will function, you must enable LCD locking in the Network Security console. Once locking is enabled, the LCD panel can be locked and unlocked by using the buttons on the front bezel of the appliance. To prevent the LCD panel from being locked, you can disable LCD locking in the Network Security console. In this case, selecting the Lock LCD menu item has no effect. To enable or disable LCD panel locking 1 In the Network Security console, click Configuration > Node > Network Security Parameters. 2 In Select Node, choose a node from the pull-down list, and click OK. 3 In Symantec Network Security Configuration Parameters, under 7100 Series Parameters, click Lock LCD Screen. 4 In the right pane, do one of the following: ■ Click True to enable LCD panel locking. ■ Click False to disable LCD panel locking. 5 Click Apply. 6 In Apply Changes To, check the node on which to enable or disable LCD locking, and click OK. Changing the IP address You can change the IP address of the appliance by using the LCD run menu. You can use the Network Security console to change the IP address of any node in the cluster. See the Symantec Network Security Administration Guide for that procedure. After rebooting with the new IP address, you must restart the Network Security console and connect using the new IP. Slave nodes in the cluster do not require any additional configuration after you change the IP on the master node. When you change the IP of a slave node using the LCD, no configuration is required on the master node. To change a node IP address from the LCD 1 On the appliance front panel, press any button to change the LCD display. If the LCD screen is locked, see "Unlocking the LCD panel" on page 155 to unlock it.
-
 1
1 -
2
-
3
-
4
-
5
-
6
-
7
-
8
-
9
-
10
-
11
-
12
-
13
-
14
-
15
-
16
-
17
-
18
-
19
-
20
-
21
-
22
-
23
-
24
-
25
-
26
-
27
-
28
-
29
-
30
-
31
-
32
-
33
-
34
-
35
-
36
-
37
-
38
-
39
-
40
-
41
-
42
-
43
-
44
-
45
-
46
-
47
-
48
-
49
-
50
-
51
-
52
-
53
-
54
-
55
-
56
-
57
-
58
-
59
-
60
-
61
-
62
-
63
-
64
-
65
-
66
-
67
-
68
-
69
-
70
-
71
-
72
-
73
-
74
-
75
-
76
-
77
-
78
-
79
-
80
-
81
-
82
-
83
-
84
-
85
-
86
-
87
-
88
-
89
-
90
-
91
-
92
-
93
-
94
-
95
-
96
-
97
-
98
-
99
-
100
-
101
-
102
-
103
-
104
-
105
-
106
-
107
-
108
-
109
-
110
-
111
-
112
-
113
-
114
-
115
-
116
-
117
-
118
-
119
-
120
-
121
-
122
-
123
-
124
-
125
-
126
-
127
-
128
-
129
-
130
-
131
-
132
-
133
-
134
-
135
-
136
-
137
-
138
-
139
-
140
-
141
-
142
-
143
-
144
-
145
-
146
-
147
-
148
-
149
-
150
-
151
-
152
-
153
-
154
-
155
-
156
-
157
-
158
-
 159
159 -
 160
160 -
 161
161 -
 162
162 -
 163
163 -
 164
164 -
 165
165 -
 166
166 -
 167
167 -
 168
168 -
 169
169 -
170
-
171
-
172
-
173
-
174
-
175
-
176
-
177
-
178
-
179
-
180
-
181
-
182
-
183
-
184
-
185
-
186
-
187
-
188
-
189
-
190
-
191
-
192
-
193
-
194
-
195
-
196
-
197
-
198
-
199
-
200
-
201
-
202
-
203
-
204
-
205
-
206
-
207
-
208
-
209
-
210
-
211
-
212
-
213
-
214
 |
 |
