Symantec 10521148 Implementation Guide - Page 77
Using the LCD panel to con a master node, Symantec v1.03, SNS7120, LCD Config
 |
View all Symantec 10521148 manuals
Add to My Manuals
Save this manual to your list of manuals |
Page 77 highlights
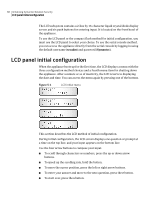
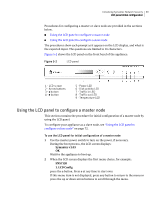
Initializing Symantec Network Security 69 LCD panel initial configuration Procedures for configuring a master or slave node are provided in the sections below. ■ Using the LCD panel to configure a master node ■ Using the LCD panel to configure a slave node The procedures show each prompt as it appears on the LCD display, and what is the expected input. The questions are limited to 16 characters. Figure 5-2 shows the LCD panel on the front bezel of the appliance. Figure 5-2 LCD panel 1 - LCD screen 2 - Arrow buttons 3 - s button 4 - e button 5 - Power LED 6 - Disk activity LED 7 - Traffic in LED 8 - Traffic out LED 9 - Temperature LED Using the LCD panel to configure a master node This section contains the procedure for initial configuration of a master node by using the LCD panel. To configure your appliance as a slave node, see "Using the LCD panel to configure a slave node" on page 72. To use the LCD panel for initial configuration of a master node 1 Use the master power switch to turn on the power, if necessary. During the boot process, the LCD screen displays: Symantec v1.03 OK Wait for the appliance to boot up. 2 When the LCD screen displays the first menu choice, for example: SNS7120 1. LCD Config press the e button. Press s at any time to start over. If this menu item is not displayed, press any button to return to the menu or press the up or down arrow buttons to scroll through the menu.
-
 1
1 -
2
-
3
-
4
-
5
-
6
-
7
-
8
-
9
-
10
-
11
-
12
-
13
-
14
-
15
-
16
-
17
-
18
-
19
-
20
-
21
-
22
-
23
-
24
-
25
-
26
-
27
-
28
-
29
-
30
-
31
-
32
-
33
-
34
-
35
-
36
-
37
-
38
-
39
-
40
-
41
-
42
-
43
-
44
-
45
-
46
-
47
-
48
-
49
-
50
-
51
-
52
-
53
-
54
-
55
-
56
-
57
-
58
-
59
-
60
-
61
-
62
-
63
-
64
-
65
-
66
-
67
-
68
-
69
-
70
-
71
-
 72
72 -
 73
73 -
 74
74 -
 75
75 -
 76
76 -
 77
77 -
 78
78 -
 79
79 -
 80
80 -
 81
81 -
 82
82 -
83
-
84
-
85
-
86
-
87
-
88
-
89
-
90
-
91
-
92
-
93
-
94
-
95
-
96
-
97
-
98
-
99
-
100
-
101
-
102
-
103
-
104
-
105
-
106
-
107
-
108
-
109
-
110
-
111
-
112
-
113
-
114
-
115
-
116
-
117
-
118
-
119
-
120
-
121
-
122
-
123
-
124
-
125
-
126
-
127
-
128
-
129
-
130
-
131
-
132
-
133
-
134
-
135
-
136
-
137
-
138
-
139
-
140
-
141
-
142
-
143
-
144
-
145
-
146
-
147
-
148
-
149
-
150
-
151
-
152
-
153
-
154
-
155
-
156
-
157
-
158
-
159
-
160
-
161
-
162
-
163
-
164
-
165
-
166
-
167
-
168
-
169
-
170
-
171
-
172
-
173
-
174
-
175
-
176
-
177
-
178
-
179
-
180
-
181
-
182
-
183
-
184
-
185
-
186
-
187
-
188
-
189
-
190
-
191
-
192
-
193
-
194
-
195
-
196
-
197
-
198
-
199
-
200
-
201
-
202
-
203
-
204
-
205
-
206
-
207
-
208
-
209
-
210
-
211
-
212
-
213
-
214
 |
 |
