Symantec 10521148 Implementation Guide - Page 31
Table 2-4, Diagram, location, Component, Description, you like
 |
View all Symantec 10521148 manuals
Add to My Manuals
Save this manual to your list of manuals |
Page 31 highlights
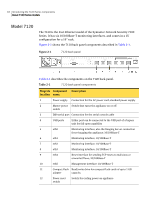
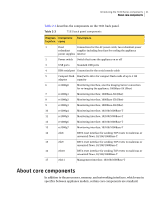
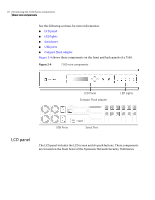
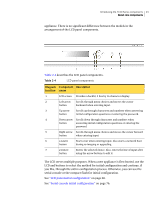
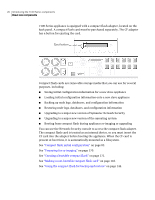
Introducing the 7100 Series components 23 About core components appliance. There is no significant difference between the models in the arrangement of the LCD panel components. Table 2-4 describes the LCD panel components. Table 2-4 LCD panel components Diagram Component Description location name 1 LCD screen Provides a backlit, 2 line by 16 character display. 2 Left arrow Scrolls through menu choices and moves the cursor button backward when entering input. 3 Up arrow Scrolls up through characters and numbers when answering button initial configuration questions or entering the password. 4 Down arrow Scrolls down through characters and numbers when button answering initial configuration questions or entering the password. 5 Right arrow Scrolls through menu choices and moves the cursor forward button when entering input. 6 s (start) Starts over when entering input. Also starts a network boot button during re-imaging or upgrading. 7 e (enter) Enters the selected choice. Also, enters the line of input after button using the arrow buttons to edit it. The LCD serves multiple purposes. When a new appliance is first booted, use the LCD and buttons to select the method for initial configuration and continue, if you like, through the entire configuration process. Otherwise, you can use the serial console or the compact flash for initial configuration. See "LCD panel initial configuration" on page 68. See "Serial console initial configuration" on page 76.
-
 1
1 -
2
-
3
-
4
-
5
-
6
-
7
-
8
-
9
-
10
-
11
-
12
-
13
-
14
-
15
-
16
-
17
-
18
-
19
-
20
-
21
-
22
-
23
-
24
-
25
-
 26
26 -
 27
27 -
 28
28 -
 29
29 -
 30
30 -
 31
31 -
 32
32 -
 33
33 -
 34
34 -
 35
35 -
 36
36 -
37
-
38
-
39
-
40
-
41
-
42
-
43
-
44
-
45
-
46
-
47
-
48
-
49
-
50
-
51
-
52
-
53
-
54
-
55
-
56
-
57
-
58
-
59
-
60
-
61
-
62
-
63
-
64
-
65
-
66
-
67
-
68
-
69
-
70
-
71
-
72
-
73
-
74
-
75
-
76
-
77
-
78
-
79
-
80
-
81
-
82
-
83
-
84
-
85
-
86
-
87
-
88
-
89
-
90
-
91
-
92
-
93
-
94
-
95
-
96
-
97
-
98
-
99
-
100
-
101
-
102
-
103
-
104
-
105
-
106
-
107
-
108
-
109
-
110
-
111
-
112
-
113
-
114
-
115
-
116
-
117
-
118
-
119
-
120
-
121
-
122
-
123
-
124
-
125
-
126
-
127
-
128
-
129
-
130
-
131
-
132
-
133
-
134
-
135
-
136
-
137
-
138
-
139
-
140
-
141
-
142
-
143
-
144
-
145
-
146
-
147
-
148
-
149
-
150
-
151
-
152
-
153
-
154
-
155
-
156
-
157
-
158
-
159
-
160
-
161
-
162
-
163
-
164
-
165
-
166
-
167
-
168
-
169
-
170
-
171
-
172
-
173
-
174
-
175
-
176
-
177
-
178
-
179
-
180
-
181
-
182
-
183
-
184
-
185
-
186
-
187
-
188
-
189
-
190
-
191
-
192
-
193
-
194
-
195
-
196
-
197
-
198
-
199
-
200
-
201
-
202
-
203
-
204
-
205
-
206
-
207
-
208
-
209
-
210
-
211
-
212
-
213
-
214
 |
 |
