Symantec 10521148 Implementation Guide - Page 200
Removing the hard drive
 |
View all Symantec 10521148 manuals
Add to My Manuals
Save this manual to your list of manuals |
Page 200 highlights
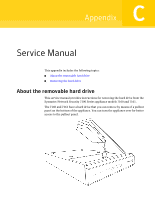
192 Service Manual Removing the hard drive The pullout panel provides a convenient way to extract the hard drive before shipping the appliance to Symantec for support. This allows you to protect proprietary or sensitive data contained on the hard drive. Note: You are not required to remove the hard drive prior to shipping the appliance. This feature of the 7100 Series appliance is provided solely for the protection of your private data while your appliance is away from your site. When Symantec sends you the repaired or replacement appliance, it will contain a new hard drive. You should not insert your original hard drive into the returned appliance. Note: Symantec does not support inserting your original hard drive into a new or repaired 7100 Series appliance. Removing the hard drive You can remove the hard drive while the appliance is installed in a rack, or you can take the appliance out of the rack for easier access. Removing the appliance from the rack may require disconnecting network cables. Warning: Make sure you are properly grounded before handling the appliance. You can use an anti-static wristband to ground yourself. To remove the hard drive 1 Shut down and power off the appliance by doing one of the following: ■ On the LCD panel, use the arrow buttons to scroll to the Shutdown Host menu item, and press the e button. ■ On the serial console, type shutdown Wait for the appliance to shut down and power off. 2 Unplug the appliance from the power sources. Warning: Turn off the power and unplug the appliance before attempting to open the panel and remove the hard drive. 3 Put on an anti-static wristband or use other means to ground yourself.
-
 1
1 -
2
-
3
-
4
-
5
-
6
-
7
-
8
-
9
-
10
-
11
-
12
-
13
-
14
-
15
-
16
-
17
-
18
-
19
-
20
-
21
-
22
-
23
-
24
-
25
-
26
-
27
-
28
-
29
-
30
-
31
-
32
-
33
-
34
-
35
-
36
-
37
-
38
-
39
-
40
-
41
-
42
-
43
-
44
-
45
-
46
-
47
-
48
-
49
-
50
-
51
-
52
-
53
-
54
-
55
-
56
-
57
-
58
-
59
-
60
-
61
-
62
-
63
-
64
-
65
-
66
-
67
-
68
-
69
-
70
-
71
-
72
-
73
-
74
-
75
-
76
-
77
-
78
-
79
-
80
-
81
-
82
-
83
-
84
-
85
-
86
-
87
-
88
-
89
-
90
-
91
-
92
-
93
-
94
-
95
-
96
-
97
-
98
-
99
-
100
-
101
-
102
-
103
-
104
-
105
-
106
-
107
-
108
-
109
-
110
-
111
-
112
-
113
-
114
-
115
-
116
-
117
-
118
-
119
-
120
-
121
-
122
-
123
-
124
-
125
-
126
-
127
-
128
-
129
-
130
-
131
-
132
-
133
-
134
-
135
-
136
-
137
-
138
-
139
-
140
-
141
-
142
-
143
-
144
-
145
-
146
-
147
-
148
-
149
-
150
-
151
-
152
-
153
-
154
-
155
-
156
-
157
-
158
-
159
-
160
-
161
-
162
-
163
-
164
-
165
-
166
-
167
-
168
-
169
-
170
-
171
-
172
-
173
-
174
-
175
-
176
-
177
-
178
-
179
-
180
-
181
-
182
-
183
-
184
-
185
-
186
-
187
-
188
-
189
-
190
-
191
-
192
-
193
-
194
-
 195
195 -
 196
196 -
 197
197 -
 198
198 -
 199
199 -
 200
200 -
 201
201 -
 202
202 -
 203
203 -
 204
204 -
 205
205 -
206
-
207
-
208
-
209
-
210
-
211
-
212
-
213
-
214
 |
 |
