Symantec 10521148 Implementation Guide - Page 169
Changing the secadm password, Installing the SESA bridge, Preparing to use SESA
 |
View all Symantec 10521148 manuals
Add to My Manuals
Save this manual to your list of manuals |
Page 169 highlights
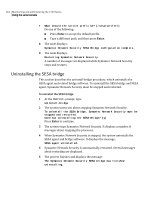
Maintaining and administering the 7100 Series 161 Using the serial console Changing the secadm password You must have secadm access to change the secadm password from the serial console. Changing the secadm password also changes the password for unlocking the LCD panel. These passwords are always the same. To change the secadm password from the serial console 1 Start a serial console on the appliance and log in as secadm. See "Starting a serial console" on page 77. 2 Type the command: passwd 3 Enter the new password. 4 Enter the new password again. Installing the SESA bridge The install-bridge command configures and installs the SESA agent software on the appliance. Before running install-bridge, there are two tasks to perform in order to prepare for using SESA. Preparing to use SESA To use SESA with Symantec Network Security, you must do two things in preparation: ■ Make sure that the appliance host name can be resolved ■ Make the Symantec Network Security SIP file available on the SESA Manager If your Domain Name Service (DNS) server cannot resolve the appliance host name, you must provide an alternative method for the host name resolution. The Symantec Network Security SIP file is the SESA Integration Package file for Symantec Network Security. The SIP file is available on the Management Console CD. You can access it directly from the CD or copy it to the SESA Manager. Making the host name resolvable The SESA agent installer requires that DNS can resolve the appliance host name. If the host name is not known to the DNS server, you can make it locally resolvable by adding it to the /etc/hosts file. You can use the serial console for this procedure.
-
 1
1 -
2
-
3
-
4
-
5
-
6
-
7
-
8
-
9
-
10
-
11
-
12
-
13
-
14
-
15
-
16
-
17
-
18
-
19
-
20
-
21
-
22
-
23
-
24
-
25
-
26
-
27
-
28
-
29
-
30
-
31
-
32
-
33
-
34
-
35
-
36
-
37
-
38
-
39
-
40
-
41
-
42
-
43
-
44
-
45
-
46
-
47
-
48
-
49
-
50
-
51
-
52
-
53
-
54
-
55
-
56
-
57
-
58
-
59
-
60
-
61
-
62
-
63
-
64
-
65
-
66
-
67
-
68
-
69
-
70
-
71
-
72
-
73
-
74
-
75
-
76
-
77
-
78
-
79
-
80
-
81
-
82
-
83
-
84
-
85
-
86
-
87
-
88
-
89
-
90
-
91
-
92
-
93
-
94
-
95
-
96
-
97
-
98
-
99
-
100
-
101
-
102
-
103
-
104
-
105
-
106
-
107
-
108
-
109
-
110
-
111
-
112
-
113
-
114
-
115
-
116
-
117
-
118
-
119
-
120
-
121
-
122
-
123
-
124
-
125
-
126
-
127
-
128
-
129
-
130
-
131
-
132
-
133
-
134
-
135
-
136
-
137
-
138
-
139
-
140
-
141
-
142
-
143
-
144
-
145
-
146
-
147
-
148
-
149
-
150
-
151
-
152
-
153
-
154
-
155
-
156
-
157
-
158
-
159
-
160
-
161
-
162
-
163
-
 164
164 -
 165
165 -
 166
166 -
 167
167 -
 168
168 -
 169
169 -
 170
170 -
 171
171 -
 172
172 -
 173
173 -
 174
174 -
175
-
176
-
177
-
178
-
179
-
180
-
181
-
182
-
183
-
184
-
185
-
186
-
187
-
188
-
189
-
190
-
191
-
192
-
193
-
194
-
195
-
196
-
197
-
198
-
199
-
200
-
201
-
202
-
203
-
204
-
205
-
206
-
207
-
208
-
209
-
210
-
211
-
212
-
213
-
214
 |
 |
