Panasonic WJHD316A WJHD309A User Guide - Page 109
Host Edit] Correction of the registered host, information, User Level] Setting of the operation level
 |
View all Panasonic WJHD316A manuals
Add to My Manuals
Save this manual to your list of manuals |
Page 109 highlights
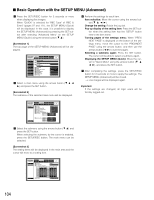
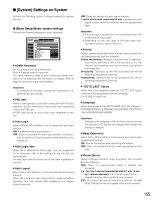
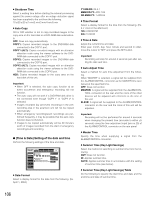
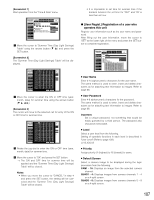
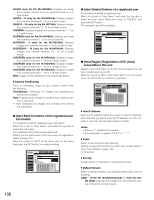
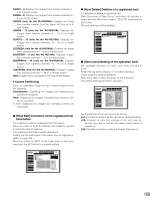
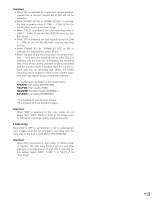
QUAD1 - 4: Displays live images from camera channels 1 4 on a 4-split screen. QUAD5 - 8: Displays live images from camera channels 5 8 on a 4-split screen. QUAD9 (only for the WJ-HD309A): Displays an image from camera channel 9 on the upper left area on a 4split screen. QUAD9 - 12 (only for the WJ-HD316A): Displays live images from camera channels 9 - 12 on a 4-split screen. QUAD13 - 16 (only for the WJ-HD316A): Displays live images from camera channels 13 - 16 on a 4-split screen. 9SCREEN (only for the WJ-HD309A): Displays an image from camera channel 1 - 9 on a 9-split screen. 9SCREEN1 - 9 (for the WJ-HD316A): Displays images from camera channels 1 - 9 on a 9-split screen. 9SCREEN10 - 16 (only for the WJ-HD316A): Displays images from camera channels 10 - 16 on a 9-split screen. 16SCREEN (only for the WJ-HD316A): Displays images from camera channels 1 - 16 on a 16-split screen. SEQ: Images will be displayed in the sequential display. 8 Camera Partitioning Select a controllable range for each camera channel from the following. View/Operate: Displaying live images and operating the camera are possible. View: Displaying live images is possible but cameras can- not be operated. --: Both displaying live images and operating camera are impossible. G [Host Edit] Correction of the registered host information It is possible to edit the registered host information. Move the cursor to "Host IP Address" and rotate the jog dial to select the host IP address. The registered information will be displayed. Editing can be performed in the same way as registration. (Refer to page 108.) Move the cursor to "EDIT" at the lower right on the menu and press the SET button to complete editing. SETUP MENU Advanced Basic Setup Time & Date User Regist. User Edit User Delete Host Regist. Host Edit Host Delete User Level Save/Load Quick Menu System Switcher Recording Display Event Comm Schedule Maintenance LIVE I Host IP Address I Level I Priority I Default Screen I Camera Partitioning CAM1 CAM2 CAM3 CAM4 CAM5 CAM6 CAM7 CAM8 View/Operate View/Operate View/Operate View/Operate View/Operate View/Operate View/Operate View/Operate CAM9 CAM10 CAM11 CAM12 CAM13 CAM14 CAM15 CAM16 000 . 000 . 000 . 000 LV1 16 16 SCREEN View View View ------ EDIT G [Host Delete] Deletion of a registered host It is possible to delete a registered host. Move the cursor to "Host Delete" and rotate the jog dial to select the host. Move the cursor to "DELETE" and press the SET button. The selected host will be deleted. SETUP MENU Advanced System Switcher Recording Display Basic Setup Time & Date User Regist. User Edit User Delete Host Regist. Host Edit Host Delete User Level Save/Load Quick Menu I Host IP Address Event Comm Schedule Maintenance LIVE 0. 0. 0. 0 DELETE G [User Level] Setting of the operation level Set operable functions at each user level (LV 1/LV 2/ LV 3). Rotate the jog dial to display "b" to enable operation. Leave it blank to disable operation. Refer to the table on the next page for each function. The default settings are shown as below. SETUP MENU Advanced Basic Setup Time & Date User Regist. User Edit User Delete Host Regist. Host Edit Host Delete User Level Save/Load Quick Menu System Switcher Recording Display Event Comm SChedule Maintenance LIVE Setup Setup Status Camera Setup Event Log Status Access Log Status Error Log Status Alarm Reset Alarm Suspended Time Copy Normal Recording Erase Event Recording Erase Manual REC Operation Playback Operation N/W Access LV1 LV2 LV3 Each parameter of the user level is as follows: LV1: Possible to perform all the operations (Administrators) LV2: Possible to refer the settings of the unit and the access log, and to perform the alarm reset (Head of operators) LV3: Possible to monitor or play the images (Operators) 109
-
 1
1 -
2
-
3
-
4
-
5
-
6
-
7
-
8
-
9
-
10
-
11
-
12
-
13
-
14
-
15
-
16
-
17
-
18
-
19
-
20
-
21
-
22
-
23
-
24
-
25
-
26
-
27
-
28
-
29
-
30
-
31
-
32
-
33
-
34
-
35
-
36
-
37
-
38
-
39
-
40
-
41
-
42
-
43
-
44
-
45
-
46
-
47
-
48
-
49
-
50
-
51
-
52
-
53
-
54
-
55
-
56
-
57
-
58
-
59
-
60
-
61
-
62
-
63
-
64
-
65
-
66
-
67
-
68
-
69
-
70
-
71
-
72
-
73
-
74
-
75
-
76
-
77
-
78
-
79
-
80
-
81
-
82
-
83
-
84
-
85
-
86
-
87
-
88
-
89
-
90
-
91
-
92
-
93
-
94
-
95
-
96
-
97
-
98
-
99
-
100
-
101
-
102
-
103
-
 104
104 -
 105
105 -
 106
106 -
 107
107 -
 108
108 -
 109
109 -
 110
110 -
 111
111 -
 112
112 -
 113
113 -
 114
114 -
115
-
116
-
117
-
118
-
119
-
120
-
121
-
122
-
123
-
124
-
125
-
126
-
127
-
128
-
129
-
130
-
131
-
132
-
133
-
134
-
135
-
136
-
137
-
138
-
139
-
140
-
141
-
142
-
143
-
144
-
145
-
146
-
147
-
148
-
149
-
150
-
151
-
152
-
153
-
154
-
155
-
156
-
157
-
158
-
159
-
160
-
161
-
162
-
163
-
164
-
165
-
166
-
167
-
168
-
169
-
170
-
171
-
172
-
173
-
174
-
175
-
176
-
177
-
178
-
179
-
180
-
181
-
182
 |
 |
