Panasonic WJHD316A WJHD309A User Guide - Page 70
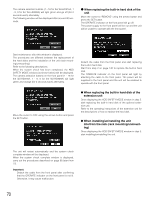
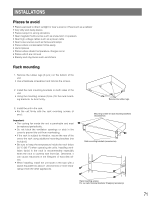
When replacing the built-in hard disk of the, extension unit, When installing/uninstalling the unit
 |
View all Panasonic WJHD316A manuals
Add to My Manuals
Save this manual to your list of manuals |
Page 70 highlights
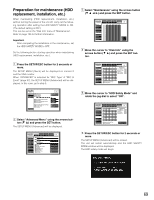
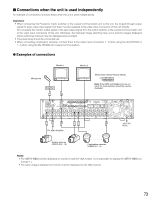
The camera selection buttons (1 - 16 for the WJ-HD316A, 1 - 9, 0 for the WJ-HD309A) will light green and go off (for 2 seconds each) alternately. The following window will be displayed after around 30 seconds. G When replacing the built-in hard disk of the unit Move the cursor to "REMOVE" using the arrows button and press the SET button. The OPERATE indicator on the front panel will go off. The power supply to the front panel will be cut and the unit will be unable to operate with the front panel. Start maintenance after this window is displayed. The procedures are different between the replacement of the hard disks and the installation of the unit (rack mounting/unmounting). Refer to the following descriptions. When the system check has been completed, the HDD SAFETY MODE window (as shown below) will be displayed. The camera selection buttons on the front panel (1 - 16 for the WJ-HD316A, 1 - 9, 0 for the WJ-HD309A) will light green and orange (for 2 seconds each) alternately. Detach the cable from the front panel and start replacing the built-in hard disk. Start from step 2 on page 140 to replace the built-in hard disk. The OPERATE indicator on the front panel will light by attaching the cable to the front panel. The power will be supplied to the front panel and the unit will be enabled to operate with the front panel. Move the cursor to OFF using the arrows button and press the SET button. G When replacing the built-in hard disk of the extension unit Once displaying the HDD SAFETY MODE window in step 5, start replacing the built-in hard disk of the optional extension unit. Refer to the operating instructions of the extension unit for the descriptions of how to replace the hard disk. G When installing/uninstalling the unit into/from the rack (rack mounting/unmounting) Once displaying the HDD SAFETY MODE window in step 5, start installing/uninstalling the unit. The unit will restart automatically and the system check complete window will be displayed. When the system check complete window is displayed, carry out the procedures described on page 68 (start from x). Important: Detach the cable from the front panel after confirming that the OPERATE indicator on the front panel is not lit. Otherwise, it may cause malfunction. 70
-
 1
1 -
2
-
3
-
4
-
5
-
6
-
7
-
8
-
9
-
10
-
11
-
12
-
13
-
14
-
15
-
16
-
17
-
18
-
19
-
20
-
21
-
22
-
23
-
24
-
25
-
26
-
27
-
28
-
29
-
30
-
31
-
32
-
33
-
34
-
35
-
36
-
37
-
38
-
39
-
40
-
41
-
42
-
43
-
44
-
45
-
46
-
47
-
48
-
49
-
50
-
51
-
52
-
53
-
54
-
55
-
56
-
57
-
58
-
59
-
60
-
61
-
62
-
63
-
64
-
 65
65 -
 66
66 -
 67
67 -
 68
68 -
 69
69 -
 70
70 -
 71
71 -
 72
72 -
 73
73 -
 74
74 -
 75
75 -
76
-
77
-
78
-
79
-
80
-
81
-
82
-
83
-
84
-
85
-
86
-
87
-
88
-
89
-
90
-
91
-
92
-
93
-
94
-
95
-
96
-
97
-
98
-
99
-
100
-
101
-
102
-
103
-
104
-
105
-
106
-
107
-
108
-
109
-
110
-
111
-
112
-
113
-
114
-
115
-
116
-
117
-
118
-
119
-
120
-
121
-
122
-
123
-
124
-
125
-
126
-
127
-
128
-
129
-
130
-
131
-
132
-
133
-
134
-
135
-
136
-
137
-
138
-
139
-
140
-
141
-
142
-
143
-
144
-
145
-
146
-
147
-
148
-
149
-
150
-
151
-
152
-
153
-
154
-
155
-
156
-
157
-
158
-
159
-
160
-
161
-
162
-
163
-
164
-
165
-
166
-
167
-
168
-
169
-
170
-
171
-
172
-
173
-
174
-
175
-
176
-
177
-
178
-
179
-
180
-
181
-
182
 |
 |
