Panasonic WJHD316A WJHD309A User Guide - Page 18
Clock Adjustment
 |
View all Panasonic WJHD316A manuals
Add to My Manuals
Save this manual to your list of manuals |
Page 18 highlights
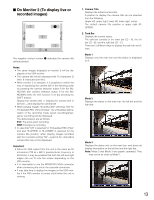
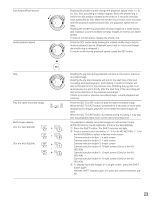
CLOCK ADJUSTMENT It is recommended to check the clock periodically and put the clock right if it shows the wrong time. Adjust the clock when displaying a live image. Note: The following are the descriptions of how to adjust the clock on the SETUP MENU (Quick). Refer to page 106 for descriptions of how to adjust the clock on the SETUP MENU (Advanced). zv MONITOR1 MONITOR2 123 4 STOP PLAY PAUSE REC - REC STOP REV FWD PAN/ GOTO TILT LAST SEARCH SHIFT SEQ OSD PAN/TILT SETUP 5 6 7 8 ZOOM/ A-B SLOW /ESC FOCUS REPEAT - + DISK SELECT COPY TEXT MARK 9 10/0 11 12 IRIS LISTED EL-ZOOM LOGOUT LOGOUT PRESET /AUTO 13 14 15 16 SET BUSY xc c x z Press the SETUP/ESC button for 2 seconds or more. The SETUP MENU (Quick) will be displayed on monitor 2 and the VGA monitor. c Move the cursor to "SET" and press the SET button. The set time will be applied. SETUP MENU Quick LIVE Display REC & Event Network I Date Format I Time Format I Time & Date JAN . 1 . 04 10 : 00 : 00 I Time & Date Display Position I Camera Title I Camera Title Display Position I Live Sequence MMM.DD.YY 12h PM SET L-UPPER SETUP R-LOWER SETUP I Summer Time (Day Light Savings) I Beep (Operation) I Language AUTO ON ENGLISH Advanced Menu 31v6 Press the SETUP/ESC button for 2 seconds or more. The SETUP MENU (Quick) will disappear and a live image will be displayed. Important: Recording will stop for around 4 seconds just after setting the clock. SETUP MENU Quick LIVE Display REC & Event Network I Date Format I Time Format I Time & Date JAN . 1 . 04 10 : 00 : 00 I Time & Date Display Position I Camera Title I Camera Title Display Position I Live Sequence MMM.DD.YY 12h PM SET L-UPPER SETUP R-LOWER SETUP I Summer Time (Day Light Savings) I Beep (Operation) I Language AUTO ON ENGLISH Advanced Menu x Move the cursor to "Time & Date" using the arrows button (C D A B), and set the time (Month, Day, Year, Time) using the jog dial. SETUP MENU Quick LIVE Display REC & Event Network I Date Format I Time Format I Time & Date JAN . 1 . 04 10 : 00 : 00 I Time & Date Display Position I Camera Title I Camera Title Display Position I Live Sequence MMM.DD.YY 12h PM SET L-UPPER SETUP R-LOWER SETUP I Summer Time (Day Light Savings) I Beep (Operation) I Language AUTO ON ENGLISH Advanced Menu 18
-
 1
1 -
2
-
3
-
4
-
5
-
6
-
7
-
8
-
9
-
10
-
11
-
12
-
 13
13 -
 14
14 -
 15
15 -
 16
16 -
 17
17 -
 18
18 -
 19
19 -
 20
20 -
 21
21 -
 22
22 -
 23
23 -
24
-
25
-
26
-
27
-
28
-
29
-
30
-
31
-
32
-
33
-
34
-
35
-
36
-
37
-
38
-
39
-
40
-
41
-
42
-
43
-
44
-
45
-
46
-
47
-
48
-
49
-
50
-
51
-
52
-
53
-
54
-
55
-
56
-
57
-
58
-
59
-
60
-
61
-
62
-
63
-
64
-
65
-
66
-
67
-
68
-
69
-
70
-
71
-
72
-
73
-
74
-
75
-
76
-
77
-
78
-
79
-
80
-
81
-
82
-
83
-
84
-
85
-
86
-
87
-
88
-
89
-
90
-
91
-
92
-
93
-
94
-
95
-
96
-
97
-
98
-
99
-
100
-
101
-
102
-
103
-
104
-
105
-
106
-
107
-
108
-
109
-
110
-
111
-
112
-
113
-
114
-
115
-
116
-
117
-
118
-
119
-
120
-
121
-
122
-
123
-
124
-
125
-
126
-
127
-
128
-
129
-
130
-
131
-
132
-
133
-
134
-
135
-
136
-
137
-
138
-
139
-
140
-
141
-
142
-
143
-
144
-
145
-
146
-
147
-
148
-
149
-
150
-
151
-
152
-
153
-
154
-
155
-
156
-
157
-
158
-
159
-
160
-
161
-
162
-
163
-
164
-
165
-
166
-
167
-
168
-
169
-
170
-
171
-
172
-
173
-
174
-
175
-
176
-
177
-
178
-
179
-
180
-
181
-
182
 |
 |
