Panasonic WJHD316A WJHD309A User Guide - Page 140
DISK MANAGEMENT, Notes on the hard disk, How to replace the built-in hard disk
 |
View all Panasonic WJHD316A manuals
Add to My Manuals
Save this manual to your list of manuals |
Page 140 highlights
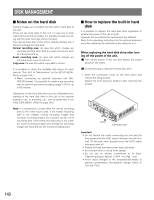
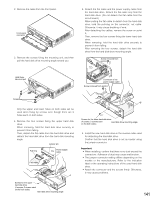
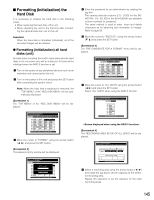
DISK MANAGEMENT I Notes on the hard disk Camera images are recorded into the built-in hard disk of this unit. There are two hard disks in this unit. In case one of them malfunctions during recording, it is possible to keep recording with the other hard disk (mirror function). The internal hard disk of this unit is virtually divided into 3 areas to manage the hard disk. Normal recording area: An area into which images are recorded at times other than an event occurrence such as manual recording. Event recording area: An area into which images are recorded at an event occurrence. Copy area: An area into which copy data is stored. It is possible to check the available disk space for each area on "Disk Info" of "Maintenance" on the SETUP MENU. (Refer to page 135.) • When connecting an optional extension unit (WJHDE300 series), it is possible to create a pre-recording area to perform pre-event recording (page 147) for up to 60 minutes. Operations for the hard disk drive such as initialization (formatting) of the hard disk drive in the unit or the optional extension unit, or mirroring, etc., can be performed in the "HDD DISK MENU". (Refer to page 143.) Note: It is necessary to create either the normal recording area or the event record area. If the normal recording area is not created, manual recording images and schedule recording images are recorded into the event recording area. If the event recording area is not created, event recording images and emergency recording images are recorded into the normal recording area. I How to replace the built-in hard disk It is possible to replace the hard disk drive regardless of whether the power of the unit is on/off. However, the procedures for replacement are different. Refer to the operating instructions for the optional extension unit when replacing the hard disk in the extension unit. When replacing the hard disk drive after turning off the power of the unit. z Turn off the power of the unit and detach the power plug from the outlet. x Do the following to replace the hard disk drive. 1. Open the connectors cover on the front panel and remove the fixing screws. Detach the front panel by sliding it after removing the screws. Screw Connectors cover Important: • Do not detach the cable connecting the unit and the front panel while the HDD status indicators are still lit or until 30 seconds have passed since the HDD status indicators went off. • Protect the hard disk drives from static electricity. • Do not stack them, or keep them upright. • Do not use an electric screwdriver to fix them. (Tightening torque: Approx. 0.49 N · m (5 kgf · cm)) • Avoid rapid changes in the temperature/humidity to prevent condensation. (Acceptable change: within 15 °C/h (59 °F/h)) 140
-
 1
1 -
2
-
3
-
4
-
5
-
6
-
7
-
8
-
9
-
10
-
11
-
12
-
13
-
14
-
15
-
16
-
17
-
18
-
19
-
20
-
21
-
22
-
23
-
24
-
25
-
26
-
27
-
28
-
29
-
30
-
31
-
32
-
33
-
34
-
35
-
36
-
37
-
38
-
39
-
40
-
41
-
42
-
43
-
44
-
45
-
46
-
47
-
48
-
49
-
50
-
51
-
52
-
53
-
54
-
55
-
56
-
57
-
58
-
59
-
60
-
61
-
62
-
63
-
64
-
65
-
66
-
67
-
68
-
69
-
70
-
71
-
72
-
73
-
74
-
75
-
76
-
77
-
78
-
79
-
80
-
81
-
82
-
83
-
84
-
85
-
86
-
87
-
88
-
89
-
90
-
91
-
92
-
93
-
94
-
95
-
96
-
97
-
98
-
99
-
100
-
101
-
102
-
103
-
104
-
105
-
106
-
107
-
108
-
109
-
110
-
111
-
112
-
113
-
114
-
115
-
116
-
117
-
118
-
119
-
120
-
121
-
122
-
123
-
124
-
125
-
126
-
127
-
128
-
129
-
130
-
131
-
132
-
133
-
134
-
 135
135 -
 136
136 -
 137
137 -
 138
138 -
 139
139 -
 140
140 -
 141
141 -
 142
142 -
 143
143 -
 144
144 -
 145
145 -
146
-
147
-
148
-
149
-
150
-
151
-
152
-
153
-
154
-
155
-
156
-
157
-
158
-
159
-
160
-
161
-
162
-
163
-
164
-
165
-
166
-
167
-
168
-
169
-
170
-
171
-
172
-
173
-
174
-
175
-
176
-
177
-
178
-
179
-
180
-
181
-
182
 |
 |
