Panasonic WJHD316A WJHD309A User Guide - Page 116
Set the detection mode, Screenshot 2], <ANY AREA>, <VECTOR>, <DURATION>
 |
View all Panasonic WJHD316A manuals
Add to My Manuals
Save this manual to your list of manuals |
Page 116 highlights
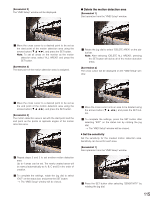
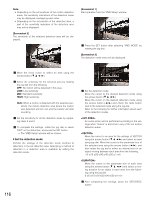
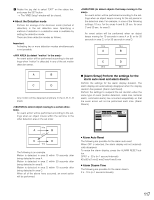
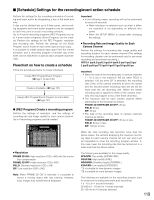
Note: • Depending on the set positions of the motion detection areas, the sensitivity indications of the detection areas may be displayed overlapping each other. • Depending on the set position of the detection area, a part of the sensitivity indication of the detection area may not be displayed. [Screenshot 2] The sensitivity of the selected detection area will be displayed. [Screenshot 1] Start operation from the "VMD Setup" window. z Press the SET button after selecting "VMD MODE" by rotating the jog dial. [Screenshot 2] The detection mode menu will be displayed. x Move the cross cursor to select an area using the arrows button (C D A B). c Select the sensitivity for the selected area by rotating the jog dial from the following. OFF: No motion will be detected in this area. LOW: Low sensitivity MID: Standard sensitivity HIGH: High sensitivity Note: When a motion is detected with the selected sensitivity, the motion detection area where the motion was detected will turn red and the buzzer will start sounding. v Set the sensitivity for all the detection areas by repeating steps 2 and 3. b To complete the settings, rotate the jog dial to select "EXIT" on the status bar, and press the SET button. → The "VMD Setup" window will be closed. 8 Set the detection mode Perform the settings of the detection mode (method of detection) in the set detection area. Specifying a method of detection in a detection area is available by setting the detection mode. x Set the detection mode. Move the cursor to the desired detection mode using the arrows button (C D A B). Move the cursor on the desired detection mode using the arrows button (A B) and check the radio button next to the selected mode using the jog dial. Refer to the following for further information about each of the detection modes. An event action will be performed according to the settings when "motion" is detected in any of the set motion detection areas. Move the cursor to an area for the settings of VECTOR using the arrows button (C D A B) and select an area using jog dial. Move the cursor to the parameter box of the selected area using the arrows button (A B), and then rotate the jog dial to select an interval time for an object moving between each area from the following. --/5 s/10 s/20 s/30 s/40 s/50 s/1 min Move the cursor to the parameter box of each area using the arrows button (C D A B) and select a moving duration for an object in each area from the following using the jog dial. 0 s/5 s/10 s/20 s/30 s/40 s/50 s/1 min c After completing the settings, press the SETUP/ESC button. 116
-
 1
1 -
2
-
3
-
4
-
5
-
6
-
7
-
8
-
9
-
10
-
11
-
12
-
13
-
14
-
15
-
16
-
17
-
18
-
19
-
20
-
21
-
22
-
23
-
24
-
25
-
26
-
27
-
28
-
29
-
30
-
31
-
32
-
33
-
34
-
35
-
36
-
37
-
38
-
39
-
40
-
41
-
42
-
43
-
44
-
45
-
46
-
47
-
48
-
49
-
50
-
51
-
52
-
53
-
54
-
55
-
56
-
57
-
58
-
59
-
60
-
61
-
62
-
63
-
64
-
65
-
66
-
67
-
68
-
69
-
70
-
71
-
72
-
73
-
74
-
75
-
76
-
77
-
78
-
79
-
80
-
81
-
82
-
83
-
84
-
85
-
86
-
87
-
88
-
89
-
90
-
91
-
92
-
93
-
94
-
95
-
96
-
97
-
98
-
99
-
100
-
101
-
102
-
103
-
104
-
105
-
106
-
107
-
108
-
109
-
110
-
 111
111 -
 112
112 -
 113
113 -
 114
114 -
 115
115 -
 116
116 -
 117
117 -
 118
118 -
 119
119 -
 120
120 -
 121
121 -
122
-
123
-
124
-
125
-
126
-
127
-
128
-
129
-
130
-
131
-
132
-
133
-
134
-
135
-
136
-
137
-
138
-
139
-
140
-
141
-
142
-
143
-
144
-
145
-
146
-
147
-
148
-
149
-
150
-
151
-
152
-
153
-
154
-
155
-
156
-
157
-
158
-
159
-
160
-
161
-
162
-
163
-
164
-
165
-
166
-
167
-
168
-
169
-
170
-
171
-
172
-
173
-
174
-
175
-
176
-
177
-
178
-
179
-
180
-
181
-
182
 |
 |
