Panasonic WJHD316A WJHD309A User Guide - Page 111
[Recording], Power ON Manual REC, Manual Recording Channel, Color Mode, Embedded REC Title
 |
View all Panasonic WJHD316A manuals
Add to My Manuals
Save this manual to your list of manuals |
Page 111 highlights
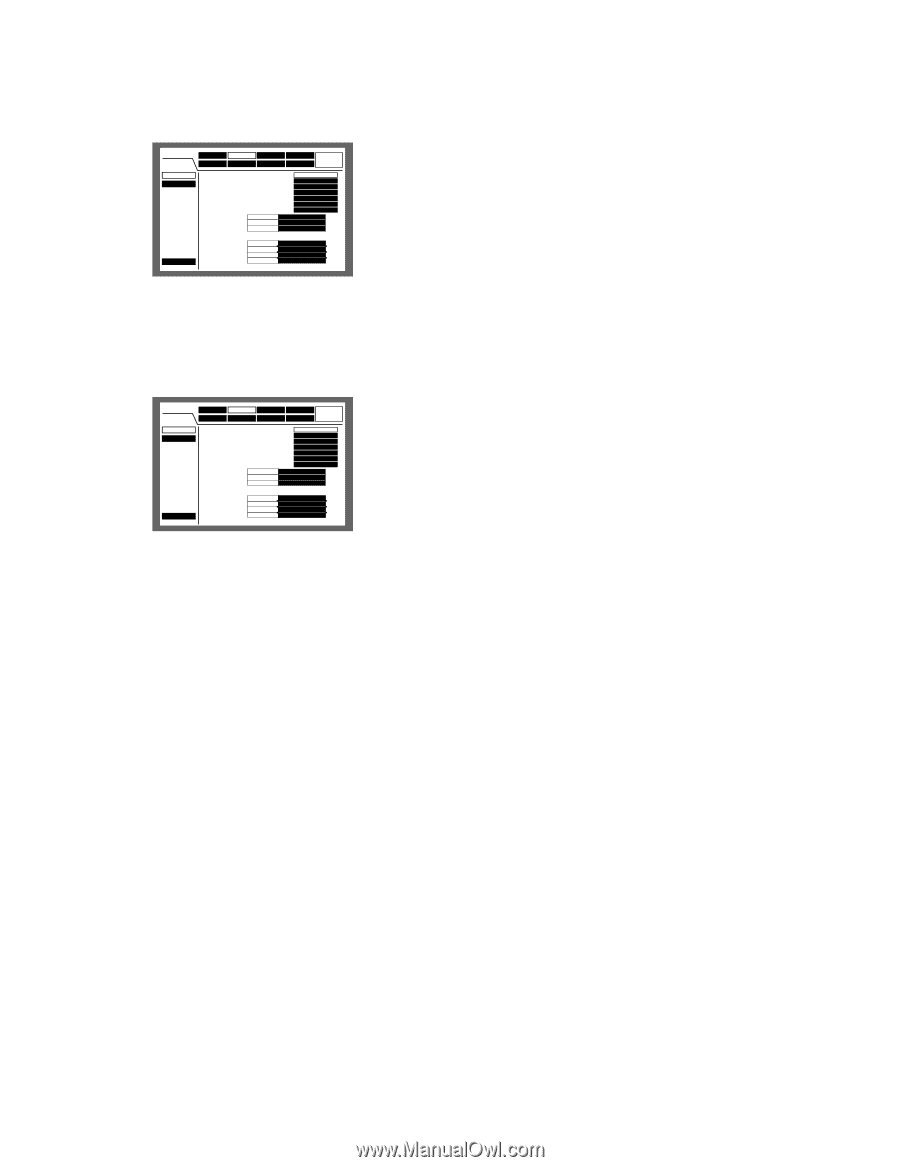
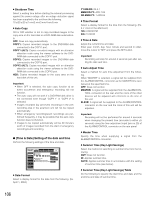
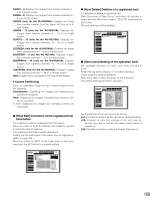
I [Recording] Perform the settings for the basic recording (REC Setup) and the emergency recording. SETUP MENU Advanced REC Setup Emergency REC System Switcher Recording Display Event Comm I REC Type I Recording I Power ON Manual REC I Manual Recording Channel I Color Mode I Embedded REC(Title) I Embedded REC(Time&Date) I REC Priority 1 2 3 Schedule Maintenance LIVE QUICK ON OFF All COLOR STD ON ON Manual REC Event REC Schedule REC Quick Menu I Audio Allocation Audio1 Audio2 Audio3 Audio4 CAM1 CAM2 CAM3 CAM4 G [REC Setup] Perform the settings for the basic recording Perform the following settings for the basic recording. SETUP MENU Advanced REC Setup Emergency REC System Switcher Recording Display Event Comm I REC Type I Recording I Power ON Manual REC I Manual Recording Channel I Color Mode I Embedded REC(Title) I Embedded REC(Time&Date) I REC Priority 1 2 3 Schedule Maintenance LIVE QUICK ON OFF All COLOR STD ON ON Manual REC Event REC Schedule REC Quick Menu I Audio Allocation Audio1 Audio2 Audio3 Audio4 CAM1 CAM2 CAM3 CAM4 Select "QUICK" or "ADVANCED" for validation of the recording settings. QUICK: The recording settings set on the SETUP MENU (Quick) will be validated when recording. ADVANCED: The recording settings set on the SETUP MENU (Advanced) will be validated when recording. 8 Recording Select ON or OFF to record or not record. ON: Recording will be performed. OFF: No recording will be performed. Important: When OFF is selected for this setting, no recording will be performed. Select ON for normal use except when it is necessary to stop recording forcibly such as when a problem has occurred with the unit. 8 Power ON Manual REC Select ON or OFF to determine whether or not to start recording when the power is turned on by the connected external timer (or the switch). ON: Manual recording will start automatically after complet- ing the system check. OFF: Manual recording will not start automatically after completing the system check. Important: When ON is selected, manual recording will start automatically after completing the system check. 8 Manual Recording Channel Select a camera channel for manual recording from the following. Refer to page 20 for manual recording. MON2: Images from the camera channel currently dis- played on monitor 2 will be recorded. ALL: Images from all the camera channels will be record- ed. Important: When operating on monitor 1 when "MON2" is selected for "Manual Recording Channel" on the "REC Setup" menu, all camera channels will be recorded by manual recording instead of recording the camera channel displayed on monitor 2. When "MON2" is selected, images from a camera channel for another manual recording that has started later will be recorded regardless of the operation using the buttons on the front panel or via a network. 8 Color Mode Select the color mode for recording from the following. COLOR FINE: Record images in a high resolution color COLOR STD: Record images in a standard resolution color B/W: Record images in black and white Important: When "B/W" is selected for the color mode, do not select "SFA", "FQA", "NQA" or "EXA" for the image quality. Otherwise, it may cause deterioration of the image quality. 8 Embedded REC (Title) Select ON or OFF to determine whether or not to record a displayed camera title together as a part of the recorded image. ON: Record camera titles together as a part of the record- ed image. OFF: Does not record camera titles. Note: In case that "ON" is selected for "Embedded REC (Title)" and also "R-UPPER" or "R-LOWER" is selected for the camera title position, when playing images recorded with the resolution setting of "SIF", a part of the embedded camera title may not be displayed. 8 Embedded REC (Time & Date) Select ON or OFF to determine whether or not to record the displayed time and date together. ON: Record the time and date together as a part of the recorded image. OFF: Does not record the time and date. 111
-
 1
1 -
2
-
3
-
4
-
5
-
6
-
7
-
8
-
9
-
10
-
11
-
12
-
13
-
14
-
15
-
16
-
17
-
18
-
19
-
20
-
21
-
22
-
23
-
24
-
25
-
26
-
27
-
28
-
29
-
30
-
31
-
32
-
33
-
34
-
35
-
36
-
37
-
38
-
39
-
40
-
41
-
42
-
43
-
44
-
45
-
46
-
47
-
48
-
49
-
50
-
51
-
52
-
53
-
54
-
55
-
56
-
57
-
58
-
59
-
60
-
61
-
62
-
63
-
64
-
65
-
66
-
67
-
68
-
69
-
70
-
71
-
72
-
73
-
74
-
75
-
76
-
77
-
78
-
79
-
80
-
81
-
82
-
83
-
84
-
85
-
86
-
87
-
88
-
89
-
90
-
91
-
92
-
93
-
94
-
95
-
96
-
97
-
98
-
99
-
100
-
101
-
102
-
103
-
104
-
105
-
 106
106 -
 107
107 -
 108
108 -
 109
109 -
 110
110 -
 111
111 -
 112
112 -
 113
113 -
 114
114 -
 115
115 -
 116
116 -
117
-
118
-
119
-
120
-
121
-
122
-
123
-
124
-
125
-
126
-
127
-
128
-
129
-
130
-
131
-
132
-
133
-
134
-
135
-
136
-
137
-
138
-
139
-
140
-
141
-
142
-
143
-
144
-
145
-
146
-
147
-
148
-
149
-
150
-
151
-
152
-
153
-
154
-
155
-
156
-
157
-
158
-
159
-
160
-
161
-
162
-
163
-
164
-
165
-
166
-
167
-
168
-
169
-
170
-
171
-
172
-
173
-
174
-
175
-
176
-
177
-
178
-
179
-
180
-
181
-
182
 |
 |