Panasonic WJHD316A WJHD309A User Guide - Page 141
Important, After removing the four screws, detach the hard disk
 |
View all Panasonic WJHD316A manuals
Add to My Manuals
Save this manual to your list of manuals |
Page 141 highlights
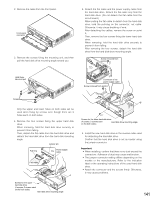
2. Remove the cable from the front panel. Front panel connector 3. Remove the screws fixing the mounting unit, and then pull the hard disk drive mounting angle toward you. 5. Detach the flat cable and the power supply cable from the hard disk drive. Detach the flat cable only from the hard disk drive. (Do not detach the flat cable from the circuit board.) When pulling the flat cable to detach from the hard disk drive, hold the pull-ring on the connector, not cable. Otherwise, it may cause breaking of wire. After detaching the cables, remove the screw on point A. Then, remove the four screws fixing the lower hard disk drive. When removing, hold the hard disk drive securely to prevent it from falling. After removing the four screws, detach the hard disk drive from the hard disk drive mounting angle. Screw removed from point A Hold these tabs and pull Connector of the power supply cable Screw removed from point A SSD SSD Screws SSD Only the upper and lower holes on both sides will be used when fixing by screws even though there are 3 holes each on both sides. 4. Remove the four screws fixing the upper hard disk drive. When removing, hold the hard disk drive securely to prevent it from falling. Then, detach the flat cable from the hard disk drive and detach the hard disk drive from the hard disk mounting angle. Jumper pin Pull-ring Power supply cable Flat cable SSD Screws for the lower hard disk drive (4 screws: 2 screws each on the both sides) Hard disk drive mounting angle 6. Install the new hard disk drive in the reverse order used for detaching the hard disk drive. Confirm that the hard disk drive is set as master using the jumper connector. Important: • When installing, confirm that there is no dust around the connectors. Adhesion of dust may cause malfunction. • The jumper connector setting differs depending on the models or the manufacturers. Refer to the indication label or the operating instructions of the used hard disk drive. • Attach the connector and the screws firmly. Otherwise, it may cause problems. Screws for the upper hard disk drive (4 screws: 2 screws each on the both sides) Hard disk drive mounting angle 141
-
 1
1 -
2
-
3
-
4
-
5
-
6
-
7
-
8
-
9
-
10
-
11
-
12
-
13
-
14
-
15
-
16
-
17
-
18
-
19
-
20
-
21
-
22
-
23
-
24
-
25
-
26
-
27
-
28
-
29
-
30
-
31
-
32
-
33
-
34
-
35
-
36
-
37
-
38
-
39
-
40
-
41
-
42
-
43
-
44
-
45
-
46
-
47
-
48
-
49
-
50
-
51
-
52
-
53
-
54
-
55
-
56
-
57
-
58
-
59
-
60
-
61
-
62
-
63
-
64
-
65
-
66
-
67
-
68
-
69
-
70
-
71
-
72
-
73
-
74
-
75
-
76
-
77
-
78
-
79
-
80
-
81
-
82
-
83
-
84
-
85
-
86
-
87
-
88
-
89
-
90
-
91
-
92
-
93
-
94
-
95
-
96
-
97
-
98
-
99
-
100
-
101
-
102
-
103
-
104
-
105
-
106
-
107
-
108
-
109
-
110
-
111
-
112
-
113
-
114
-
115
-
116
-
117
-
118
-
119
-
120
-
121
-
122
-
123
-
124
-
125
-
126
-
127
-
128
-
129
-
130
-
131
-
132
-
133
-
134
-
135
-
 136
136 -
 137
137 -
 138
138 -
 139
139 -
 140
140 -
 141
141 -
 142
142 -
 143
143 -
 144
144 -
 145
145 -
 146
146 -
147
-
148
-
149
-
150
-
151
-
152
-
153
-
154
-
155
-
156
-
157
-
158
-
159
-
160
-
161
-
162
-
163
-
164
-
165
-
166
-
167
-
168
-
169
-
170
-
171
-
172
-
173
-
174
-
175
-
176
-
177
-
178
-
179
-
180
-
181
-
182
 |
 |
