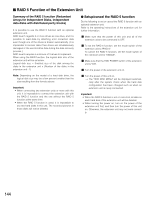
Panasonic WJHD316A WJHD309A User Guide - Page 146
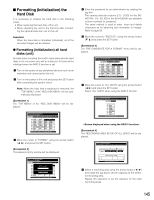
Formatting initialization the, selected hard disk unit, Screenshot 5]
 |
View all Panasonic WJHD316A manuals
Add to My Manuals
Save this manual to your list of manuals |
Page 146 highlights
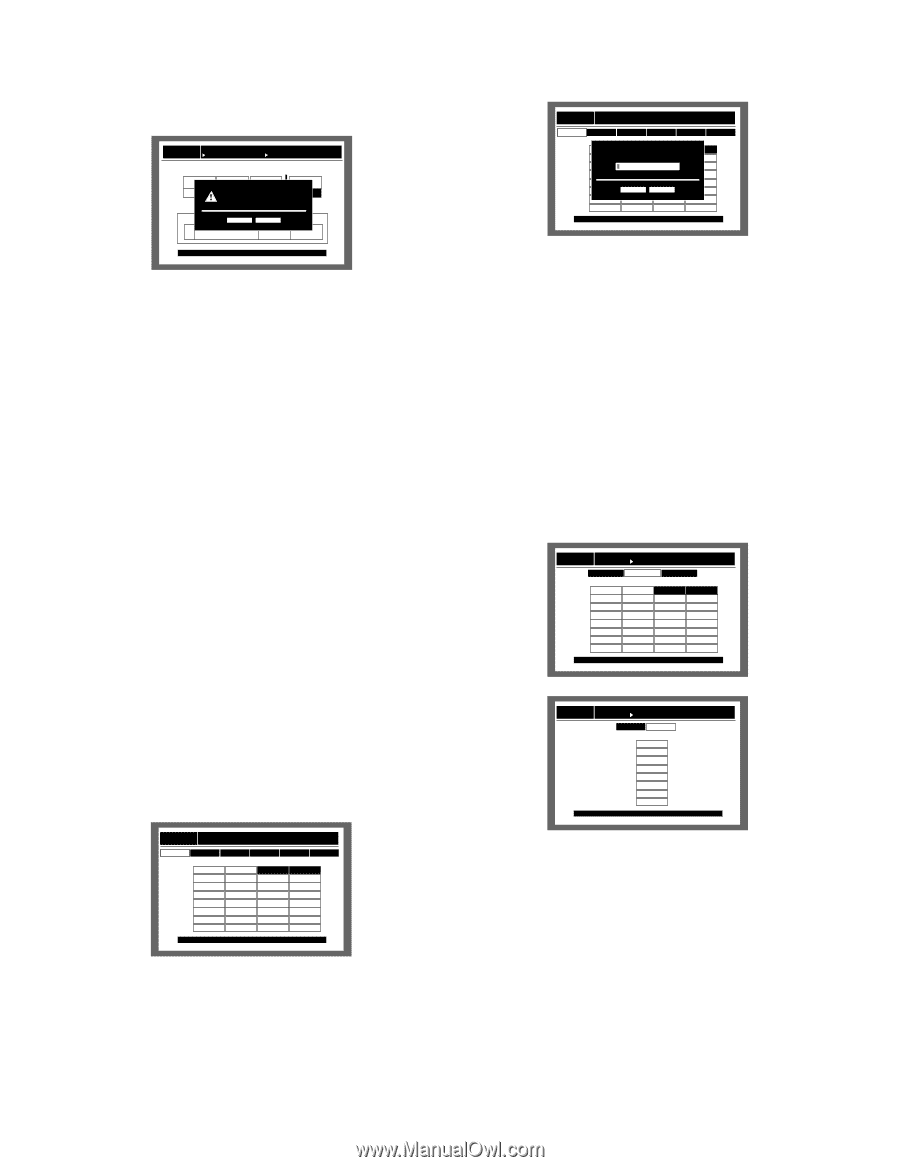
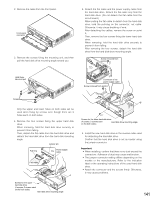
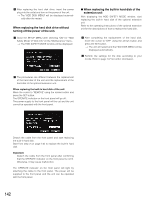
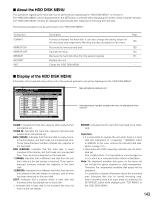
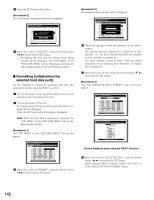
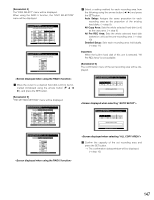
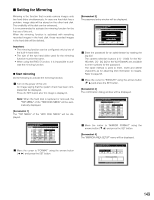
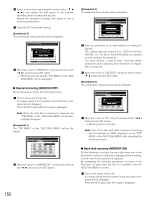
, Press the SET button after setting. [Screenshot 5] The confirmation dialog window will be displayed. Digital Disk Recorder HDD DISK MENU WJ-HD300A THE CANDIDATE FOR A FORMAT RECORDING AREA SETUP OF ALL DISK Normal area 90GB Event area Copy area Starting format of all HDDs, a1n8d00aGllBof data in45H0DGDBs are going to be erased. Free area 450GB HDDETXoEtaClUcTaEpaciCtyA:N2C7E9L0GB RETURN: [SETUP/ESC] OK : [SET] . Move the cursor to "EXECUTE" using the arrows button (A B) and press the SET button. → Formatting will start and the format result dialog window will be displayed. The "TOP MENU" of the "HDD DISK MENU" will be displayed automatically after displaying the format result dialog window. G Formatting (initialization) the selected hard disk (unit) Do the following to format the selected hard disk (the selected unit when using the RAID 5 function). z Turn on the power of any peripheral devices such as an extension unit connected to this unit. x Turn on the power of this unit. An image saying that the system check has been completed will be displayed. Press the SET button after the image is displayed. Note: When the hard disk is replaced or removed, the "TOP MENU" of the "HDD DISK MENU" will be displayed automatically. [Screenshot 1] The "TOP MENU" of the "HDD DISK MENU" will be displayed. Digital Disk Recorder HDD DISK MENU WJ-HD300A TOP MENU FORMAT MIRROR ON MIRROR OFF REMOVE LINK RESTART 1 MAIN 160GB 2 160GB 3 - EXT1 160GB 160GB 160GB EXT2 160GB 160GB 160GB EXT3 160GB 160GB 160GB EXT4 *(160GB) *(ERROR) 160GB EXT5 ADD (160GB) ADD (ERROR) 160GB EXT6 160GB 160GB 160GB EXT7 LOST - - 4 160GB 160GB 160GB 160GB 160GB 160GB - Information of recording areas : [SETUP/ESC] OK : [SET] EXIT c Move the cursor to "FORMAT" using the arrows button (A B) and press the SET button. [Screenshot 2] The password entry window will be displayed. Digital Disk Recorder HDD DISK MENU WJ-HD300A TOP MENU FORMAT MIRROR ON MIRROR OFF REMOVE LINK RESTART 1 MAIN 160GB M EXT1 160GB 2 3 160GB M Enter the password. 160GB 160GB EXT2 160GB 160GB 160GB EXT3 160GB 160GB 160GB EXT4 *(160GB) *(ERROR) 160GB EXT5 ADD (160GB) EAXDEDC(EURTREOR) C1A6N0GCBEL EXT6 160GB 160GB 160GB EXT7 LOST - - 4 160GB 160GB 160GB 160GB 160GB 160GB - Information of recording areas : [SETUP/ESC] OK : [SET] EXIT v Rotate the jog dial to enter the password for an administrator. The camera selection buttons ([1] - [10/0] for the WJHD316A, [1] - [9], [0] for the WJ-HD309A) are available to enter numbers for password. The same method is used to enter, insert and delete characters as for attaching text information to images. Refer to page 58. b Move the cursor to "OK" using the arrows button (C D) and press the SET button. [Screenshot 3] The "THE CANDIDATE FOR A FORMAT" menu will be displayed. Digital Disk Recorder HDD DISK MENU WJ-HD300A TOP MENU THE CANDIDATE FOR A FORMAT ALL FORMAT SELECTED DISC MIRROR FORMAT 1 2 3 MAIN 160GB 160GB EXT1 160GB 160GB 160GB EXT2 160GB 160GB 160GB EXT3 160GB 160GB 160GB EXT4 *(160GB) *(ERROR) 160GB EXT5 ADD (160GB) ADD (ERROR) 160GB EXT6 160GB 160GB 160GB EXT7 LOST - - 4 160GB 160GB 160GB 160GB 160GB 160GB - RETURN: [SETUP/ESC] OK : [SET] Digital Disk Recorder HDD DISK MENU WJ-HD300A TOP MENU THE CANDIDATE FOR A FORMAT ALL UNIT ONE UNIT MAIN EXT1 480GB EXT2 480GB EXT3 480GB EXT4 *(480GB) EXT5 ADD (480GB) EXT6 480GB EXT7 LOST RETURN: [SETUP/ESC] OK : [SET] n Move the cursor to "SELECTED DISK" using the arrows button (A B) and press the SET button. When using the RAID 5 function, select "ONE UNIT" on "THE CANDIDATE FOR A FORMAT" menu. 146
-
 1
1 -
2
-
3
-
4
-
5
-
6
-
7
-
8
-
9
-
10
-
11
-
12
-
13
-
14
-
15
-
16
-
17
-
18
-
19
-
20
-
21
-
22
-
23
-
24
-
25
-
26
-
27
-
28
-
29
-
30
-
31
-
32
-
33
-
34
-
35
-
36
-
37
-
38
-
39
-
40
-
41
-
42
-
43
-
44
-
45
-
46
-
47
-
48
-
49
-
50
-
51
-
52
-
53
-
54
-
55
-
56
-
57
-
58
-
59
-
60
-
61
-
62
-
63
-
64
-
65
-
66
-
67
-
68
-
69
-
70
-
71
-
72
-
73
-
74
-
75
-
76
-
77
-
78
-
79
-
80
-
81
-
82
-
83
-
84
-
85
-
86
-
87
-
88
-
89
-
90
-
91
-
92
-
93
-
94
-
95
-
96
-
97
-
98
-
99
-
100
-
101
-
102
-
103
-
104
-
105
-
106
-
107
-
108
-
109
-
110
-
111
-
112
-
113
-
114
-
115
-
116
-
117
-
118
-
119
-
120
-
121
-
122
-
123
-
124
-
125
-
126
-
127
-
128
-
129
-
130
-
131
-
132
-
133
-
134
-
135
-
136
-
137
-
138
-
139
-
140
-
 141
141 -
 142
142 -
 143
143 -
 144
144 -
 145
145 -
 146
146 -
 147
147 -
 148
148 -
 149
149 -
 150
150 -
 151
151 -
152
-
153
-
154
-
155
-
156
-
157
-
158
-
159
-
160
-
161
-
162
-
163
-
164
-
165
-
166
-
167
-
168
-
169
-
170
-
171
-
172
-
173
-
174
-
175
-
176
-
177
-
178
-
179
-
180
-
181
-
182
 |
 |