Panasonic WJHD316A WJHD309A User Guide - Page 139
Display Setup Menu Of Camera
 |
View all Panasonic WJHD316A manuals
Add to My Manuals
Save this manual to your list of manuals |
Page 139 highlights
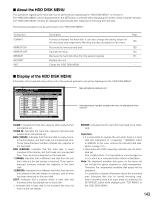
DISPLAY SETUP MENU OF CAMERA For operating the camera connected to this unit, it is necessary to set the camera functions in advance. Setup of the camera functions can be performed on the setup menu of the connected camera. You can operate the camera setup menu by calling up it from this unit. Contents of the camera setting menu and operations vary according to the connected cameras. For further information, refer to the operating instructions of the camera. The following are the descriptions of how to display the camera setting menu. z Press the camera selection button for a desired camera channel and the SET button simultaneously. →The camera setup menu will be displayed. Use the following buttons on the front panel to perform the settings of the camera setup menu. To move the cursor To change the selected parameter To determine the selected parameter To display the submenu To return to the previous menu Arrows button (C D) Arrows button (A B) SET button SETUP/ESC button x Press any one of the PAN/TILT button, the ZOOM/FOCUS button, the IRIS button, the PRESET/AUTO button and the camera selection buttons 4 - 16 for the WJ-HD316A (4 - 9 for the WJ-HD309A) to complete the camera setting. Notes: • To display the special menu of the camera setup menu, press the camera selection button 2 after moving the cursor to SPECIAL on the camera setup menu. • To reset the settings of the camera setup menu to the default settings, do the following: 1. Display the SPECIAL menu of the camera setup menu by pressing the camera selection button 2 after moving the cursor to SPECIAL on the camera setup menu. 2. Press the camera selection button 3 after moving the cursor to CAMERA RESET on the camera setup menu. 3. Press any of the PAN/TILT, ZOOM/FOCUS, IRIS, PRESET/AUTO or the camera selection buttons 4 -16. • To go back to the previously displayed window from the SPECIAL menu, press the SET/ESC button. • Depending on the models of the connected cameras, the operation method and menu items are different. Refer to the operating instructions of the connected camera. 139
-
 1
1 -
2
-
3
-
4
-
5
-
6
-
7
-
8
-
9
-
10
-
11
-
12
-
13
-
14
-
15
-
16
-
17
-
18
-
19
-
20
-
21
-
22
-
23
-
24
-
25
-
26
-
27
-
28
-
29
-
30
-
31
-
32
-
33
-
34
-
35
-
36
-
37
-
38
-
39
-
40
-
41
-
42
-
43
-
44
-
45
-
46
-
47
-
48
-
49
-
50
-
51
-
52
-
53
-
54
-
55
-
56
-
57
-
58
-
59
-
60
-
61
-
62
-
63
-
64
-
65
-
66
-
67
-
68
-
69
-
70
-
71
-
72
-
73
-
74
-
75
-
76
-
77
-
78
-
79
-
80
-
81
-
82
-
83
-
84
-
85
-
86
-
87
-
88
-
89
-
90
-
91
-
92
-
93
-
94
-
95
-
96
-
97
-
98
-
99
-
100
-
101
-
102
-
103
-
104
-
105
-
106
-
107
-
108
-
109
-
110
-
111
-
112
-
113
-
114
-
115
-
116
-
117
-
118
-
119
-
120
-
121
-
122
-
123
-
124
-
125
-
126
-
127
-
128
-
129
-
130
-
131
-
132
-
133
-
 134
134 -
 135
135 -
 136
136 -
 137
137 -
 138
138 -
 139
139 -
 140
140 -
 141
141 -
 142
142 -
 143
143 -
 144
144 -
145
-
146
-
147
-
148
-
149
-
150
-
151
-
152
-
153
-
154
-
155
-
156
-
157
-
158
-
159
-
160
-
161
-
162
-
163
-
164
-
165
-
166
-
167
-
168
-
169
-
170
-
171
-
172
-
173
-
174
-
175
-
176
-
177
-
178
-
179
-
180
-
181
-
182
 |
 |
