Panasonic WJHD316A WJHD309A User Guide - Page 114
[Event] Function for Events, Event Setup] Settings for the alarm output
 |
View all Panasonic WJHD316A manuals
Add to My Manuals
Save this manual to your list of manuals |
Page 114 highlights
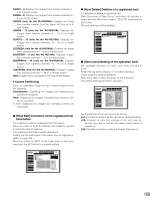
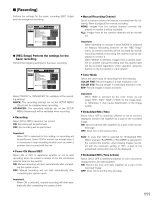
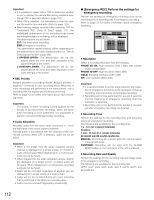
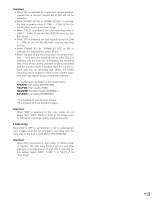
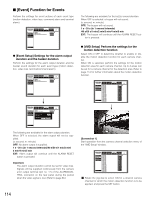
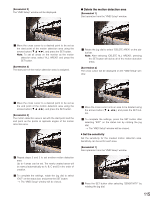
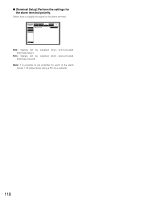
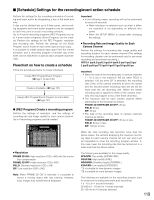
I [Event] Function for Events Perform the settings for event actions of each event type (motion detection, video loss, command alarm and terminal alarm). SETUP MENU Advanced Event Setup VMD Setup Alarm Setup Terminal Setup System Switcher Recording Display Event Comm I VMD I Video Loss I Terminal/Command Alarm Schedule Maintenance SETUP SETUP SETUP LIVE The following are available for the buzzer sound duration. When OFF is selected, a buzzer will not sound. (s: second, m: minute) OFF: The buzzer will not sound. 1 s - 30 s (in 1 second intervals) /40 s/50 s/1 min/2 min/3 min/4 min/5 min EXT: The buzzer will continue until the ALARM RESET but- ton is pressed. Quick Menu G [Event Setup] Settings for the alarm output duration and the buzzer duration Perform the settings for the alarm output duration and the buzzer sound duration for each event type (motion detection, video loss, terminal/command alarm). SETUP MENU Advanced Event Setup VMD Setup Alarm Setup Terminal Setup System Switcher Recording Display Event Comm I VMD I Video Loss I Terminal/Command Alarm Schedule Maintenance SETUP SETUP SETUP LIVE Quick Menu SETUP MENU Advanced Event Setup VMD Setup Alarm Setup Terminal Setup System Switcher Recording Display Event Comm Schedule Maintenance I VMD I Video Loss Setup I Terminal/Command Alarm Setup I Alarm Output 10s I Buzzer 10s SETUP SETUP SETUP LIVE O K CANCEL Quick Menu The following are available for the alarm output duration. When OFF is selected, the alarm output will not be supplied. (s: second, m: minute) OFF: No alarm output is supplied. 1 s - 30 s (in 1 second intervals)/40 s/50 s/1 min/2 min/ 3 min/4 min/5 min EXT: Alarm output will continue until the ALARM RESET button is pressed. Important: The alarm output duration cannot be set for video loss. Signals will be supplied continuously from the camera error output terminal (pin no. 17) of the ALARM/CONTROL connector on the rear panel during the period when the video signal is lost. (Refer to page 86.) G [VMD Setup] Perform the settings for the motion detection function Select ON or OFF to determine whether to enable or disable the motion detection function for each camera channel. When ON is selected, perform the settings for the motion detection area for each camera channel. Up to 4 areas can be set for a camera channel for the detection area. Refer to page 114 for further information about the motion detection function. SETUP MENU Advanced Event Setup VMD Setup Alarm Setup Terminal Setup Quick Menu System Switcher Recording Display I CAM1 I CAM2 I CAM3 I CAM4 I CAM5 I CAM6 I CAM7 I CAM8 I CAM9 I CAM10 I CAM11 I CAM12 I CAM13 I CAM14 I CAM15 I CAM16 Event Comm Schedule Maintenance ON OFF OFF OFF OFF OFF OFF OFF OFF OFF OFF OFF OFF OFF OFF LIVE [Screenshot 1] Start operation from the camera channel selection menu of the "VMD Setup" window. SETUP MENU Advanced Event Setup VMD Setup Alarm Setup Terminal Setup Quick Menu System Switcher Recording Display I CAM1 I CAM2 I CAM3 I CAM4 I CAM5 I CAM6 I CAM7 I CAM8 I CAM9 I CAM10 I CAM11 I CAM12 I CAM13 I CAM14 I CAM15 I CAM16 Event Comm Schedule Maintenance ON OFF OFF OFF OFF OFF OFF OFF OFF OFF OFF OFF OFF OFF OFF LIVE z Rotate the jog dial to select ON for a desired camera channel for which the motion detection function is to be applied, and press the SET button. 114
-
 1
1 -
2
-
3
-
4
-
5
-
6
-
7
-
8
-
9
-
10
-
11
-
12
-
13
-
14
-
15
-
16
-
17
-
18
-
19
-
20
-
21
-
22
-
23
-
24
-
25
-
26
-
27
-
28
-
29
-
30
-
31
-
32
-
33
-
34
-
35
-
36
-
37
-
38
-
39
-
40
-
41
-
42
-
43
-
44
-
45
-
46
-
47
-
48
-
49
-
50
-
51
-
52
-
53
-
54
-
55
-
56
-
57
-
58
-
59
-
60
-
61
-
62
-
63
-
64
-
65
-
66
-
67
-
68
-
69
-
70
-
71
-
72
-
73
-
74
-
75
-
76
-
77
-
78
-
79
-
80
-
81
-
82
-
83
-
84
-
85
-
86
-
87
-
88
-
89
-
90
-
91
-
92
-
93
-
94
-
95
-
96
-
97
-
98
-
99
-
100
-
101
-
102
-
103
-
104
-
105
-
106
-
107
-
108
-
 109
109 -
 110
110 -
 111
111 -
 112
112 -
 113
113 -
 114
114 -
 115
115 -
 116
116 -
 117
117 -
 118
118 -
 119
119 -
120
-
121
-
122
-
123
-
124
-
125
-
126
-
127
-
128
-
129
-
130
-
131
-
132
-
133
-
134
-
135
-
136
-
137
-
138
-
139
-
140
-
141
-
142
-
143
-
144
-
145
-
146
-
147
-
148
-
149
-
150
-
151
-
152
-
153
-
154
-
155
-
156
-
157
-
158
-
159
-
160
-
161
-
162
-
163
-
164
-
165
-
166
-
167
-
168
-
169
-
170
-
171
-
172
-
173
-
174
-
175
-
176
-
177
-
178
-
179
-
180
-
181
-
182
 |
 |
