Panasonic WJHD316A WJHD309A User Guide - Page 148
Screenshot 7], Important, and assign the disk space to the selected recording
 |
View all Panasonic WJHD316A manuals
Add to My Manuals
Save this manual to your list of manuals |
Page 148 highlights
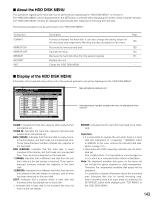
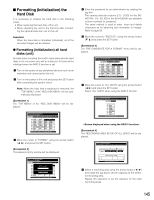
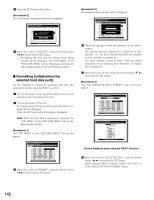
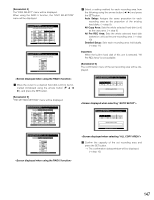
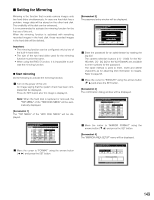
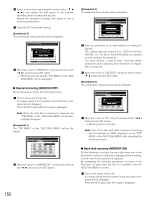
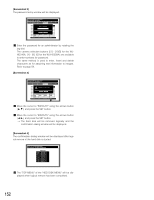
[Screenshot 7] The "PRE RECORDING AREAS" menu will be displayed. Digital Disk Recorder HDD DISK MENU WJ-HD300A DISK SETTING METHOD PRE RECORDING AREAS 1CH 0GB 2CH 0GB 3CH 0GB 4CH 0GB 5CH 0GB 6CH 0GB 7CH 0GB 8CH 0GB 9CH 0GB 10CH 0GB 11CH 0GB 12CH 0GB 13CH 0GB 14CH 0GB 15CH 0GB 16CH 0GB HDD Total capacity:160GB FREE 0GB RETURN: [SETUP/ESC] OK : [SET] ⁄0 Select the camera channel for pre-event recording using the arrows button (C D A B) and assign the disk space to the selected pre-recording area by rotating the jog dial. Repeat this operation to assign disk space to two or more camera channels. Press the SET button after setting. → The confirmation dialog window will be displayed. (→ step 13) Important: It is impossible to select the camera channel to which the pre-recording area on another hard disk (extension unit) is already assigned. [Screenshot 8] The "DETAILED SETUP" menu will be displayed. Digital Disk Recorder HDD DISK MENU WJ-HD300A DISK SETTING METHOD DETAILED SETUP Normal area 119GB Event area 0GB Copy area 0GB Free area 50GB HDD Total capacity:119GB RETURN: [SETUP/ESC] OK : [SET] ⁄1 Select the recording area using the arrows button (A B) and assign the disk space to the selected recording area by rotating the jog dial. Repeat this operation to assign disk space to two or more recording areas. ⁄2 Press the SET button after setting. [Screenshot 9] The confirmation dialog window will be displayed. Digital Disk Recorder HDD DISK MENU WJ-HD300A DISK SETTING METHOD DETAILED SETUP Normal area 110GB Event area Copy area Free area Sta0rGtiBng one (1) di0sGkBformatting. 30GB All of contents in the disk is erased. HDEXDECUATPEACITCYA:1N6C0EGLB RETURN: [SETUP/ESC] OK : [SET] ⁄3 Move the cursor to "EXECUTE" using the arrows button (A B) and press the SET button. → Formatting will start and the "TOP MENU" of the "HDD DISK MENU" will be displayed. 148
-
 1
1 -
2
-
3
-
4
-
5
-
6
-
7
-
8
-
9
-
10
-
11
-
12
-
13
-
14
-
15
-
16
-
17
-
18
-
19
-
20
-
21
-
22
-
23
-
24
-
25
-
26
-
27
-
28
-
29
-
30
-
31
-
32
-
33
-
34
-
35
-
36
-
37
-
38
-
39
-
40
-
41
-
42
-
43
-
44
-
45
-
46
-
47
-
48
-
49
-
50
-
51
-
52
-
53
-
54
-
55
-
56
-
57
-
58
-
59
-
60
-
61
-
62
-
63
-
64
-
65
-
66
-
67
-
68
-
69
-
70
-
71
-
72
-
73
-
74
-
75
-
76
-
77
-
78
-
79
-
80
-
81
-
82
-
83
-
84
-
85
-
86
-
87
-
88
-
89
-
90
-
91
-
92
-
93
-
94
-
95
-
96
-
97
-
98
-
99
-
100
-
101
-
102
-
103
-
104
-
105
-
106
-
107
-
108
-
109
-
110
-
111
-
112
-
113
-
114
-
115
-
116
-
117
-
118
-
119
-
120
-
121
-
122
-
123
-
124
-
125
-
126
-
127
-
128
-
129
-
130
-
131
-
132
-
133
-
134
-
135
-
136
-
137
-
138
-
139
-
140
-
141
-
142
-
 143
143 -
 144
144 -
 145
145 -
 146
146 -
 147
147 -
 148
148 -
 149
149 -
 150
150 -
 151
151 -
 152
152 -
 153
153 -
154
-
155
-
156
-
157
-
158
-
159
-
160
-
161
-
162
-
163
-
164
-
165
-
166
-
167
-
168
-
169
-
170
-
171
-
172
-
173
-
174
-
175
-
176
-
177
-
178
-
179
-
180
-
181
-
182
 |
 |
