Panasonic WJHD316A WJHD309A User Guide - Page 38
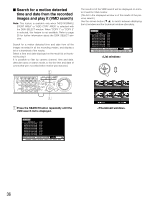
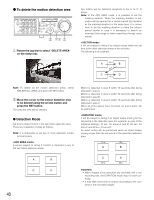
MODE by rotating the jog dial., Press the SET button after selecting VMD
 |
View all Panasonic WJHD316A manuals
Add to My Manuals
Save this manual to your list of manuals |
Page 38 highlights
⁄1 MONITOR1 MONITOR2 R 123 4 STOP PLAY PAUSE REC - REC STOP REV FWD R PAN/ GOTO TILT LAST SEARCH SHIFT SEQ OSD PAN/TILT SETUP 567 8 ZOOM/ A-B SLOW /ESC FOCUS REPEAT - + DISK SELECT COPY TEXT MARK 9 10/0 11 12 IRIS LISTED 1 EL-ZOOM LOGOUT LOGOUT PRESET /AUTO 2 13 14 15 16 SET BUSY m. m,⁄2 ,⁄0⁄2 . Move the cross cursor to the motion detection area to apply the sensitivity using the arrows button (D C A B). 316 m Move the cross cursor using the arrows button to a point to be determined as the end point of the motion detection area. Press the SET button to determine the selected point as the end point of the motion detection area. It is possible to set up to 4 motion detection areas by repeating steps 6 and 7. , Press the SET button after selecting "SENSI- TIVITY" by rotating the jog dial. ⁄0 Select the sensitivity using the jog dial from the following. OFF: Motion will not be detected LOW: Low sensitivity MID: Standard sensitivity HIGH: High sensitivity Note: Depending on the set positions of each motion detection area, the sensitivity parameters for the motion detection areas may be displayed overlapped with each other. ⁄1 After completing the sensitivity settings for the detection areas by repeating steps 9 and 10, press the SETUP/ESC button. ⁄2 Press the SET button after selecting "VMD MODE" by rotating the jog dial. Notes: • Depending on the set positions of the detection areas, the sensitivity indications of the detection areas may be displayed overlapping each other. • Depending on the set position of the detection area, a part of the sensitivity indication of the detection area may not be displayed. 38
-
 1
1 -
2
-
3
-
4
-
5
-
6
-
7
-
8
-
9
-
10
-
11
-
12
-
13
-
14
-
15
-
16
-
17
-
18
-
19
-
20
-
21
-
22
-
23
-
24
-
25
-
26
-
27
-
28
-
29
-
30
-
31
-
32
-
 33
33 -
 34
34 -
 35
35 -
 36
36 -
 37
37 -
 38
38 -
 39
39 -
 40
40 -
 41
41 -
 42
42 -
 43
43 -
44
-
45
-
46
-
47
-
48
-
49
-
50
-
51
-
52
-
53
-
54
-
55
-
56
-
57
-
58
-
59
-
60
-
61
-
62
-
63
-
64
-
65
-
66
-
67
-
68
-
69
-
70
-
71
-
72
-
73
-
74
-
75
-
76
-
77
-
78
-
79
-
80
-
81
-
82
-
83
-
84
-
85
-
86
-
87
-
88
-
89
-
90
-
91
-
92
-
93
-
94
-
95
-
96
-
97
-
98
-
99
-
100
-
101
-
102
-
103
-
104
-
105
-
106
-
107
-
108
-
109
-
110
-
111
-
112
-
113
-
114
-
115
-
116
-
117
-
118
-
119
-
120
-
121
-
122
-
123
-
124
-
125
-
126
-
127
-
128
-
129
-
130
-
131
-
132
-
133
-
134
-
135
-
136
-
137
-
138
-
139
-
140
-
141
-
142
-
143
-
144
-
145
-
146
-
147
-
148
-
149
-
150
-
151
-
152
-
153
-
154
-
155
-
156
-
157
-
158
-
159
-
160
-
161
-
162
-
163
-
164
-
165
-
166
-
167
-
168
-
169
-
170
-
171
-
172
-
173
-
174
-
175
-
176
-
177
-
178
-
179
-
180
-
181
-
182
 |
 |
