Panasonic WJHD316A WJHD309A User Guide - Page 53
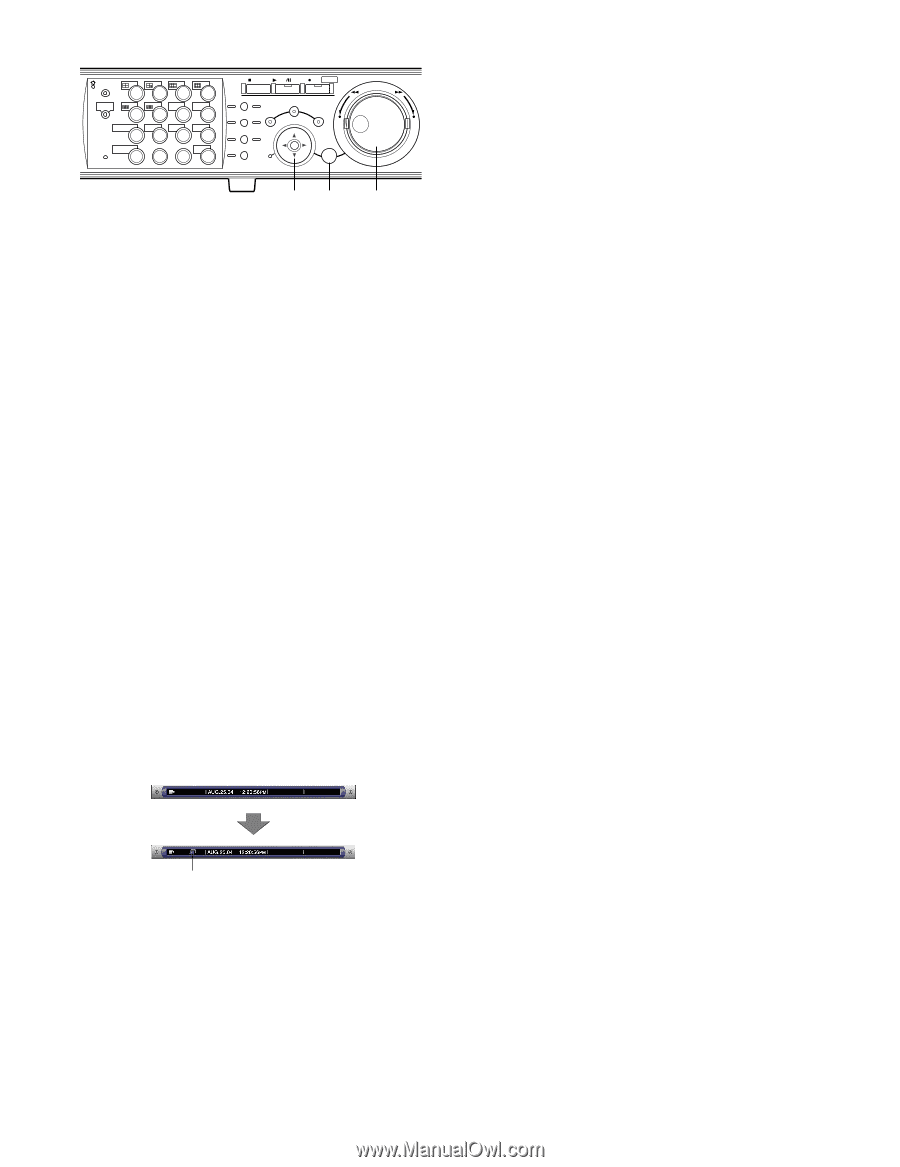
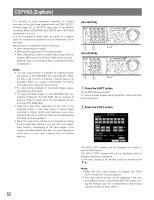
parameter by rotating the jog dial. It is possi, ble to change only the CAMERA parameter set
 |
View all Panasonic WJHD316A manuals
Add to My Manuals
Save this manual to your list of manuals |
Page 53 highlights
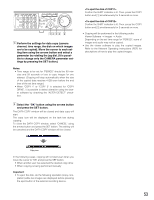
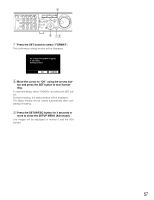
MONITOR1 MONITOR2 R 123 4 STOP PLAY PAUSE REC - REC STOP REV FWD R PAN/ GOTO TILT LAST SEARCH SHIFT SEQ OSD PAN/TILT SETUP 567 8 ZOOM/ A-B SLOW /ESC FOCUS REPEAT - + DISK SELECT COPY TEXT MARK 9 10/0 11 12 IRIS LISTED 1 EL-ZOOM LOGOUT LOGOUT PRESET /AUTO 2 13 14 15 16 SET BUSY cvcv v c Perform the settings for data copy (camera channel, time range, the disk on which images are to be copied). Move the cursor to each setting item using the arrows button and select a parameter by rotating the jog dial. (It is possible to change only the CAMERA parameter settings by pressing the SET button.) Notes: • Time range to be set for "PERIOD" should be 99 minutes and 59 seconds or less to copy images for one attempt. (Copying will stop automatically when the size of the copied data reaches 4 GB even before the end time of the set time range.) • When "COPY 1" or "COPY 2" is selected for "COPY DRIVE", it is possible to detect alteration using the viewer software by checking the "ALTER DETECT" checkbox. Confirm the SHIFT indicator is lit. Then, press the COPY button and [1] simultaneously for 2 seconds or more. Confirm the SHIFT indicator is lit. Then, press the COPY 316 button and [2] simultaneously for 2 seconds or more. • Copying will be performed in the following order: Viewer Software → Images → Audio Depending on the set time range for "PERIOD", some of images and audio may not be copied. • Use the viewer software to play the copied images. Refer to the Network Operating Instructions (PDF) for descriptions of how to play the copied images. v Select the "OK" button using the arrows button and press the SET button. The DATA COPY window will be closed and data copy will start. The copy icon will be displayed on the task bar during copying. To close the DATA COPY window, select "CANCEL" using the arrows button and press the SET button. The setting will be canceled and the DATA COPY window will be closed. Copy icon In the following cases, copying will not start even when you move the cursor to "OK" and press the SET button: • When another user has selected the desired copy drive • When copying is being performed manually Important: • To eject the disk, do the following operation (copy completion) while live images are displayed before pressing the eject button of the external recording device. 53
-
 1
1 -
2
-
3
-
4
-
5
-
6
-
7
-
8
-
9
-
10
-
11
-
12
-
13
-
14
-
15
-
16
-
17
-
18
-
19
-
20
-
21
-
22
-
23
-
24
-
25
-
26
-
27
-
28
-
29
-
30
-
31
-
32
-
33
-
34
-
35
-
36
-
37
-
38
-
39
-
40
-
41
-
42
-
43
-
44
-
45
-
46
-
47
-
 48
48 -
 49
49 -
 50
50 -
 51
51 -
 52
52 -
 53
53 -
 54
54 -
 55
55 -
 56
56 -
 57
57 -
 58
58 -
59
-
60
-
61
-
62
-
63
-
64
-
65
-
66
-
67
-
68
-
69
-
70
-
71
-
72
-
73
-
74
-
75
-
76
-
77
-
78
-
79
-
80
-
81
-
82
-
83
-
84
-
85
-
86
-
87
-
88
-
89
-
90
-
91
-
92
-
93
-
94
-
95
-
96
-
97
-
98
-
99
-
100
-
101
-
102
-
103
-
104
-
105
-
106
-
107
-
108
-
109
-
110
-
111
-
112
-
113
-
114
-
115
-
116
-
117
-
118
-
119
-
120
-
121
-
122
-
123
-
124
-
125
-
126
-
127
-
128
-
129
-
130
-
131
-
132
-
133
-
134
-
135
-
136
-
137
-
138
-
139
-
140
-
141
-
142
-
143
-
144
-
145
-
146
-
147
-
148
-
149
-
150
-
151
-
152
-
153
-
154
-
155
-
156
-
157
-
158
-
159
-
160
-
161
-
162
-
163
-
164
-
165
-
166
-
167
-
168
-
169
-
170
-
171
-
172
-
173
-
174
-
175
-
176
-
177
-
178
-
179
-
180
-
181
-
182
 |
 |