Panasonic WJHD316A WJHD309A User Guide - Page 95
Camera Title Display Position, Live Sequence, 16 only for the WJ-HD316A - wj hd316a pdf
 |
View all Panasonic WJHD316A manuals
Add to My Manuals
Save this manual to your list of manuals |
Page 95 highlights
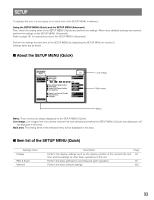
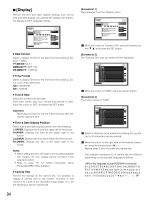
0123456789ABCDEFGHIJKLMNOPQRSTUVW XYZabcdefghijklmnopqrstuvwxyz SP Note: To correct the entered characters, move the cursor to the character to be corrected and press the STOP button to delete it. Enter a correct character after deleting. [Screenshot 4] The camera title is entered. SETUP MENU QuickCamera Title Display REC & Event CAM1 CAM2 CAM3 I I Dat1EeNFTRoArmNCaEt Tim3e Format CAM4I Tim4e & Date Network CAM5 J5AN . 1 . 04 10 : 00 : 00 CAM6 6 CAM7 CAM8 I Tim78e & Date Display Position CAM9I Cam9 era Title CAM10I Cam10era Title Display Position CAM11I Liv1e1Sequence CAM12 12 CCAAMM1134I Sum1134mer Time (Day Light Saving) CAM15I Bee1p5 (Operation) CAM16I Lan1g6uage LIVE MMM.DD.YY 12h PM SET L-UPPER SETUP R-LOWER SETUP AUTO ON ENGLISH Advanced Menu b Press the SETUP/ESC button. → The camera title will be set and the setting window of the camera title will be closed. Note: It is possible to set "Camera Title [Display]" to display a camera title on monitor 2 and "Camera Title [Embedded]" to embed/display a camera title on monitor 1 individually using a PC via a network. Refer to the Network Setup Instruction (PDF) for further information. 8 Camera Title Display Position Select a camera title display position from the following. L-UPPER: Displays a camera title at the upper left of the screen. L-LOWER: Displays a camera title at the lower left of the screen. R-UPPER: Displays a camera title at the upper right of the screen. R-LOWER: Displays a camera title at the lower right of the screen. CENTER: Displays a camera title at the center of the screen. Note: When setting the camera title to be recorded together with images, the camera title display will be embedded in the selected position. Refer to page 111 for further information about "Embedded REC (title)". 8 Live Sequence Perform the settings for the sequential display of live images as follows. [Screenshot 1] Start operation from the "Display" menu. SETUP MENU Quick LIVE Display REC & Event Network I Date Format I Time Format I Time & Date JAN . 1 . 04 10 : 00 : 00 I Time & Date Display Position I Camera Title I Camera Title Display Position I Live Sequence MMM.DD.YY 12h PM SET L-UPPER SETUP R-LOWER SETUP I Summer Time (Day Light Savings) I Beep (Operation) I Language AUTO ON ENGLISH Advanced Menu z Move the cursor to "Live Sequence" using the arrows button (C D) and press the SET button. [Screenshot 2] The "Live Sequence" pop-up menu will be displayed. SETUP MENU Quick Monitor 1 Monitor 2 LIVE STEP CAM PRESET DWELL STEP CAM PRESET DWELL Display 1 I1 Date F--ormat 2s 1 1 --MMM.D2Ds.YY REC & Event 2 3 Network 4 5 6 7 I2 Time F--ormat 2s 2 2 --12h 2s I3 Time &-- Date 2s 3 3 -- 2s 4 5 6 JAN---- . -- 1 22.ss 2s 04 4 5 10 : 0450 : 6 6 00 ----PM -- 2s SET22ss I7 Time &-- Date D2issplay P7osition7 --L-UPPE2Rs 8 I8 Camer--a Title 2s 8 8 -- SETU2sP 9 I9 Camer--a Title D2issplay P9ositio9n 10 11 I1101Live S--e-- quence22ss 10 10 11 11 --R-LOW2EsR --- SETU22ssP 12 12 -- 2s 12 12 13 I13Summ-e-r Time (D2say Ligh1t3Savin1g3) -- 2s --AUTO 2s 14 I14Beep (-O-peration2)s 14 14 --ON 2s 15 I15Langu-a- ge 2s 16 16 -- 2s 15 15 16 16 --ENGLIS2Hs -- 2s Advanced Menu x Move the cursor to "CAM" of "STEP 1" using the arrows button. [Screenshot 3] The cursor moves to "CAM". SETUP MENU Quick Monitor 1 Monitor 2 LIVE STEP CAM PRESET DWELL STEP CAM PRESET DWELL Display 1 I1 Date F--ormat 2s 1 1 --MMM.D2Ds.YY REC & Event 2 3 Network 4 5 6 7 I2 Time F--ormat 2s 2 2 --12h 2s I3 Time &-- Date 2s 3 3 -- 2s 4 5 6 JAN---- . -- 1 22.ss 2s 04 4 5 10 : 0450 : 6 6 00 ----PM -- 2s SET22ss I7 Time &-- Date D2issplay P7osition7 --L-UPPE2Rs 8 I8 Camer--a Title 2s 8 8 -- SETU2sP 9 I9 Camer--a Title D2issplay P9ositio9n 10 11 I1101Live S--e-- quence22ss 10 10 11 11 --R-LOW2EsR --- SETU22ssP 12 12 -- 2s 12 12 13 I13Summ-e-r Time (D2say Ligh1t3Savin1g3) -- 2s --AUTO 2s 14 I14Beep (-O-peration2)s 14 14 --ON 2s 15 I15Langu-a- ge 2s 16 16 -- 2s 15 15 16 16 --ENGLIS2Hs -- 2s Advanced Menu c Select how to display images from camera channels in "STEP 1" from the following by rotating the jog dial. 1, 2, ... , 16: Displays an image from the selected camera channel on a single screen. 1 - 4: Displays images from camera channels 1 - 4 on a 4-split screen. 5 - 8: Displays images from camera channels 5 - 8 on a 4-split screen. 9 - 9 (only for the WJ-HD309A): Displays an image from camera channel 9 on the upper left area on a 4-split screen. 9 - 12 (only for the WJ-HD316A): Displays images from camera channels 9 - 12 on a 4-split screen. 13 - 16 (only for the WJ-HD316A): Displays images from camera channels 13 - 16 on a 4-split screen. 1 - 9: Displays images from camera channels 1 - 9 on a 9-split screen. 95
-
 1
1 -
2
-
3
-
4
-
5
-
6
-
7
-
8
-
9
-
10
-
11
-
12
-
13
-
14
-
15
-
16
-
17
-
18
-
19
-
20
-
21
-
22
-
23
-
24
-
25
-
26
-
27
-
28
-
29
-
30
-
31
-
32
-
33
-
34
-
35
-
36
-
37
-
38
-
39
-
40
-
41
-
42
-
43
-
44
-
45
-
46
-
47
-
48
-
49
-
50
-
51
-
52
-
53
-
54
-
55
-
56
-
57
-
58
-
59
-
60
-
61
-
62
-
63
-
64
-
65
-
66
-
67
-
68
-
69
-
70
-
71
-
72
-
73
-
74
-
75
-
76
-
77
-
78
-
79
-
80
-
81
-
82
-
83
-
84
-
85
-
86
-
87
-
88
-
89
-
 90
90 -
 91
91 -
 92
92 -
 93
93 -
 94
94 -
 95
95 -
 96
96 -
 97
97 -
 98
98 -
 99
99 -
 100
100 -
101
-
102
-
103
-
104
-
105
-
106
-
107
-
108
-
109
-
110
-
111
-
112
-
113
-
114
-
115
-
116
-
117
-
118
-
119
-
120
-
121
-
122
-
123
-
124
-
125
-
126
-
127
-
128
-
129
-
130
-
131
-
132
-
133
-
134
-
135
-
136
-
137
-
138
-
139
-
140
-
141
-
142
-
143
-
144
-
145
-
146
-
147
-
148
-
149
-
150
-
151
-
152
-
153
-
154
-
155
-
156
-
157
-
158
-
159
-
160
-
161
-
162
-
163
-
164
-
165
-
166
-
167
-
168
-
169
-
170
-
171
-
172
-
173
-
174
-
175
-
176
-
177
-
178
-
179
-
180
-
181
-
182
 |
 |
