Panasonic WJHD316A WJHD309A User Guide - Page 57
Press the SETUP/ESC button for 2 seconds or, more to close the SETUP MENU Advanced.
 |
View all Panasonic WJHD316A manuals
Add to My Manuals
Save this manual to your list of manuals |
Page 57 highlights
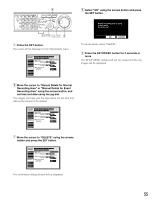
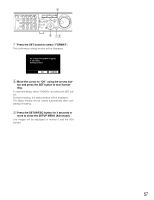
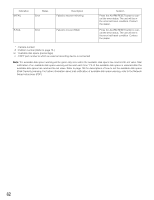
. MONITOR1 MONITOR2 R 123 4 STOP PLAY PAUSE REC - REC STOP REV FWD R PAN/ GOTO TILT LAST SEARCH SHIFT SEQ OSD PAN/TILT SETUP 567 8 ZOOM/ A-B SLOW /ESC FOCUS REPEAT - + DISK SELECT COPY TEXT MARK 9 10/0 11 12 IRIS LISTED 1 EL-ZOOM LOGOUT LOGOUT PRESET /AUTO 2 13 14 15 16 SET BUSY , m, m Press the SET button to select "FORMAT". The confirmation dialog window will be displayed. 316 All of data in the COPY1 is going to be erased. Starting format? OK CANCEL , Move the cursor to "OK" using the arrows but- ton and press the SET button to start formatting. To stop formatting, select "CANCEL" and press the SET button. During formatting, the status window will be displayed. The status window will be closed automatically after completing formatting. . Press the SETUP/ESC button for 2 seconds or more to close the SETUP MENU (Advanced). Live images will be displayed on monitor 2 and the VGA monitor. 57
-
 1
1 -
2
-
3
-
4
-
5
-
6
-
7
-
8
-
9
-
10
-
11
-
12
-
13
-
14
-
15
-
16
-
17
-
18
-
19
-
20
-
21
-
22
-
23
-
24
-
25
-
26
-
27
-
28
-
29
-
30
-
31
-
32
-
33
-
34
-
35
-
36
-
37
-
38
-
39
-
40
-
41
-
42
-
43
-
44
-
45
-
46
-
47
-
48
-
49
-
50
-
51
-
 52
52 -
 53
53 -
 54
54 -
 55
55 -
 56
56 -
 57
57 -
 58
58 -
 59
59 -
 60
60 -
 61
61 -
 62
62 -
63
-
64
-
65
-
66
-
67
-
68
-
69
-
70
-
71
-
72
-
73
-
74
-
75
-
76
-
77
-
78
-
79
-
80
-
81
-
82
-
83
-
84
-
85
-
86
-
87
-
88
-
89
-
90
-
91
-
92
-
93
-
94
-
95
-
96
-
97
-
98
-
99
-
100
-
101
-
102
-
103
-
104
-
105
-
106
-
107
-
108
-
109
-
110
-
111
-
112
-
113
-
114
-
115
-
116
-
117
-
118
-
119
-
120
-
121
-
122
-
123
-
124
-
125
-
126
-
127
-
128
-
129
-
130
-
131
-
132
-
133
-
134
-
135
-
136
-
137
-
138
-
139
-
140
-
141
-
142
-
143
-
144
-
145
-
146
-
147
-
148
-
149
-
150
-
151
-
152
-
153
-
154
-
155
-
156
-
157
-
158
-
159
-
160
-
161
-
162
-
163
-
164
-
165
-
166
-
167
-
168
-
169
-
170
-
171
-
172
-
173
-
174
-
175
-
176
-
177
-
178
-
179
-
180
-
181
-
182
 |
 |
