Panasonic WJHD316A WJHD309A User Guide - Page 99
Power ON Manual REC, VMD Setup, s - 30 s in 1 second intervals/40 s/50 s/1 min, min/3 min/4 min/5 min
 |
View all Panasonic WJHD316A manuals
Add to My Manuals
Save this manual to your list of manuals |
Page 99 highlights
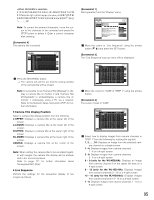
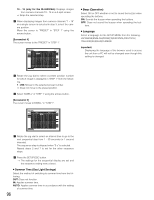
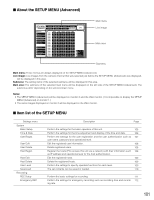
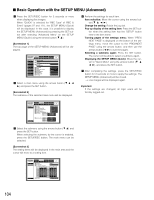
1 s - 30 s (in 1 second intervals)/40 s/50 s/1 min/ 2 min/3 min/4 min/5 min EXT: Alarm output will continue until the ALARM RESET button is pressed. The following are available for "Buzzer" (buzzer sound duration). When OFF is selected, a buzzer will not sound. (s: second, min: minute) 1 s - 30 s (in 1 second intervals)/40 s/50 s/1 min/ 2 min/3 min/4 min/5 min EXT: The buzzer will continue until the ALARM RESET button is pressed. OFF: The buzzer will not sound. c Press the SETUP/ESC button. → The settings for "Alarm Output" and "Buzzer" will be applied and the "Event Setup" pop-up menu will be closed. 8 Power ON Manual REC Select ON or OFF to determine whether or not to start recording when the power is turned on by the connected external timer (or the switch). ON: Manual recording will start automatically after complet- ing the system check. OFF: Manual recording will not start automatically after completing the system check. Important: When ON is selected, manual recording will start automatically after completing the system check. 8 VMD Setup Select ON or OFF to determine whether to enable or disable the motion detection function for each camera channel. When ON is selected, perform the settings for the motion detection area for each camera channel. Up to 4 areas can be set for a camera channel for the detection area. Refer to page 114 for further information about the motion detection function. [Screenshot 1] Start operation from the "REC & Event" menu. SETUP MENU Quick Display REC & Event Network I REC Type I REC Camera I Resolution I Manual REC REC Rate Quality I Event REC REC Rate Quality Time Operation Mode Advanced Menu I Event Setup I Power ON Manual REC I VMD Setup LIVE QUICK SETUP FIELD 30ips / 16CH FQB 30ips / 16CH FQB 30s ALARM SETUP OFF SETUP z Move the cursor to "VMD Setup" using the arrows button (C D) and press the SET button. [Screenshot 2] The "VMD Setup" pop-up menu will be displayed. SETUP MENU Quick Display I REC Type REC & EventVMD Network SCIIeAtRRMuEep1sCoCluatmioOenrFaF CIAMMa2nual REOCN CAMR3EC RaOteFF CAMQ4uality OFF CCCCIAAAAEMMMMvRQ5678eEunCatlRiRtyEaOOOOCteFFFFFFFF Time Operation Mode CAM9 CAM10 CAM11 CAM12 CAM13 CAM14 CAM15 CAM16 Advanced Menu I Event Setup I Power ON Manual REC I VMD Setup LIVE QUICK SETUP OFFFIELD OFF OF3F0ips / 16CH OFFFQB OFF OOFF3FF0ips / 16CH OFFFQB 30s ALARM SETUP OFF SETUP x Select the camera channel to be set by using the arrows button (C D). c Rotate the jog dial to select ON for a desired camera channel for which the motion detection function is to be applied, and press the SET button. [Screenshot 3] The "VMD Area Setup" window will be displayed. v Move the cross cursor to a desired point to be set as the start point of the motion detection area using the arrows button, and press the SET button. Note: To set all areas on the monitor as the motion detection area, select "ALL AREAS" and press the SET button. [Screenshot 4] The start point of the motion detection area is assigned. b Move the cross cursor to a desired point to be set as the end point of the motion detection area using the arrows button (C D A B), and press the SET button. 99
-
 1
1 -
2
-
3
-
4
-
5
-
6
-
7
-
8
-
9
-
10
-
11
-
12
-
13
-
14
-
15
-
16
-
17
-
18
-
19
-
20
-
21
-
22
-
23
-
24
-
25
-
26
-
27
-
28
-
29
-
30
-
31
-
32
-
33
-
34
-
35
-
36
-
37
-
38
-
39
-
40
-
41
-
42
-
43
-
44
-
45
-
46
-
47
-
48
-
49
-
50
-
51
-
52
-
53
-
54
-
55
-
56
-
57
-
58
-
59
-
60
-
61
-
62
-
63
-
64
-
65
-
66
-
67
-
68
-
69
-
70
-
71
-
72
-
73
-
74
-
75
-
76
-
77
-
78
-
79
-
80
-
81
-
82
-
83
-
84
-
85
-
86
-
87
-
88
-
89
-
90
-
91
-
92
-
93
-
 94
94 -
 95
95 -
 96
96 -
 97
97 -
 98
98 -
 99
99 -
 100
100 -
 101
101 -
 102
102 -
 103
103 -
 104
104 -
105
-
106
-
107
-
108
-
109
-
110
-
111
-
112
-
113
-
114
-
115
-
116
-
117
-
118
-
119
-
120
-
121
-
122
-
123
-
124
-
125
-
126
-
127
-
128
-
129
-
130
-
131
-
132
-
133
-
134
-
135
-
136
-
137
-
138
-
139
-
140
-
141
-
142
-
143
-
144
-
145
-
146
-
147
-
148
-
149
-
150
-
151
-
152
-
153
-
154
-
155
-
156
-
157
-
158
-
159
-
160
-
161
-
162
-
163
-
164
-
165
-
166
-
167
-
168
-
169
-
170
-
171
-
172
-
173
-
174
-
175
-
176
-
177
-
178
-
179
-
180
-
181
-
182
 |
 |
