Panasonic WJHD316A WJHD309A User Guide - Page 122
Notes, Screenshot 5], Yellow, Green, Pale purple, Indigo blue
 |
View all Panasonic WJHD316A manuals
Add to My Manuals
Save this manual to your list of manuals |
Page 122 highlights
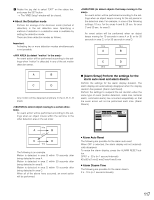
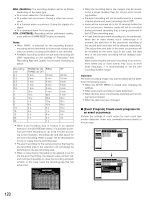
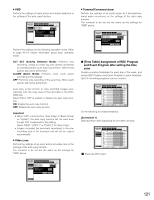
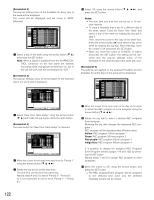
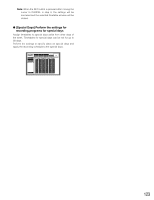
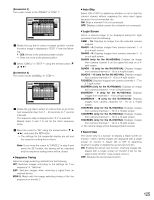
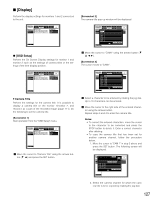
[Screenshot 2] The pop-up setting menu of the timetable for every day of the week will be displayed. The cursor will be displayed and will move to "MON" (Monday). SETUP MENU System Advanced Time Table REC Program Event Program Special Days Switche1r2AM MON REC EVT TUE REC EVT WED REC EVT THU REC EVT FRI REC EVT SAT REC EVT SUN REC EVT DAILY REC EVT EXT REC EVT Recording Displ6aAyM Event Com1m2PM Schedule Main6tePnMance 1L2IAVME Quick Menu OK CANCEL REC PROG1 PROG2 PROG3 PROG4 EVT PROG1 PROG2 PROG3 PROG4 x Select a day of the week using the arrows button (C D) and press the SET button. Note: When a signal is supplied from the ALARM/CONTROL connector on the rear panel the external recording mode changeover terminal (pin no. 24) of the unit will work with the set timetable for "EXT." [Screenshot 3] The pop-up settings menu of the timetable for the selected day of the week will be displayed. SETUP MENU System Recording AdvancedTime TabSwleitc(MheOr N) Display Copy the Other Time Table Time Table New Time Table Setup REC Program Event Program Period 1 Period 2 Period 3 12 : 00 AM 08 : 00 AM 12 : 00 PM Special Days Period 4 01 : 00 PM Period 5 05 : 00 PM Period 6 09 : 00 PM Event Schedule Comm Maintenance TUE 08 : 00 AM 12 : 00 PM 01 : 00 PM 05 : 00 PM 09 : 00 PM 12 : 00 AM O K CANCEL LIVE Quick Menu REC PROG1 PROG2 PROG3 PROG4 EVT PROG1 PROG2 PROG3 PROG4 c Select "New Time Table Setup" using the arrows button (C D) and rotate the jog dial to check the radio button. [Screenshot 4] The radio button for "New Time Table Setup" is checked. SETUP MENU System Recording AdvancedTime TabSwleitc(hMeOr N) Display Copy the Other Time Table Time Table New Time Table Setup REC Program Event Program Period 1 Period 2 Period 3 12 : 00 AM 08 : 00 AM 12 : 00 PM Special Days Period 4 01 : 00 PM Period 5 05 : 00 PM Period 6 09 : 00 PM Event Schedule Comm Maintenance TUE 08 : 00 AM 12 : 00 PM 01 : 00 PM 05 : 00 PM 09 : 00 PM 12 : 00 AM O K CANCEL LIVE Quick Menu REC PROG1 PROG2 PROG3 PROG4 EVT PROG1 PROG2 PROG3 PROG4 v Move the cursor to the start time input box for "Period 1" using the arrows button (C D A B). b Rotate the jog dial to set the start time. The end time can be set in the same way. Repeat steps 4 and 5 to set for "Period 2" - "Period 6". (It is not necessary to set for all of "Period 1" - "Period 6".) n Select OK using the arrows button (C D A B), and press the SET button. Notes: • The start time and end time can be set in 15 minutes intervals. • To copy a timetable that is set for a different day of the week, select "Copy the Other Time Table" and select a day of the week by rotating the jog dial in step 3. Then, move the cursor to the "day of the week" box, press the arrows button (B) and select a day of the week by rotating the jog dial. After selecting, move the cursor to OK and press the SET button. • When you move the cursor to "CANCEL" in step 6 and press the SET button, the setting will be canceled and the pop-up settings menu of the timetable for the selected day of the week will close. [Screenshot 5] The settings are applied to the selected timetable and the timetable for all the days of the week will be displayed. SETUP MENU System Advanced Time Table REC Program Event Program Special Days Switche1r2AM MON REC EVT TUE REC EVT WED REC EVT THU REC EVT FRI REC EVT SAT REC EVT SUN REC EVT DAILY REC EVT EXT REC EVT Recording Displ6aAyM Event Com1m2PM Schedule Main6tePnMance 1L2IAVME Quick Menu OK CANCEL REC PROG1 PROG2 PROG3 PROG4 EVT PROG1 PROG2 PROG3 PROG4 m Move the cursor to the time zone of the day of the week to which the REC program is to be assigned using the arrows button (C D A B). , Rotate the jog dial to select a desired REC program/ Event program. (Rotating the jog dial changes the displayed REC program.) REC program will be displayed with different colors. Yellow: REC program 1/Event program 1 Green: REC program 2/Event program 2 Pale purple: REC program 3/Event program 3 Indigo blue: REC program 4/Event program 4 It is possible to display the assigned REC Program/ Event Program window (pages 119 and 120) by pressing the SET button. Repeat steps 7 and 8 to assign REC program to other timetables. . Move the cursor to OK using the arrows button and press the SET button. → The REC program/Event program will be assigned to the selected time zone and the selected timetable window will be closed. 122
-
 1
1 -
2
-
3
-
4
-
5
-
6
-
7
-
8
-
9
-
10
-
11
-
12
-
13
-
14
-
15
-
16
-
17
-
18
-
19
-
20
-
21
-
22
-
23
-
24
-
25
-
26
-
27
-
28
-
29
-
30
-
31
-
32
-
33
-
34
-
35
-
36
-
37
-
38
-
39
-
40
-
41
-
42
-
43
-
44
-
45
-
46
-
47
-
48
-
49
-
50
-
51
-
52
-
53
-
54
-
55
-
56
-
57
-
58
-
59
-
60
-
61
-
62
-
63
-
64
-
65
-
66
-
67
-
68
-
69
-
70
-
71
-
72
-
73
-
74
-
75
-
76
-
77
-
78
-
79
-
80
-
81
-
82
-
83
-
84
-
85
-
86
-
87
-
88
-
89
-
90
-
91
-
92
-
93
-
94
-
95
-
96
-
97
-
98
-
99
-
100
-
101
-
102
-
103
-
104
-
105
-
106
-
107
-
108
-
109
-
110
-
111
-
112
-
113
-
114
-
115
-
116
-
 117
117 -
 118
118 -
 119
119 -
 120
120 -
 121
121 -
 122
122 -
 123
123 -
 124
124 -
 125
125 -
 126
126 -
 127
127 -
128
-
129
-
130
-
131
-
132
-
133
-
134
-
135
-
136
-
137
-
138
-
139
-
140
-
141
-
142
-
143
-
144
-
145
-
146
-
147
-
148
-
149
-
150
-
151
-
152
-
153
-
154
-
155
-
156
-
157
-
158
-
159
-
160
-
161
-
162
-
163
-
164
-
165
-
166
-
167
-
168
-
169
-
170
-
171
-
172
-
173
-
174
-
175
-
176
-
177
-
178
-
179
-
180
-
181
-
182
 |
 |
