Panasonic WJHD316A WJHD309A User Guide - Page 112
Emergency REC] Perform the settings for, emergency recording, REC Priority, Audio Allocation
 |
View all Panasonic WJHD316A manuals
Add to My Manuals
Save this manual to your list of manuals |
Page 112 highlights
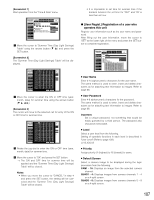
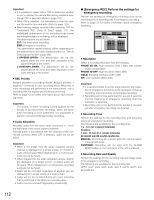
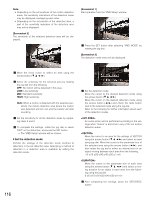
Important: • It is possible to select ON or OFF to determine whether or not to display the camera title during playback even though OFF is selected. (Refer to page 129.) • When ON is selected, it is impossible to hide the camera title and the time and date. (Refer to page 129.) • When playing images recorded after selecting "ON" for "Embedded REC (Time & Date)" (page 111), the embedded abbreviation of the recording mode (event recording/emergency recording) will be displayed. The abbreviations are as follows: EVT: Pre-/post-event recording EMR: Emergency recording The abbreviation display position differs depending on the selected time and date display position for "Time & Date Display Position" (page 129). L-UPPER/R-UPPER: The abbreviation will be displayed below the time and date displayed at the upper left/right of the screen. L-LOWER/R-LOWER: The abbreviation will be displayed above the time and date displayed at the lower left/right of the screen. 8 REC Priority Assigns priorities to recording modes. Assigns priorities 1 (highest) - 3 (lowest) to each recording mode. When two or more recordings are performed in the same period, only a recording with the highest priority will be performed. Refer to page 20 for further information about each recording mode. Important: The priority of event recording will be applied for the priority of pre-/post-event recording. When pre-/postevent recording is to be performed, it is impossible to perform manual recording/schedule recording. 8 Audio Allocation Allocates audio from the audio input connectors (1 - 4) on the rear panel of the unit to camera channels. Allocate audio in accordance with the channels of the connected cameras. When OFF is selected, audio will not be heard. Important: • When a live image from the audio assigned camera channel is displayed on a single screen on monitor 2, audio will be heard. When displaying on a multi-screen, audio will not be heard. • When images from the audio assigned camera channel are displayed on a single screen, recorded audio will be heard. When displaying on a multi-screen, recorded audio will not be heard. • Audio will be recorded regardless of whether you are displaying on a single screen or a multi-screen. • Audio will not be recorded during pre-event recording that is performed in the HDD pre-recording area. • Audio may be recorded fragmentary occasionally. G [Emergency REC] Perform the settings for emergency recording Perform the settings for emergency recording such as the recording time or recording rate for emergency recording. Refer to page 21 for further information about emergency recording. SETUP MENU Advanced System Switcher Recording Display Event Comm Schedule Maintenance LIVE REC Setup Emergency REC Quick Menu I Resolution I Recording Time I Recording Rate and Quality FIELD 10s RATE Quality RATE CAM1 3ips SFA CAM9 3ips CAM2 3ips SFA CAM10 3ips CAM3 3ips SFA CAM11 3ips CAM4 3ips SFA CAM12 3ips CAM5 3ips SFA CAM13 3ips CAM6 3ips SFA CAM14 3ips CAM7 3ips SFA CAM15 3ips CAM8 3ips SFA CAM16 3ips I Auto Copy OFF Quality SFA SFA SFA SFA SFA SFA SFA SFA 8 Resolution Select a recording resolution from the following. FRAME 3D ON: High resolution (720 x 480), with camera shake compensation FRAME 3D OFF: High resolution (720 x 480) FIELD: Standard resolution (720 x 240) SIF: Low resolution (360 x 240) Important: • It is recommended to set the same value for the resolution of emergency recording as the resolution of manual recording, event recording and schedule recording. • Recording will not be performed for around 4 seconds from the beginning of emergency recording when the resolution is switched. • Recording will not be performed for around 4 seconds just after emergency recording has finished. 8 Recording Time Perform the settings for the recording time and recording action for emergency recording. The following are available for the recording time. 1 s - 10 s (in 1 second intervals) 20 s/30 s 1 min - 10 min (in 1 minute intervals) 20 min/30 min/40 min/50 min/60 min MANUAL: Recording will continue while the external switch is being held down. CONTINUE: Recording will not stop until the ALARM RESET button on the front panel of the unit is pressed. 8 Recording Rate and Quality Perform the settings for the recording rate and image quality for emergency recording. The following are available for the recording rate. OFF/1 ips/2 ips/3 ips/5 ips/6 ips/7.5 ips/10 ips/15 ips/ 30 ips/60 ips 112
-
 1
1 -
2
-
3
-
4
-
5
-
6
-
7
-
8
-
9
-
10
-
11
-
12
-
13
-
14
-
15
-
16
-
17
-
18
-
19
-
20
-
21
-
22
-
23
-
24
-
25
-
26
-
27
-
28
-
29
-
30
-
31
-
32
-
33
-
34
-
35
-
36
-
37
-
38
-
39
-
40
-
41
-
42
-
43
-
44
-
45
-
46
-
47
-
48
-
49
-
50
-
51
-
52
-
53
-
54
-
55
-
56
-
57
-
58
-
59
-
60
-
61
-
62
-
63
-
64
-
65
-
66
-
67
-
68
-
69
-
70
-
71
-
72
-
73
-
74
-
75
-
76
-
77
-
78
-
79
-
80
-
81
-
82
-
83
-
84
-
85
-
86
-
87
-
88
-
89
-
90
-
91
-
92
-
93
-
94
-
95
-
96
-
97
-
98
-
99
-
100
-
101
-
102
-
103
-
104
-
105
-
106
-
 107
107 -
 108
108 -
 109
109 -
 110
110 -
 111
111 -
 112
112 -
 113
113 -
 114
114 -
 115
115 -
 116
116 -
 117
117 -
118
-
119
-
120
-
121
-
122
-
123
-
124
-
125
-
126
-
127
-
128
-
129
-
130
-
131
-
132
-
133
-
134
-
135
-
136
-
137
-
138
-
139
-
140
-
141
-
142
-
143
-
144
-
145
-
146
-
147
-
148
-
149
-
150
-
151
-
152
-
153
-
154
-
155
-
156
-
157
-
158
-
159
-
160
-
161
-
162
-
163
-
164
-
165
-
166
-
167
-
168
-
169
-
170
-
171
-
172
-
173
-
174
-
175
-
176
-
177
-
178
-
179
-
180
-
181
-
182
 |
 |
