Panasonic WJHD316A WJHD309A User Guide - Page 97
[REC & Event], Resolution, Manual REC, REC Type, REC Camera
 |
View all Panasonic WJHD316A manuals
Add to My Manuals
Save this manual to your list of manuals |
Page 97 highlights
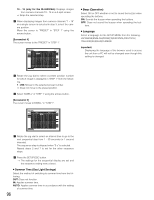
I [REC & Event] Perform the settings for the basic recording and the settings for event actions of each event type (motion detection, video loss, command alarm and terminal alarm.) SETUP MENU Quick Display REC & Event Network I REC Type I REC Camera I Resolution I Manual REC REC Rate Quality I Event REC REC Rate Quality Time Operation Mode Advanced Menu I Event Setup I Power ON Manual REC I VMD Setup LIVE QUICK SETUP FIELD 30ips / 16CH FQB 30ips / 16CH FQB 30s ALARM SETUP OFF SETUP 8 REC Type Select "QUICK" or "ADVANCED" for validation of the recording settings. QUICK: The recording settings set on the SETUP MENU (Quick) will be validated when recording. ADVANCED: The recording settings set on the SETUP MENU (Advanced) will be validated when recording. Note: When "QUICK" is selected for "REC Type" of "REC & Event", the SETUP MENU (Quick) will be displayed by pressing the SETUP/ESC button for 2 seconds or more. When "ADVANCED" is selected for "REC Type" of "REC & Event", the SETUP MENU (Advanced) will be displayed by pressing the SETUP/ESC button for 2 seconds or more. 8 REC Camera Select a camera channel for manual recording/event recording. [Screenshot 1] Start operation from the "REC & Event" menu. SETUP MENU Quick Display REC & Event Network I REC Type I REC Camera I Resolution I Manual REC REC Rate Quality I Event REC REC Rate Quality Time Operation Mode Advanced Menu I Event Setup I Power ON Manual REC I VMD Setup LIVE QUICK SETUP FIELD 30ips / 16CH FQB 30ips / 16CH FQB 30s ALARM SETUP OFF SETUP z Move the cursor to "REC Camera" using the arrows button (C D) and press the SET button. [Screenshot 2] The REC Camera pop-up menu will be displayed. SETUP MENU Quick LIVE Display REC & Event Network I REC Type QUICK I REC Camera SETUP I Resolution IREMCanCuaaml eRrEaC FIELD 1 RQEu2CaliRtyat3e 4 5 6 7 3F80QiBps / 16CH I9Even1t0RE1C1 12 13 14 15 16 REC Rate 30ips / 16CH Quality FQB Time 30s Operation Mode ALARM Advanced Menu I Event Setup I Power ON Manual REC I VMD Setup SETUP OFF SETUP x Select the desired camera channel for manual recording/event recording using the arrows button (C D A B) and rotate the jog dial. It is possible to select a camera channel by pressing a camera channel selection button (1 - 16 for the WJ-HD316A, 1 - 9 for the WJHD309A) on the front panel of the unit. c Press the SETUP/ESC button. → The settings will be applied and the "REC camera" pop-up menu will be closed. 8 Resolution Select a recording resolution from the following. FRAME 3D ON: High resolution (720 x 480), with camera shake compensation FRAME 3D OFF: High resolution (720 x 480) FIELD: Standard resolution (720 x 240) SIF: Low resolution (360 x 240) Recording will not be performed for around 4 seconds when the SETUP MENU (Quick) was closed after changing the settings. Note: It is possible to minimize blurring to record fast moving objects by selecting "FRAME 3D ON". 8 Manual REC Perform the recording rate (REC Rate) and the image quality (Quality) for manual recording. The following are available for the recording rate. OFF/2 ips/3 ips/5 ips/6 ips/7.5 ips/10 ips/15 ips/30 ips/ 60 ips/120 ips Note: The available recording rate differs depending on the selected solution. Resolution FRAME 3D ON/FRAME 3D OFF FIELD SIF Maximum recording rate 30 ips 60 ips 120 ips Note: The camera channel number selected for "REC Camera" will be displayed next to the selected recording rate. 97
-
 1
1 -
2
-
3
-
4
-
5
-
6
-
7
-
8
-
9
-
10
-
11
-
12
-
13
-
14
-
15
-
16
-
17
-
18
-
19
-
20
-
21
-
22
-
23
-
24
-
25
-
26
-
27
-
28
-
29
-
30
-
31
-
32
-
33
-
34
-
35
-
36
-
37
-
38
-
39
-
40
-
41
-
42
-
43
-
44
-
45
-
46
-
47
-
48
-
49
-
50
-
51
-
52
-
53
-
54
-
55
-
56
-
57
-
58
-
59
-
60
-
61
-
62
-
63
-
64
-
65
-
66
-
67
-
68
-
69
-
70
-
71
-
72
-
73
-
74
-
75
-
76
-
77
-
78
-
79
-
80
-
81
-
82
-
83
-
84
-
85
-
86
-
87
-
88
-
89
-
90
-
91
-
 92
92 -
 93
93 -
 94
94 -
 95
95 -
 96
96 -
 97
97 -
 98
98 -
 99
99 -
 100
100 -
 101
101 -
 102
102 -
103
-
104
-
105
-
106
-
107
-
108
-
109
-
110
-
111
-
112
-
113
-
114
-
115
-
116
-
117
-
118
-
119
-
120
-
121
-
122
-
123
-
124
-
125
-
126
-
127
-
128
-
129
-
130
-
131
-
132
-
133
-
134
-
135
-
136
-
137
-
138
-
139
-
140
-
141
-
142
-
143
-
144
-
145
-
146
-
147
-
148
-
149
-
150
-
151
-
152
-
153
-
154
-
155
-
156
-
157
-
158
-
159
-
160
-
161
-
162
-
163
-
164
-
165
-
166
-
167
-
168
-
169
-
170
-
171
-
172
-
173
-
174
-
175
-
176
-
177
-
178
-
179
-
180
-
181
-
182
 |
 |
