Panasonic WJHD316A WJHD309A User Guide - Page 55
Recording Area or Manual Delete for Event, Move the cursor to DELETE using the arrows
 |
View all Panasonic WJHD316A manuals
Add to My Manuals
Save this manual to your list of manuals |
Page 55 highlights
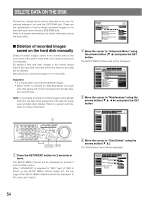
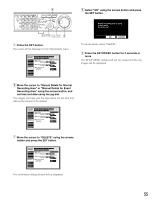
. MONITOR1 MONITOR2 R 123 4 STOP PLAY PAUSE REC - REC STOP REV FWD R PAN/ GOTO TILT LAST SEARCH SHIFT SEQ OSD PAN/TILT SETUP 56 7 8 ZOOM/ A-B SLOW /ESC FOCUS REPEAT - + DISK SELECT COPY TEXT MARK 9 10/0 11 12 IRIS LISTED EL-ZOOM LOGOUT LOGOUT PRESET /AUTO 2 13 14 15 16 SET BUSY nm, bm, n b Press the SET button. The cursor will be displayed on the "Data Delete" menu. SETUP MENU Advanced REC Rate Disk Info Version Info Disk End Mode Disk Capacity Data Delete Event Log Error Log Access Log Quick Menu System Switcher Recording Display Event Comm Schedule Maintenance I Auto Delete OFF I Manual Delete for Normal Recording Area Delete before JAN . 1 . 04 DELETE I Manual Delete for Event Recording Area Delete before JAN . 1 . 04 I Disc Format of DVD DELETE COPY1 (Rear) FORMAT COPY2 (Front) FORMAT LIVE , Select "OK" using the arrows button and press the SET button. Normal recording area is going to be erased. Are you sure? 316 OK CANCEL To cancel delete, select "CANCEL". . Press the SETUP/ESC button for 2 seconds or more. The SETUP MENU (Advanced) will be closed and the live images will be displayed. n Move the cursor to "Manual Delete for Normal Recording Area" or "Manual Delete for Event Recording Area" using the arrows button, and set time and date using the jog dial. The images recorded until the day before the set time and date will be subject to be deleted. SETUP MENU Advanced REC Rate Disk Info Version Info Disk End Mode Disk Capacity Data Delete Event Log Error Log Access Log Quick Menu System Switcher Recording Display Event Comm Schedule Maintenance I Auto Delete OFF I Manual Delete for Normal Recording Area Delete before JAN . 1 . 04 DELETE I Manual Delete for Event Recording Area Delete before JAN . 1 . 04 I Disc Format of DVD DELETE COPY1 (Rear) FORMAT COPY2 (Front) FORMAT LIVE m Move the cursor to "DELETE" using the arrows button and press the SET button. SETUP MENU Advanced REC Rate Disk Info Version Info Disk End Mode Disk Capacity Data Delete Event Log Error Log Access Log Quick Menu System Switcher Recording Display Event Comm Schedule Maintenance I Auto Delete OFF I Manual Delete for Normal Recording Area Delete before JAN . 1 . 04 DELETE I Manual Delete for Event Recording Area Delete before JAN . 1 . 04 I Disc Format of DVD DELETE COPY1 (Rear) FORMAT COPY2 (Front) FORMAT LIVE The confirmation dialog window will be displayed. 55
-
 1
1 -
2
-
3
-
4
-
5
-
6
-
7
-
8
-
9
-
10
-
11
-
12
-
13
-
14
-
15
-
16
-
17
-
18
-
19
-
20
-
21
-
22
-
23
-
24
-
25
-
26
-
27
-
28
-
29
-
30
-
31
-
32
-
33
-
34
-
35
-
36
-
37
-
38
-
39
-
40
-
41
-
42
-
43
-
44
-
45
-
46
-
47
-
48
-
49
-
 50
50 -
 51
51 -
 52
52 -
 53
53 -
 54
54 -
 55
55 -
 56
56 -
 57
57 -
 58
58 -
 59
59 -
 60
60 -
61
-
62
-
63
-
64
-
65
-
66
-
67
-
68
-
69
-
70
-
71
-
72
-
73
-
74
-
75
-
76
-
77
-
78
-
79
-
80
-
81
-
82
-
83
-
84
-
85
-
86
-
87
-
88
-
89
-
90
-
91
-
92
-
93
-
94
-
95
-
96
-
97
-
98
-
99
-
100
-
101
-
102
-
103
-
104
-
105
-
106
-
107
-
108
-
109
-
110
-
111
-
112
-
113
-
114
-
115
-
116
-
117
-
118
-
119
-
120
-
121
-
122
-
123
-
124
-
125
-
126
-
127
-
128
-
129
-
130
-
131
-
132
-
133
-
134
-
135
-
136
-
137
-
138
-
139
-
140
-
141
-
142
-
143
-
144
-
145
-
146
-
147
-
148
-
149
-
150
-
151
-
152
-
153
-
154
-
155
-
156
-
157
-
158
-
159
-
160
-
161
-
162
-
163
-
164
-
165
-
166
-
167
-
168
-
169
-
170
-
171
-
172
-
173
-
174
-
175
-
176
-
177
-
178
-
179
-
180
-
181
-
182
 |
 |
