Dell PowerConnect B-RX16 Installation Guide - Page 115
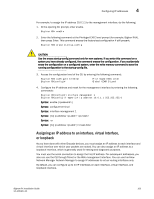
Assigning an IP address to an interface, virtual Interface, or loopback
 |
View all Dell PowerConnect B-RX16 manuals
Add to My Manuals
Save this manual to your list of manuals |
Page 115 highlights
Configuring IP addresses 4 For example, to assign the IP address 10.0.1.1 to the management interface, do the following: 1. At the opening CLI prompt, enter enable. BigIron RX> enable 2. Enter the following command at the Privileged EXEC level prompt (for example, BigIron RX#), then press Enter. This command erases the factory test configuration if still present: BigIron RX# erase startup-config CAUTION Use the erase startup-config command only for new systems. If you enter this command on a system you have already configured, the command erases the configuration. If you accidentally erase the configuration on a configured system, enter the write memory command to save the running configuration to the startup-config file. 3. Access the configuration level of the CLI by entering the following command: BigIron RX# configure terminal BigIron RX(config)# Privileged EXEC Level Global CONFIG Level 4. Configure the IP address and mask for the management interface by entering the following commands: BigIron RX(config)# interface management 1 BigIron RX(config-if-mgmt-1)# ip address 10.0.1.1 255.255.255.0 Syntax: enable [] Syntax: configure terminal Syntax: interface management 1 Syntax: [no] ip address Syntax: or Syntax: [no] ip address / Assigning an IP address to an interface, virtual Interface, or loopback As you have done with other Brocade devices, you must assign an IP address to each interface and virtual interface over which user packets are routed. You can also assign an IP address to a loopback interface, which is generally used for testing and diagnostic purposes. You must use the serial connection to assign the first IP address. For subsequent addresses, you also can use the CLI through Telnet or the Web management interface. You can use IronView Network Manager Network Manager to assign IP addresses to virtual routing interfaces only. By default, you can configure up to 24 IP interfaces on each interface, virtual interface, and loopback interface. BigIron RX Installation Guide 103 53-1001811-01
-
 1
1 -
2
-
3
-
4
-
5
-
6
-
7
-
8
-
9
-
10
-
11
-
12
-
13
-
14
-
15
-
16
-
17
-
18
-
19
-
20
-
21
-
22
-
23
-
24
-
25
-
26
-
27
-
28
-
29
-
30
-
31
-
32
-
33
-
34
-
35
-
36
-
37
-
38
-
39
-
40
-
41
-
42
-
43
-
44
-
45
-
46
-
47
-
48
-
49
-
50
-
51
-
52
-
53
-
54
-
55
-
56
-
57
-
58
-
59
-
60
-
61
-
62
-
63
-
64
-
65
-
66
-
67
-
68
-
69
-
70
-
71
-
72
-
73
-
74
-
75
-
76
-
77
-
78
-
79
-
80
-
81
-
82
-
83
-
84
-
85
-
86
-
87
-
88
-
89
-
90
-
91
-
92
-
93
-
94
-
95
-
96
-
97
-
98
-
99
-
100
-
101
-
102
-
103
-
104
-
105
-
106
-
107
-
108
-
109
-
 110
110 -
 111
111 -
 112
112 -
 113
113 -
 114
114 -
 115
115 -
 116
116 -
 117
117 -
 118
118 -
 119
119 -
 120
120 -
121
-
122
-
123
-
124
-
125
-
126
-
127
-
128
-
129
-
130
-
131
-
132
-
133
-
134
-
135
-
136
-
137
-
138
-
139
-
140
-
141
-
142
-
143
-
144
-
145
-
146
-
147
-
148
-
149
-
150
-
151
-
152
-
153
-
154
-
155
-
156
-
157
-
158
-
159
-
160
-
161
-
162
-
163
-
164
-
165
-
166
-
167
-
168
-
169
-
170
-
171
-
172
-
173
-
174
-
175
-
176
-
177
-
178
-
179
-
180
-
181
-
182
-
183
-
184
-
185
-
186
-
187
-
188
-
189
-
190
-
191
-
192
-
193
-
194
-
195
-
196
-
197
-
198
-
199
-
200
-
201
-
202
-
203
-
204
-
205
-
206
-
207
-
208
-
209
-
210
-
211
-
212
-
213
-
214
-
215
-
216
-
217
-
218
-
219
-
220
-
221
-
222
-
223
-
224
-
225
-
226
-
227
-
228
-
229
-
230
-
231
-
232
-
233
-
234
-
235
-
236
-
237
-
238
-
239
-
240
 |
 |