Dell PowerConnect B-RX16 Installation Guide - Page 74
Installing BigIron RX-32 modules, Using a Redundant Management, Module
 |
View all Dell PowerConnect B-RX16 manuals
Add to My Manuals
Save this manual to your list of manuals |
Page 74 highlights
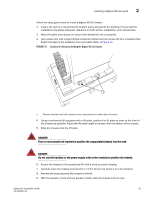
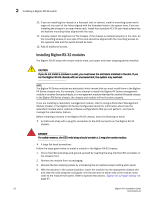
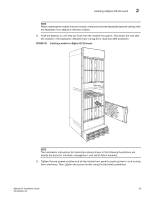
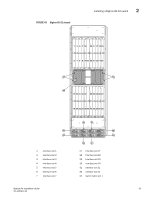
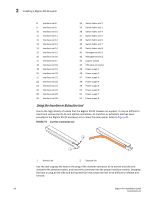
2 Installing a BigIron RX-32 switch 10. If you are installing the chassis in a four-post rack or cabinet, install a mounting screw and a cage nut into each of the holes aligned with the threaded holes in the spacer bars. If you are installing the chassis in an open-frame rack, install four standard #12-24 pan-head screws into the keyhole mounting holes aligned with the rack. 11. Visually inspect the alignment of the chassis. If the chassis is installed properly in the rack, all the mounting screws on one side of the rack should be aligned with the mounting screws on the opposite side and the switch should be level. 12. Add all additional screws. Installing BigIron RX-32 modules The BigIron RX-32 ships with empty module slots, and upper and lower shipping panels installed. CAUTION If you do not install a module in a slot, you must leave the slot blank installed in the slot. If you run the BigIron RX-32 chassis with an uncovered slot, the system may overheat. NOTE The BigIron RX Series modules are dedicated, which means that you must install them in the BigIron RX Series chassis only. For example, if you attempt to install the BigIron RX Series management module in another Brocade chassis or a management module intended for another Brocade chassis in the BigIron RX Series chassis, the chassis and module will not function properly. If you are installing a redundant management module, refer to Using a Redundant Management Module chapter in the BigIron RX Series Configuration Guide for information about how the redundant module works, optional software configurations that you can perform, and how to manage the redundancy feature. Before installing a module in the BigIron RX-32 chassis, have the following on hand: • An ESD wrist strap with a plug for connection to the ESD connector on the BigIron RX-32 chassis. DANGER For safety reasons, the ESD wrist strap should contain a 1 meg ohm series resistor. • A large flat-head screwdriver. Follow the steps given below to install a module in the BigIron RX-32 chassis. 1. Put on the ESD wrist strap and ground yourself by inserting the plug into the ESD connector on the chassis front. 2. Remove the module from its packaging. 3. Remove the two shipping panels by unscrewing the six captive screws holding each panel. 4. With the ejectors in the outward position, insert the module into the appropriate chassis slot and slide the card along the card guide until the ejectors on either side of the module move close to the module front panel. Refer to special instructions, "BigIron RX-32 cable routing" on page 67. 62 BigIron RX Installation Guide 53-1001811-01
-
 1
1 -
2
-
3
-
4
-
5
-
6
-
7
-
8
-
9
-
10
-
11
-
12
-
13
-
14
-
15
-
16
-
17
-
18
-
19
-
20
-
21
-
22
-
23
-
24
-
25
-
26
-
27
-
28
-
29
-
30
-
31
-
32
-
33
-
34
-
35
-
36
-
37
-
38
-
39
-
40
-
41
-
42
-
43
-
44
-
45
-
46
-
47
-
48
-
49
-
50
-
51
-
52
-
53
-
54
-
55
-
56
-
57
-
58
-
59
-
60
-
61
-
62
-
63
-
64
-
65
-
66
-
67
-
68
-
 69
69 -
 70
70 -
 71
71 -
 72
72 -
 73
73 -
 74
74 -
 75
75 -
 76
76 -
 77
77 -
 78
78 -
 79
79 -
80
-
81
-
82
-
83
-
84
-
85
-
86
-
87
-
88
-
89
-
90
-
91
-
92
-
93
-
94
-
95
-
96
-
97
-
98
-
99
-
100
-
101
-
102
-
103
-
104
-
105
-
106
-
107
-
108
-
109
-
110
-
111
-
112
-
113
-
114
-
115
-
116
-
117
-
118
-
119
-
120
-
121
-
122
-
123
-
124
-
125
-
126
-
127
-
128
-
129
-
130
-
131
-
132
-
133
-
134
-
135
-
136
-
137
-
138
-
139
-
140
-
141
-
142
-
143
-
144
-
145
-
146
-
147
-
148
-
149
-
150
-
151
-
152
-
153
-
154
-
155
-
156
-
157
-
158
-
159
-
160
-
161
-
162
-
163
-
164
-
165
-
166
-
167
-
168
-
169
-
170
-
171
-
172
-
173
-
174
-
175
-
176
-
177
-
178
-
179
-
180
-
181
-
182
-
183
-
184
-
185
-
186
-
187
-
188
-
189
-
190
-
191
-
192
-
193
-
194
-
195
-
196
-
197
-
198
-
199
-
200
-
201
-
202
-
203
-
204
-
205
-
206
-
207
-
208
-
209
-
210
-
211
-
212
-
213
-
214
-
215
-
216
-
217
-
218
-
219
-
220
-
221
-
222
-
223
-
224
-
225
-
226
-
227
-
228
-
229
-
230
-
231
-
232
-
233
-
234
-
235
-
236
-
237
-
238
-
239
-
240
 |
 |