Dell PowerConnect B-RX16 Installation Guide - Page 42
Chassis lifting guidelines for BigIron RX-4 switches, Installing a BigIron RX-4 chassis in a rack
 |
View all Dell PowerConnect B-RX16 manuals
Add to My Manuals
Save this manual to your list of manuals |
Page 42 highlights
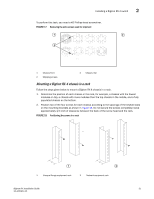
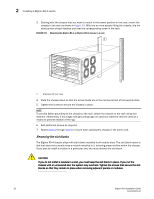
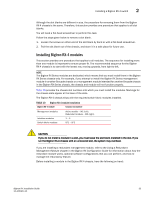
2 Installing a BigIron RX-4 switch Chassis lifting guidelines for BigIron RX-4 switches DANGER A fully-populated BigIron RX-4, chassis is heavy. TWO OR MORE PEOPLE ARE REQUIRED WHEN LIFTING, HANDLING, OR MOUNTING THESE DEVICES. Follow these guidelines for lifting and moving a BigIron RX-4 chassis: • Before lifting or moving the switch, disconnect all external cables. Installing a BigIron RX-4 chassis in a rack This section describes the following tasks: • "Preparing to mount a BigIron RX-4 chassis in a rack" • "Removing BigIron RX-4 extra shipment screws" • "Mounting a BigIron RX-4 chassis in a rack" • "Removing the slot blanks" Preparing to mount a BigIron RX-4 chassis in a rack Because of the weight of a fully loaded BigIron RX-4 chassis, Brocade recommends mounting a chassis in a rack before installing the modules and AC power supplies if necessary. In a standard 19-inch (EIA310-D) rack, you can install up to ten BigIron RX-4 chassis. For each BigIron RX-4 chassis that you install in a rack, you must provide four standard #12-24 pan-head screws with which to mount and secure the chassis. Before performing this task, you should have an assembled rack and a #2 Phillips-head screwdriver. Removing BigIron RX-4 extra shipment screws The BigIron RX-4 ships with two extra screws installed in the right side of the chassis. These screws secure the fan tray, protecting it from damage during shipment. You must remove these screws before installing the chassis. Figure 17 shows the location of the screws. 30 BigIron RX Installation Guide 53-1001811-01
-
 1
1 -
2
-
3
-
4
-
5
-
6
-
7
-
8
-
9
-
10
-
11
-
12
-
13
-
14
-
15
-
16
-
17
-
18
-
19
-
20
-
21
-
22
-
23
-
24
-
25
-
26
-
27
-
28
-
29
-
30
-
31
-
32
-
33
-
34
-
35
-
36
-
 37
37 -
 38
38 -
 39
39 -
 40
40 -
 41
41 -
 42
42 -
 43
43 -
 44
44 -
 45
45 -
 46
46 -
 47
47 -
48
-
49
-
50
-
51
-
52
-
53
-
54
-
55
-
56
-
57
-
58
-
59
-
60
-
61
-
62
-
63
-
64
-
65
-
66
-
67
-
68
-
69
-
70
-
71
-
72
-
73
-
74
-
75
-
76
-
77
-
78
-
79
-
80
-
81
-
82
-
83
-
84
-
85
-
86
-
87
-
88
-
89
-
90
-
91
-
92
-
93
-
94
-
95
-
96
-
97
-
98
-
99
-
100
-
101
-
102
-
103
-
104
-
105
-
106
-
107
-
108
-
109
-
110
-
111
-
112
-
113
-
114
-
115
-
116
-
117
-
118
-
119
-
120
-
121
-
122
-
123
-
124
-
125
-
126
-
127
-
128
-
129
-
130
-
131
-
132
-
133
-
134
-
135
-
136
-
137
-
138
-
139
-
140
-
141
-
142
-
143
-
144
-
145
-
146
-
147
-
148
-
149
-
150
-
151
-
152
-
153
-
154
-
155
-
156
-
157
-
158
-
159
-
160
-
161
-
162
-
163
-
164
-
165
-
166
-
167
-
168
-
169
-
170
-
171
-
172
-
173
-
174
-
175
-
176
-
177
-
178
-
179
-
180
-
181
-
182
-
183
-
184
-
185
-
186
-
187
-
188
-
189
-
190
-
191
-
192
-
193
-
194
-
195
-
196
-
197
-
198
-
199
-
200
-
201
-
202
-
203
-
204
-
205
-
206
-
207
-
208
-
209
-
210
-
211
-
212
-
213
-
214
-
215
-
216
-
217
-
218
-
219
-
220
-
221
-
222
-
223
-
224
-
225
-
226
-
227
-
228
-
229
-
230
-
231
-
232
-
233
-
234
-
235
-
236
-
237
-
238
-
239
-
240
 |
 |