Dell PowerConnect B-RX16 Installation Guide - Page 89
Connecting AC power to a BigIron RX-32 chassis, Final steps, Attaching a management station
 |
View all Dell PowerConnect B-RX16 manuals
Add to My Manuals
Save this manual to your list of manuals |
Page 89 highlights
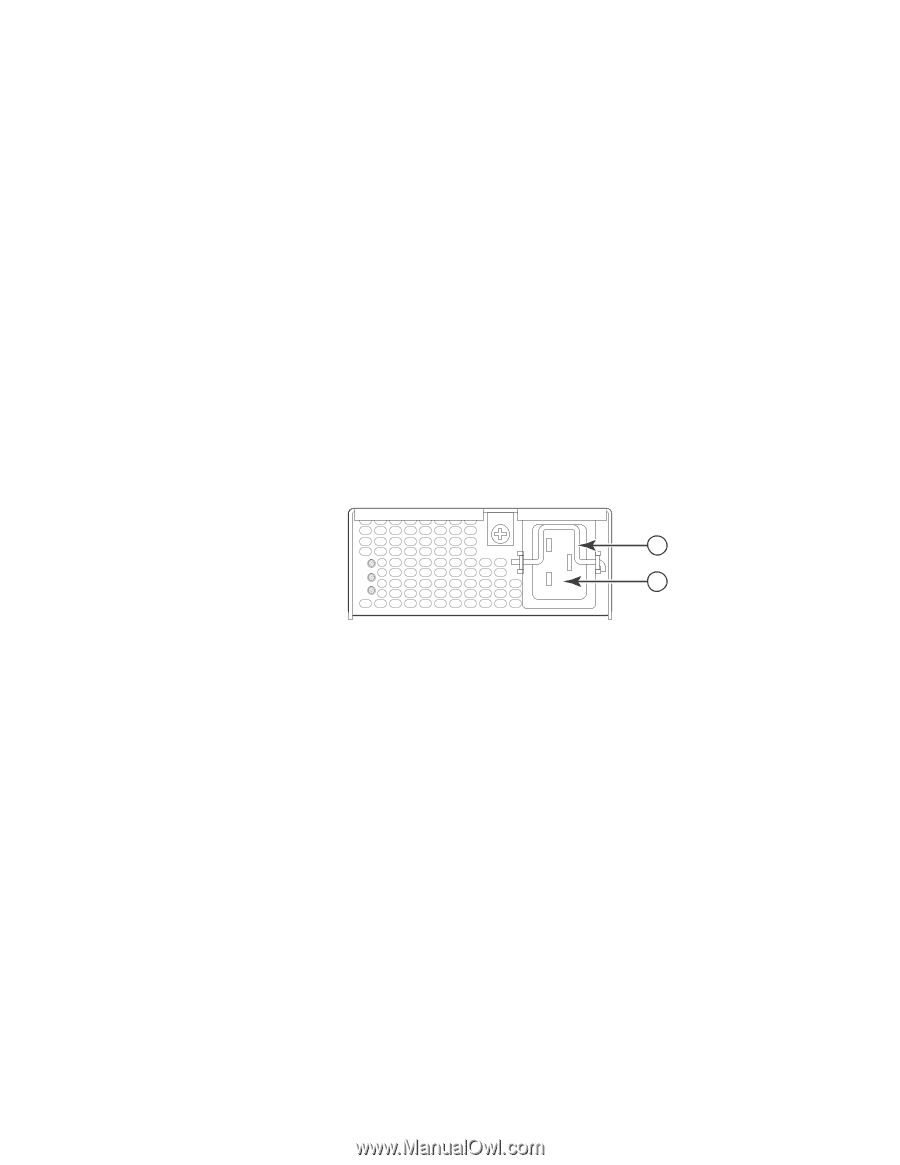
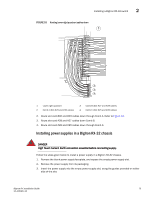
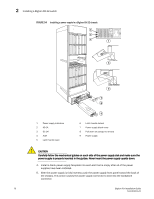
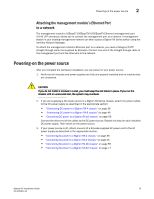
Attaching a management station 2 6. Gently pull the release latch on the power supply front panel upward and toward the top of the power supply front panel. This action locks the power supply in place. 7. For information about connecting power to the chassis, refer to "Connecting AC power to a BigIron RX-32 chassis" on page 77. 8. For information about powering on the system, refer to "Powering-on the power source" on page 79. Connecting AC power to a BigIron RX-32 chassis AC power is supplied through an AC power cord that is installed in the front of each power supply in the BigIron RX-32 chassis. 1. At the front of the BigIron RX-32 chassis, locate the power receptacle on the front panel of each power supply that has been installed. Refer to Figure 55. 2. Lift the cord retainer and connect a Brocade-supplied AC power cord to the power supply. 3. Snap the cord retainer over the power plug to hold it in place. FIGURE 55 BigIron RX-32 power supply receptacle and cord retainer 1 AC OK DC OK 2 ALM 1 Cord retainer 2 Power receptacle Final steps You should complete the final step in the order in which they are listed: • "Attaching a management station" • "Powering-on the power source" • "Verifying proper operation" Attaching a management station You can manage the BigIron RX Series system in the following ways: • You can connect a PC or terminal to the management module's serial (Console) port for a direct connection. From this interface, you can configure the 10BaseT/100BaseTX/1000BaseTX Ethernet (management) port with an IP address and either Telnet or SSH. This enables you to manage the device through the 10BaseT/100BaseTX/1000BaseTX Ethernet (management) port using either Telnet or SSH. BigIron RX Installation Guide 77 53-1001811-01
-
 1
1 -
2
-
3
-
4
-
5
-
6
-
7
-
8
-
9
-
10
-
11
-
12
-
13
-
14
-
15
-
16
-
17
-
18
-
19
-
20
-
21
-
22
-
23
-
24
-
25
-
26
-
27
-
28
-
29
-
30
-
31
-
32
-
33
-
34
-
35
-
36
-
37
-
38
-
39
-
40
-
41
-
42
-
43
-
44
-
45
-
46
-
47
-
48
-
49
-
50
-
51
-
52
-
53
-
54
-
55
-
56
-
57
-
58
-
59
-
60
-
61
-
62
-
63
-
64
-
65
-
66
-
67
-
68
-
69
-
70
-
71
-
72
-
73
-
74
-
75
-
76
-
77
-
78
-
79
-
80
-
81
-
82
-
83
-
 84
84 -
 85
85 -
 86
86 -
 87
87 -
 88
88 -
 89
89 -
 90
90 -
 91
91 -
 92
92 -
 93
93 -
 94
94 -
95
-
96
-
97
-
98
-
99
-
100
-
101
-
102
-
103
-
104
-
105
-
106
-
107
-
108
-
109
-
110
-
111
-
112
-
113
-
114
-
115
-
116
-
117
-
118
-
119
-
120
-
121
-
122
-
123
-
124
-
125
-
126
-
127
-
128
-
129
-
130
-
131
-
132
-
133
-
134
-
135
-
136
-
137
-
138
-
139
-
140
-
141
-
142
-
143
-
144
-
145
-
146
-
147
-
148
-
149
-
150
-
151
-
152
-
153
-
154
-
155
-
156
-
157
-
158
-
159
-
160
-
161
-
162
-
163
-
164
-
165
-
166
-
167
-
168
-
169
-
170
-
171
-
172
-
173
-
174
-
175
-
176
-
177
-
178
-
179
-
180
-
181
-
182
-
183
-
184
-
185
-
186
-
187
-
188
-
189
-
190
-
191
-
192
-
193
-
194
-
195
-
196
-
197
-
198
-
199
-
200
-
201
-
202
-
203
-
204
-
205
-
206
-
207
-
208
-
209
-
210
-
211
-
212
-
213
-
214
-
215
-
216
-
217
-
218
-
219
-
220
-
221
-
222
-
223
-
224
-
225
-
226
-
227
-
228
-
229
-
230
-
231
-
232
-
233
-
234
-
235
-
236
-
237
-
238
-
239
-
240
 |
 |