Dell PowerConnect B-RX16 Installation Guide - Page 60
Unpacking a BigIron RX-16 switch, Chassis lifting guidelines for BigIron RX-16 switches
 |
View all Dell PowerConnect B-RX16 manuals
Add to My Manuals
Save this manual to your list of manuals |
Page 60 highlights
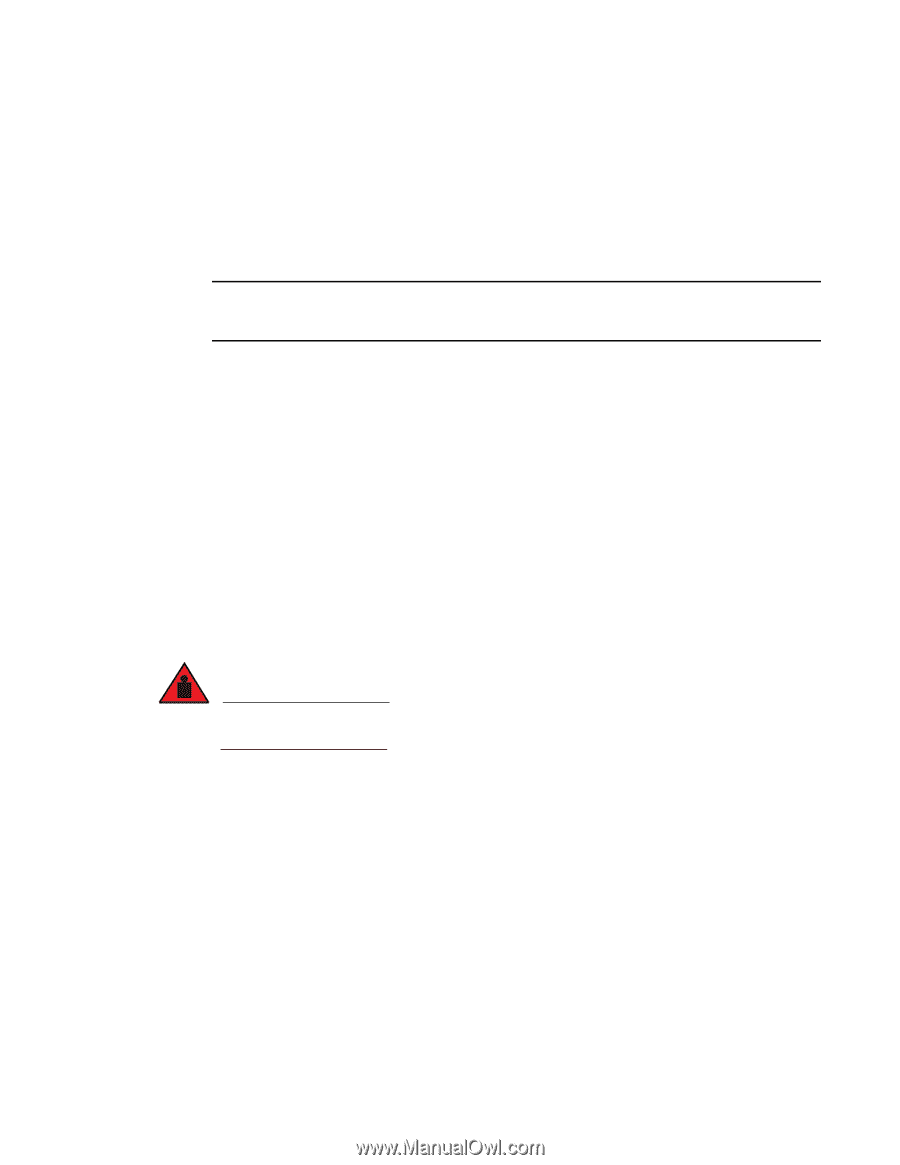
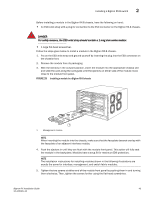
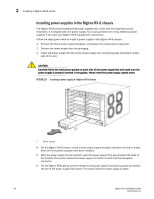
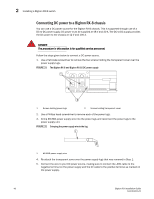
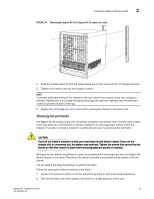
2 Installing a BigIron RX-16 switch Unpacking a BigIron RX-16 switch The BigIron RX-16 switch ships with several items. Review the list below, and verify the contents. If any items are missing, contact the place of purchase: • BigIron RX-16 chassis with the appropriate number of switch fabric modules already installed in the slot marked SF and a slot blank installed in all other module slots. • Rack mount kit, including two L-shaped brackets and mounting screws. NOTE You must provide standard #12-24 pan-head screws for mounting the BigIron RX Series chassis into a rack. • CD-ROM containing software images and the user documentation (including this guide). • Warranty card. • A 115V AC power cable for each AC power supply you purchase from Brocade. Follow the steps given below to unpack a BigIron RX-16 chassis. 1. Move the pallet to a staging area as close to the installation site as possible. 2. Position the shipping carton with the arrows pointing up. 3. Remove the strap that secures the shipping carton to the pallet. 4. Remove the plastic cover and shipping carton. 5. Save the shipping carton, pallet, and packing materials in case you need to move or ship the chassis at a later time. Chassis lifting guidelines for BigIron RX-16 switches DANGER A fully-populated BigIron RX-16 chassis is heavy. TWO OR MORE PEOPLE ARE REQUIRED WHEN LIFTING, HANDLING, OR MOUNTING THESE DEVICES. Follow these guidelines for lifting and moving a BigIron RX-16 chassis switch: • Before lifting or moving the switch, disconnect all external cables. • Do not attempt to lift a fully configured switch by yourself. Using a mechanical lift to maneuver the switch into a rack is recommended. If a lift cannot be used, a minimum of four people must lift the switch, and you must remove components from the chassis before lifting. 48 BigIron RX Installation Guide 53-1001811-01
-
 1
1 -
2
-
3
-
4
-
5
-
6
-
7
-
8
-
9
-
10
-
11
-
12
-
13
-
14
-
15
-
16
-
17
-
18
-
19
-
20
-
21
-
22
-
23
-
24
-
25
-
26
-
27
-
28
-
29
-
30
-
31
-
32
-
33
-
34
-
35
-
36
-
37
-
38
-
39
-
40
-
41
-
42
-
43
-
44
-
45
-
46
-
47
-
48
-
49
-
50
-
51
-
52
-
53
-
54
-
 55
55 -
 56
56 -
 57
57 -
 58
58 -
 59
59 -
 60
60 -
 61
61 -
 62
62 -
 63
63 -
 64
64 -
 65
65 -
66
-
67
-
68
-
69
-
70
-
71
-
72
-
73
-
74
-
75
-
76
-
77
-
78
-
79
-
80
-
81
-
82
-
83
-
84
-
85
-
86
-
87
-
88
-
89
-
90
-
91
-
92
-
93
-
94
-
95
-
96
-
97
-
98
-
99
-
100
-
101
-
102
-
103
-
104
-
105
-
106
-
107
-
108
-
109
-
110
-
111
-
112
-
113
-
114
-
115
-
116
-
117
-
118
-
119
-
120
-
121
-
122
-
123
-
124
-
125
-
126
-
127
-
128
-
129
-
130
-
131
-
132
-
133
-
134
-
135
-
136
-
137
-
138
-
139
-
140
-
141
-
142
-
143
-
144
-
145
-
146
-
147
-
148
-
149
-
150
-
151
-
152
-
153
-
154
-
155
-
156
-
157
-
158
-
159
-
160
-
161
-
162
-
163
-
164
-
165
-
166
-
167
-
168
-
169
-
170
-
171
-
172
-
173
-
174
-
175
-
176
-
177
-
178
-
179
-
180
-
181
-
182
-
183
-
184
-
185
-
186
-
187
-
188
-
189
-
190
-
191
-
192
-
193
-
194
-
195
-
196
-
197
-
198
-
199
-
200
-
201
-
202
-
203
-
204
-
205
-
206
-
207
-
208
-
209
-
210
-
211
-
212
-
213
-
214
-
215
-
216
-
217
-
218
-
219
-
220
-
221
-
222
-
223
-
224
-
225
-
226
-
227
-
228
-
229
-
230
-
231
-
232
-
233
-
234
-
235
-
236
-
237
-
238
-
239
-
240
 |
 |