Dell PowerConnect B-RX16 Installation Guide - Page 61
Installing a BigIron RX-16 chassis in a rack, Attaching mounting brackets to a BigIron RX-16 chassis
 |
View all Dell PowerConnect B-RX16 manuals
Add to My Manuals
Save this manual to your list of manuals |
Page 61 highlights
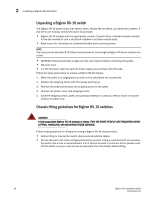
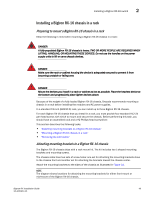
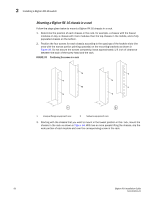
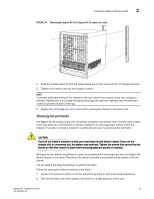
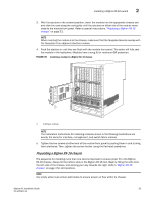
Installing a BigIron RX-16 switch 2 Installing a BigIron RX-16 chassis in a rack Preparing to mount a BigIron RX-16 chassis in a rack Keep the following in mind when mounting a BigIron RX-16 chassis in a rack: DANGER A fully-populated BigIron RX-16 chassis is heavy. TWO OR MORE PEOPLE ARE REQUIRED WHEN LIFTING, HANDLING, OR MOUNTING THESE DEVICES. Do not use the handles on the power supply units to lift or carry chassis devices. DANGER Make sure the rack or cabinet housing the device is adequately secured to prevent it from becoming unstable or falling over. DANGER Mount the devices you install in a rack or cabinet as low as possible. Place the heaviest device at the bottom and progressively place lighter devices above. Because of the weight of a fully loaded BigIron RX-16 chassis, Brocade recommends mounting a chassis in a rack before installing the modules and AC power supplies. In a standard 19-inch (EIA310-D) rack, you can install up to three BigIron RX-16 chassis. For each BigIron RX-16 chassis that you install in a rack, you must provide four standard #12-24 pan-head screws with which to mount and secure the chassis. Before performing this task, you should have an assembled rack and a #2 Phillips-head screwdriver. This section describes the following tasks: • "Attaching mounting brackets to a BigIron RX-16 chassis" • "Mounting a BigIron RX-16 chassis in a rack" • "Removing the slot blanks" Attaching mounting brackets to a BigIron RX-16 chassis The BigIron RX-16 chassis ships with a rack mount kit. The kit includes two L-shaped mounting brackets and mounting screws. The chassis sides have two sets of screw holes: one set for attaching the mounting brackets close to the chassis front and another set for attaching the brackets toward the chassis center. Attach the mounting brackets to the sides of the chassis as illustrated in Figure 33. NOTE The diagram shows locations for attaching the mounting brackets for either front-mount or mid-mount of the BigIron RX-16 chassis. BigIron RX Installation Guide 49 53-1001811-01
-
 1
1 -
2
-
3
-
4
-
5
-
6
-
7
-
8
-
9
-
10
-
11
-
12
-
13
-
14
-
15
-
16
-
17
-
18
-
19
-
20
-
21
-
22
-
23
-
24
-
25
-
26
-
27
-
28
-
29
-
30
-
31
-
32
-
33
-
34
-
35
-
36
-
37
-
38
-
39
-
40
-
41
-
42
-
43
-
44
-
45
-
46
-
47
-
48
-
49
-
50
-
51
-
52
-
53
-
54
-
55
-
 56
56 -
 57
57 -
 58
58 -
 59
59 -
 60
60 -
 61
61 -
 62
62 -
 63
63 -
 64
64 -
 65
65 -
 66
66 -
67
-
68
-
69
-
70
-
71
-
72
-
73
-
74
-
75
-
76
-
77
-
78
-
79
-
80
-
81
-
82
-
83
-
84
-
85
-
86
-
87
-
88
-
89
-
90
-
91
-
92
-
93
-
94
-
95
-
96
-
97
-
98
-
99
-
100
-
101
-
102
-
103
-
104
-
105
-
106
-
107
-
108
-
109
-
110
-
111
-
112
-
113
-
114
-
115
-
116
-
117
-
118
-
119
-
120
-
121
-
122
-
123
-
124
-
125
-
126
-
127
-
128
-
129
-
130
-
131
-
132
-
133
-
134
-
135
-
136
-
137
-
138
-
139
-
140
-
141
-
142
-
143
-
144
-
145
-
146
-
147
-
148
-
149
-
150
-
151
-
152
-
153
-
154
-
155
-
156
-
157
-
158
-
159
-
160
-
161
-
162
-
163
-
164
-
165
-
166
-
167
-
168
-
169
-
170
-
171
-
172
-
173
-
174
-
175
-
176
-
177
-
178
-
179
-
180
-
181
-
182
-
183
-
184
-
185
-
186
-
187
-
188
-
189
-
190
-
191
-
192
-
193
-
194
-
195
-
196
-
197
-
198
-
199
-
200
-
201
-
202
-
203
-
204
-
205
-
206
-
207
-
208
-
209
-
210
-
211
-
212
-
213
-
214
-
215
-
216
-
217
-
218
-
219
-
220
-
221
-
222
-
223
-
224
-
225
-
226
-
227
-
228
-
229
-
230
-
231
-
232
-
233
-
234
-
235
-
236
-
237
-
238
-
239
-
240
 |
 |