Dell PowerConnect B-RX16 Installation Guide - Page 73
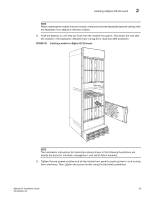
Secure the chassis to the mechanical lift with a strap to prevent tipping.
 |
View all Dell PowerConnect B-RX16 manuals
Add to My Manuals
Save this manual to your list of manuals |
Page 73 highlights
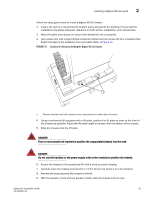
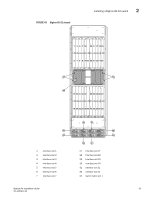
Installing a BigIron RX-32 switch 2 Follow the steps given below to install a BigIron RX-32 chassis. 1. Ensure the rack is in its permanent location and is secured to the building. Ensure that the installation site allows adequate clearance for both airflow, installation, and maintenance. 2. Move the pallet and chassis as close to the installation site as possible. 3. Use a power drill with a large Phillips screwdriver attachment to remove the four L-brackets that attach the base of the chassis to the inner pallet. Refer to Figure 41. FIGURE 41 Location of L-Brackets holding the BigIron RX-32 chassis 1 1 Remove brackets that hold chassis to base (two brackets on either side of chassis) 4. Using a mechanical lift equipped with a lift plate, position the lift plate as close to the front of the chassis as possible. Adjust the lift plate height to be even with the bottom of the chassis. 5. Slide the chassis onto the lift plate. DANGER Four or more people are required to position the unpopulated chassis into the rack. DANGER Do not use the handles on the power supply units or fan modules to position the chassis. 6. Secure the chassis to the mechanical lift with a strap to prevent tipping. 7. Carefully move the chassis and position it in front of the rack where it is to be installed. 8. Remove the strap securing the chassis to the lift. 9. With two people in front and two people in back, slide the chassis into the rack. BigIron RX Installation Guide 61 53-1001811-01
-
 1
1 -
2
-
3
-
4
-
5
-
6
-
7
-
8
-
9
-
10
-
11
-
12
-
13
-
14
-
15
-
16
-
17
-
18
-
19
-
20
-
21
-
22
-
23
-
24
-
25
-
26
-
27
-
28
-
29
-
30
-
31
-
32
-
33
-
34
-
35
-
36
-
37
-
38
-
39
-
40
-
41
-
42
-
43
-
44
-
45
-
46
-
47
-
48
-
49
-
50
-
51
-
52
-
53
-
54
-
55
-
56
-
57
-
58
-
59
-
60
-
61
-
62
-
63
-
64
-
65
-
66
-
67
-
 68
68 -
 69
69 -
 70
70 -
 71
71 -
 72
72 -
 73
73 -
 74
74 -
 75
75 -
 76
76 -
 77
77 -
 78
78 -
79
-
80
-
81
-
82
-
83
-
84
-
85
-
86
-
87
-
88
-
89
-
90
-
91
-
92
-
93
-
94
-
95
-
96
-
97
-
98
-
99
-
100
-
101
-
102
-
103
-
104
-
105
-
106
-
107
-
108
-
109
-
110
-
111
-
112
-
113
-
114
-
115
-
116
-
117
-
118
-
119
-
120
-
121
-
122
-
123
-
124
-
125
-
126
-
127
-
128
-
129
-
130
-
131
-
132
-
133
-
134
-
135
-
136
-
137
-
138
-
139
-
140
-
141
-
142
-
143
-
144
-
145
-
146
-
147
-
148
-
149
-
150
-
151
-
152
-
153
-
154
-
155
-
156
-
157
-
158
-
159
-
160
-
161
-
162
-
163
-
164
-
165
-
166
-
167
-
168
-
169
-
170
-
171
-
172
-
173
-
174
-
175
-
176
-
177
-
178
-
179
-
180
-
181
-
182
-
183
-
184
-
185
-
186
-
187
-
188
-
189
-
190
-
191
-
192
-
193
-
194
-
195
-
196
-
197
-
198
-
199
-
200
-
201
-
202
-
203
-
204
-
205
-
206
-
207
-
208
-
209
-
210
-
211
-
212
-
213
-
214
-
215
-
216
-
217
-
218
-
219
-
220
-
221
-
222
-
223
-
224
-
225
-
226
-
227
-
228
-
229
-
230
-
231
-
232
-
233
-
234
-
235
-
236
-
237
-
238
-
239
-
240
 |
 |