Dell PowerConnect B-RX16 Installation Guide - Page 44
Removing the slot blanks,
 |
View all Dell PowerConnect B-RX16 manuals
Add to My Manuals
Save this manual to your list of manuals |
Page 44 highlights
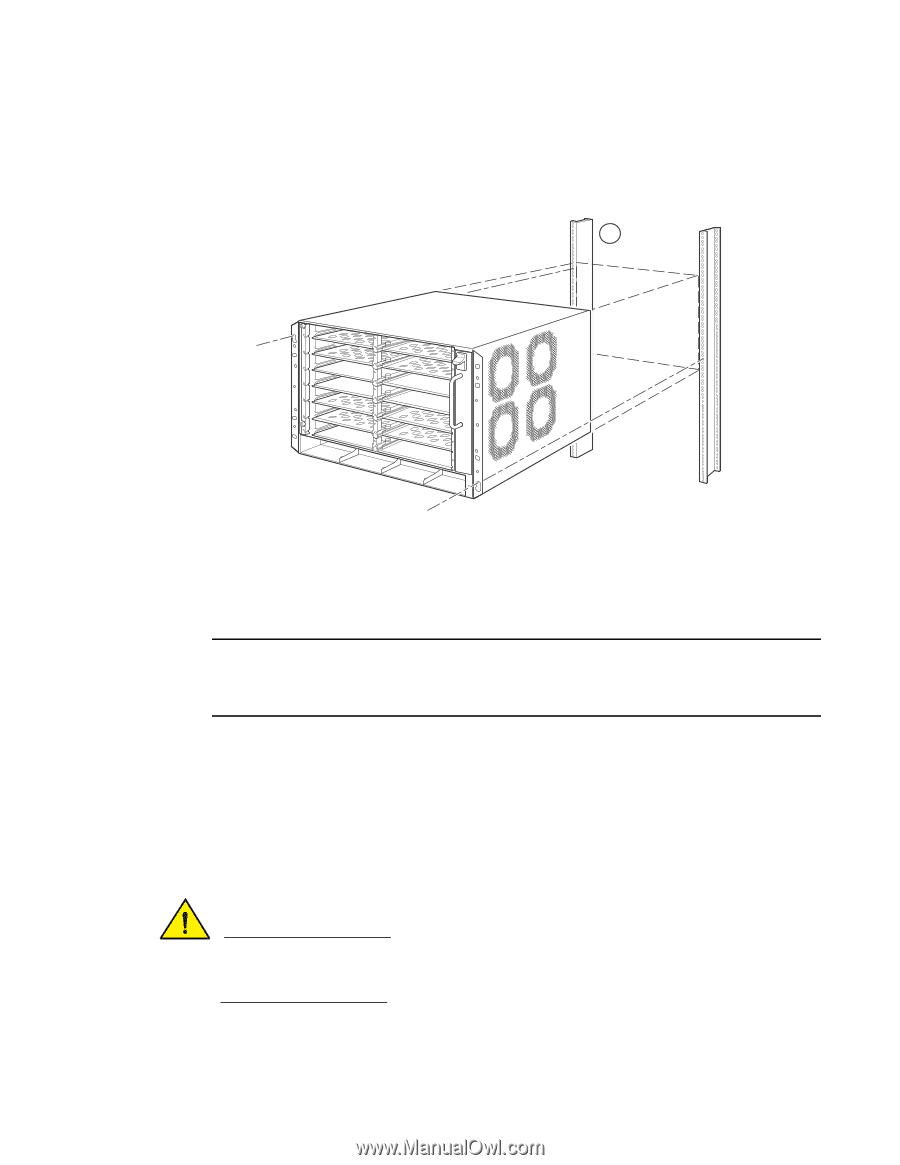
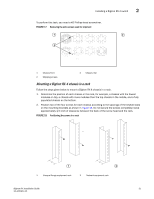
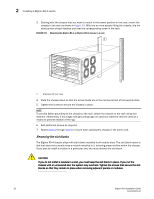
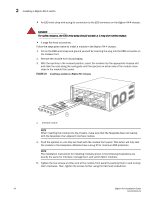
2 Installing a BigIron RX-4 switch 3. Starting with the chassis that you want to mount in the lowest position in the rack, mount the chassis in the rack as shown in Figure 19. With two or more people lifting the chassis, slip the wide portion of each keyhole slot over the corresponding screw in the rack. FIGURE 19 Mounting the BigIron RX-4 or BigIron RX-8 chassis in a rack 1 1 Standard 19 inch rack 4. Slide the chassis down so that the screw heads are in the narrow portion of the keyhole slots. 5. Tighten the screws to secure the chassis in place. NOTE To provide better grounding of the chassis to the rack, attach the chassis to the rack using star washers. Additionally, if any single hole grounding lugs are used star washers shall be used as a means to prevent rotation of the lug. 6. Add additional screws as required. 7. Repeat step 2 through step 6 to mount each subsequent chassis in the same rack. Removing the slot blanks The BigIron RX-4 chassis ships with slot blanks installed in all module slots. The slot blank covers a slot that does not currently have a module installed in it, ensuring proper airflow within the chassis. If you plan to install a module in a particular slot, you must remove the slot blank. CAUTION If you do not install a module in a slot, you must keep the slot blank in place. If you run the chassis with an uncovered slot, the system may overheat. Tighten the screws that secure the slot blanks so that they remain in place when removing adjacent panels or modules. 32 BigIron RX Installation Guide 53-1001811-01
-
 1
1 -
2
-
3
-
4
-
5
-
6
-
7
-
8
-
9
-
10
-
11
-
12
-
13
-
14
-
15
-
16
-
17
-
18
-
19
-
20
-
21
-
22
-
23
-
24
-
25
-
26
-
27
-
28
-
29
-
30
-
31
-
32
-
33
-
34
-
35
-
36
-
37
-
38
-
 39
39 -
 40
40 -
 41
41 -
 42
42 -
 43
43 -
 44
44 -
 45
45 -
 46
46 -
 47
47 -
 48
48 -
 49
49 -
50
-
51
-
52
-
53
-
54
-
55
-
56
-
57
-
58
-
59
-
60
-
61
-
62
-
63
-
64
-
65
-
66
-
67
-
68
-
69
-
70
-
71
-
72
-
73
-
74
-
75
-
76
-
77
-
78
-
79
-
80
-
81
-
82
-
83
-
84
-
85
-
86
-
87
-
88
-
89
-
90
-
91
-
92
-
93
-
94
-
95
-
96
-
97
-
98
-
99
-
100
-
101
-
102
-
103
-
104
-
105
-
106
-
107
-
108
-
109
-
110
-
111
-
112
-
113
-
114
-
115
-
116
-
117
-
118
-
119
-
120
-
121
-
122
-
123
-
124
-
125
-
126
-
127
-
128
-
129
-
130
-
131
-
132
-
133
-
134
-
135
-
136
-
137
-
138
-
139
-
140
-
141
-
142
-
143
-
144
-
145
-
146
-
147
-
148
-
149
-
150
-
151
-
152
-
153
-
154
-
155
-
156
-
157
-
158
-
159
-
160
-
161
-
162
-
163
-
164
-
165
-
166
-
167
-
168
-
169
-
170
-
171
-
172
-
173
-
174
-
175
-
176
-
177
-
178
-
179
-
180
-
181
-
182
-
183
-
184
-
185
-
186
-
187
-
188
-
189
-
190
-
191
-
192
-
193
-
194
-
195
-
196
-
197
-
198
-
199
-
200
-
201
-
202
-
203
-
204
-
205
-
206
-
207
-
208
-
209
-
210
-
211
-
212
-
213
-
214
-
215
-
216
-
217
-
218
-
219
-
220
-
221
-
222
-
223
-
224
-
225
-
226
-
227
-
228
-
229
-
230
-
231
-
232
-
233
-
234
-
235
-
236
-
237
-
238
-
239
-
240
 |
 |