Dell PowerConnect B-RX16 Installation Guide - Page 55
Dell PowerConnect B-RX16 Manual
 |
View all Dell PowerConnect B-RX16 manuals
Add to My Manuals
Save this manual to your list of manuals |
Page 55 highlights
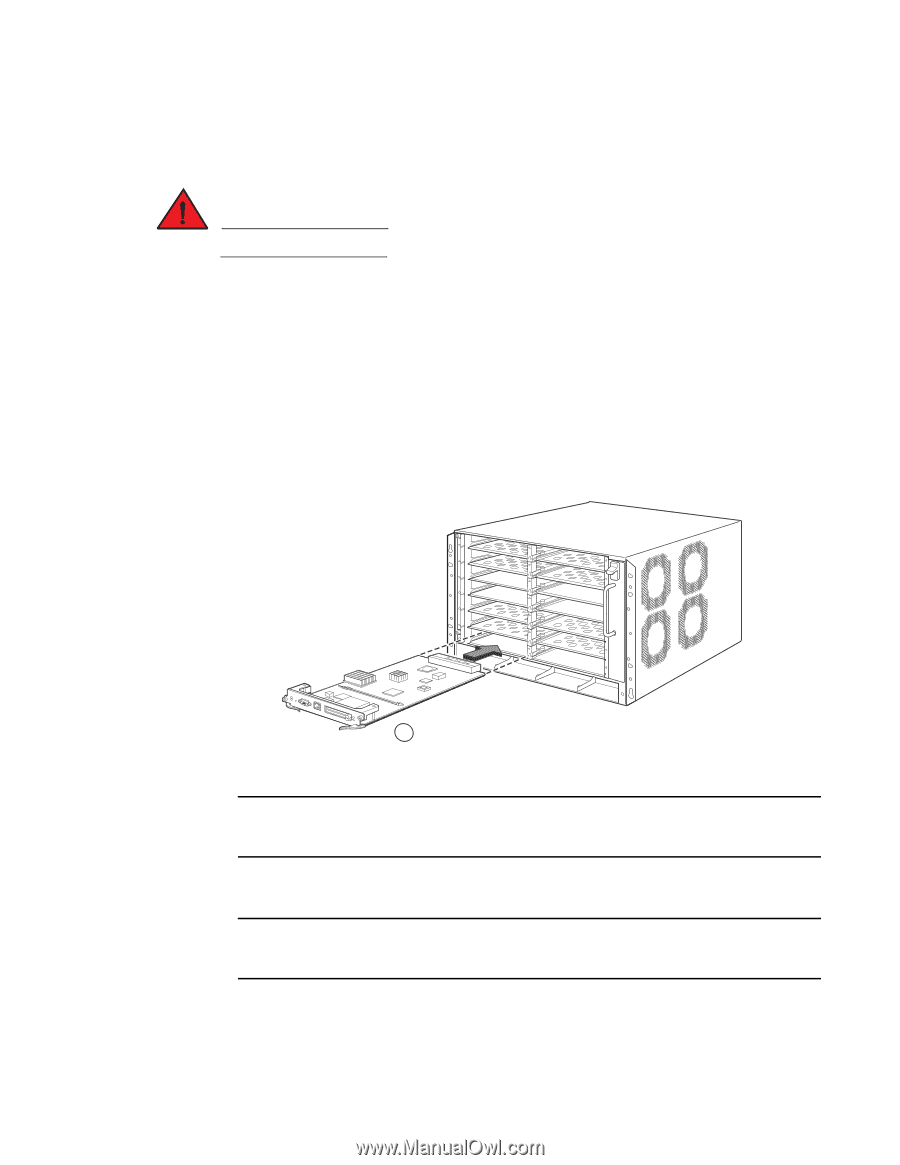
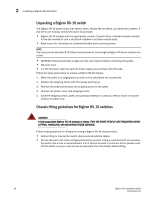
Installing a BigIron RX-8 switch 2 Before installing a module in the BigIron RX-8 chassis, have the following on hand: • An ESD wrist strap with a plug for connection to the ESD connector on the BigIron RX-8 chassis. DANGER For safety reasons, the ESD wrist strap should contain a 1 meg ohm series resistor. • A large flat-head screwdriver. Follow the steps given below to install a module in the BigIron RX-8 chassis. 1. Put on the ESD wrist strap and ground yourself by inserting the plug into the ESD connector on the chassis front. 2. Remove the module from its packaging. 3. With the ejectors in the outward position, insert the module into the appropriate chassis slot and slide the card along the card guide until the ejectors on either side of the module move close to the module front panel. FIGURE 28 Installing a module in a BigIron RX-8 chassis 1 1 Management module NOTE When inserting the module into the chassis, make sure that the faceplate doesnot overlap with the faceplate of an adjacent interface module. 4. Push the ejectors in until they are flush with the module front panel. This action will fully seat the module in the backplane. Modules have a snug fit for maximum EMI protection. NOTE The installation instructions for installing modules shown in the following illustrations are exactly the same for interface, management, and switch fabric modules. 5. Tighten the two screws at either end of the module front panel by pushing them in and turning them clockwise. Then, tighten the screws further using the flat-head screwdriver. BigIron RX Installation Guide 43 53-1001811-01
-
 1
1 -
2
-
3
-
4
-
5
-
6
-
7
-
8
-
9
-
10
-
11
-
12
-
13
-
14
-
15
-
16
-
17
-
18
-
19
-
20
-
21
-
22
-
23
-
24
-
25
-
26
-
27
-
28
-
29
-
30
-
31
-
32
-
33
-
34
-
35
-
36
-
37
-
38
-
39
-
40
-
41
-
42
-
43
-
44
-
45
-
46
-
47
-
48
-
49
-
 50
50 -
 51
51 -
 52
52 -
 53
53 -
 54
54 -
 55
55 -
 56
56 -
 57
57 -
 58
58 -
 59
59 -
 60
60 -
61
-
62
-
63
-
64
-
65
-
66
-
67
-
68
-
69
-
70
-
71
-
72
-
73
-
74
-
75
-
76
-
77
-
78
-
79
-
80
-
81
-
82
-
83
-
84
-
85
-
86
-
87
-
88
-
89
-
90
-
91
-
92
-
93
-
94
-
95
-
96
-
97
-
98
-
99
-
100
-
101
-
102
-
103
-
104
-
105
-
106
-
107
-
108
-
109
-
110
-
111
-
112
-
113
-
114
-
115
-
116
-
117
-
118
-
119
-
120
-
121
-
122
-
123
-
124
-
125
-
126
-
127
-
128
-
129
-
130
-
131
-
132
-
133
-
134
-
135
-
136
-
137
-
138
-
139
-
140
-
141
-
142
-
143
-
144
-
145
-
146
-
147
-
148
-
149
-
150
-
151
-
152
-
153
-
154
-
155
-
156
-
157
-
158
-
159
-
160
-
161
-
162
-
163
-
164
-
165
-
166
-
167
-
168
-
169
-
170
-
171
-
172
-
173
-
174
-
175
-
176
-
177
-
178
-
179
-
180
-
181
-
182
-
183
-
184
-
185
-
186
-
187
-
188
-
189
-
190
-
191
-
192
-
193
-
194
-
195
-
196
-
197
-
198
-
199
-
200
-
201
-
202
-
203
-
204
-
205
-
206
-
207
-
208
-
209
-
210
-
211
-
212
-
213
-
214
-
215
-
216
-
217
-
218
-
219
-
220
-
221
-
222
-
223
-
224
-
225
-
226
-
227
-
228
-
229
-
230
-
231
-
232
-
233
-
234
-
235
-
236
-
237
-
238
-
239
-
240
 |
 |