HTC Verizon Wireless XV6900 User Manual - Page 18
Install the battery, Battery Information, To remove the back cover - replacement screen
 |
View all HTC Verizon Wireless XV6900 manuals
Add to My Manuals
Save this manual to your list of manuals |
Page 18 highlights
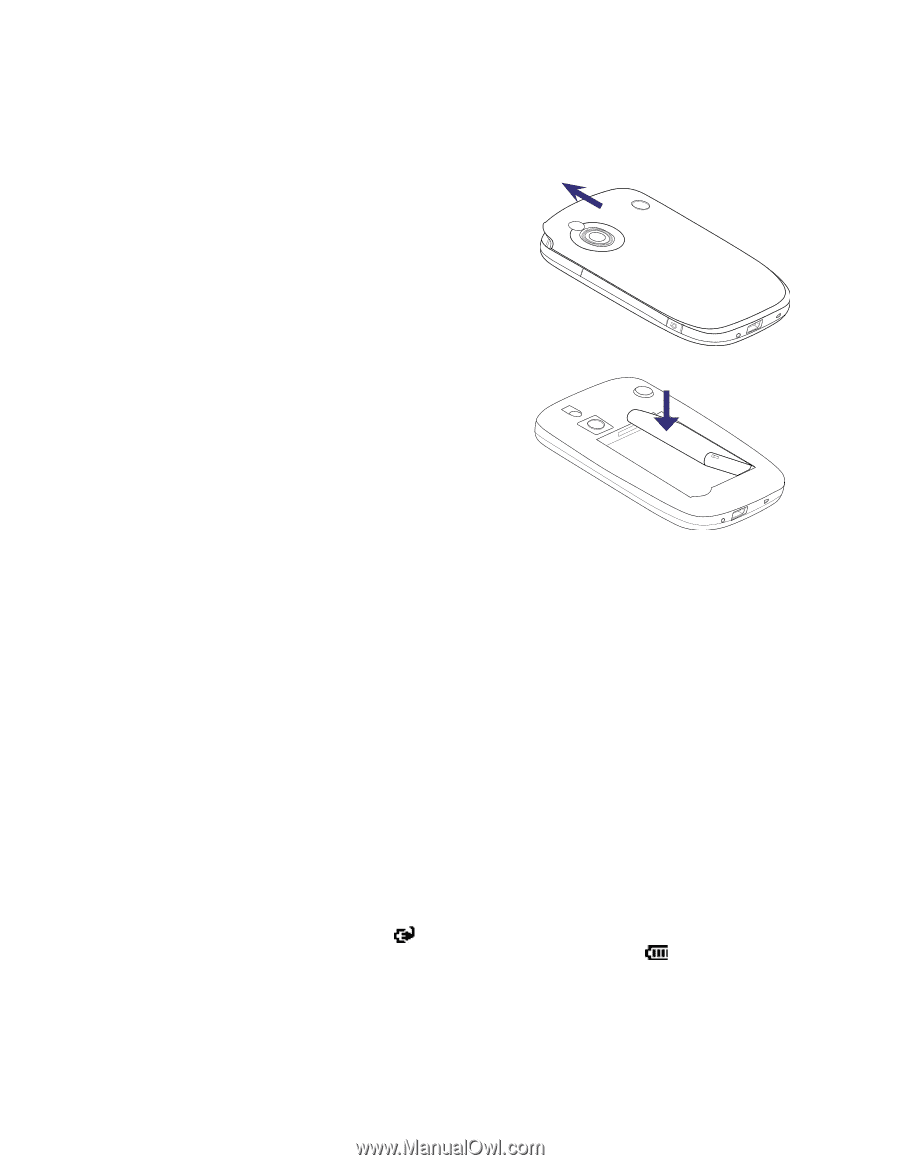
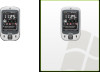
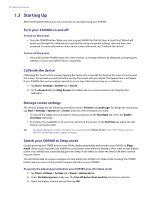
18 Getting Started Install the battery To remove the back cover Before installing the battery or storage card, you have to remove the back cover. 1. Make sure your XV6900 is turned off. 2. Slide the back cover upward. To install the battery 1. Install the battery by inserting it with its exposed copper part aligned with the protruding copper conductor on the upper right side of the battery compartment. Insert the right side of the battery first, then gently push the battery into place. 2. Replace the back cover. To remove the battery 1. Make sure your XV6900 is turned off. 2. Remove the back cover. 3. To remove the battery, lift it up from the lower-left end of the battery. Battery Information To charge the battery New batteries are shipped partially charged. Before you start using your XV6900, it is recommended that you charge the battery. Some batteries perform best after several full charge/discharge cycles. You can charge the battery in two ways: • Charging the device's battery by connecting the power adapter. • Connecting your XV6900 to a PC via the provided Mini USB cable. Note Only the AC adapter and USB cable provided with your XV6900 should be used to charge the device. Charging is indicated by a solid amber light on the left LED indicator. As the battery is being charged while the device's power is on, a charging icon ( ) will be shown on the title bar of the Today screen. After the battery has been fully charged, the left LED becomes green and a full battery icon ( ) appears on the Today screen's title bar. Warning! • Do not remove the battery from the device while you are charging it using the AC or car adapter. • As a safety precaution, the battery stops charging when it overheats.
-
 1
1 -
2
-
3
-
4
-
5
-
6
-
7
-
8
-
9
-
10
-
11
-
12
-
 13
13 -
 14
14 -
 15
15 -
 16
16 -
 17
17 -
 18
18 -
 19
19 -
 20
20 -
 21
21 -
 22
22 -
 23
23 -
24
-
25
-
26
-
27
-
28
-
29
-
30
-
31
-
32
-
33
-
34
-
35
-
36
-
37
-
38
-
39
-
40
-
41
-
42
-
43
-
44
-
45
-
46
-
47
-
48
-
49
-
50
-
51
-
52
-
53
-
54
-
55
-
56
-
57
-
58
-
59
-
60
-
61
-
62
-
63
-
64
-
65
-
66
-
67
-
68
-
69
-
70
-
71
-
72
-
73
-
74
-
75
-
76
-
77
-
78
-
79
-
80
-
81
-
82
-
83
-
84
-
85
-
86
-
87
-
88
-
89
-
90
-
91
-
92
-
93
-
94
-
95
-
96
-
97
-
98
-
99
-
100
-
101
-
102
-
103
-
104
-
105
-
106
-
107
-
108
-
109
-
110
-
111
-
112
-
113
-
114
-
115
-
116
-
117
-
118
-
119
-
120
-
121
-
122
-
123
-
124
-
125
-
126
-
127
-
128
-
129
-
130
-
131
-
132
-
133
-
134
-
135
-
136
-
137
-
138
-
139
-
140
-
141
-
142
-
143
-
144
-
145
-
146
-
147
-
148
-
149
-
150
-
151
-
152
-
153
-
154
 |
 |