HTC Verizon Wireless XV6900 User Manual - Page 27
Touch Cube screens
 |
View all HTC Verizon Wireless XV6900 manuals
Add to My Manuals
Save this manual to your list of manuals |
Page 27 highlights
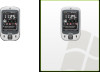
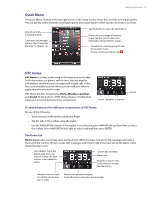
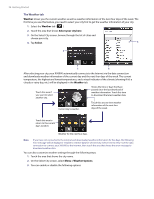
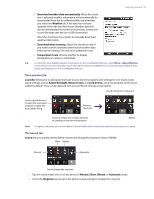
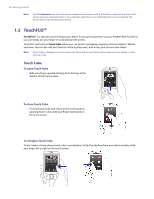
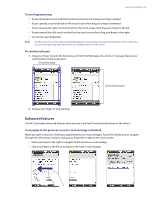
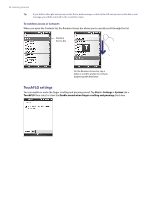
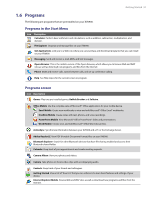
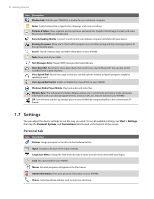
Getting Started 27 Touch Cube screens There are three sides to the Touch Cube interface: • On the first side of the interface, you can add up to nine favorite contacts. If you make calls to certain people frequently, you can add them as favorite contacts for quicker access. Note You should already have contacts created or synchronized on your XV6900 before you can add them as favorite contacts. For more information about creating contacts, see Chapter 6. For more information about synchronizing your XV6900 with the PC, see Chapter 5. For information about synchronizing your XV6900 with the Exchange Server, see Chapter 8. • Tap to call the number associated with the contact. • Tap and hold to open the contact card. Select an empty slot to add a favorite contact. Open the Phone program. (See Chapter 3 for details.) Open Call History. (See Chapter 3 for details.) Select a favorite contact to remove it. When you add a favorite contact and there is no photo associated to that contact, the contact's first name (or last name) will be displayed. Delete favorite contacts. Open Contacts. (See Chapter 6 for details) Return to your list of favorite contacts. Note When you have different phone numbers assigned to the same contact, an icon appears on the top left corner of the contact square to tell you which number is assigned to the particular square: mobile phone ( ), work phone ( ), or home phone ( ). • The second side of the interface provides quick shortcuts to your e-mail messages, text messages, the Internet, and other applications. Simply touch the icons on the screen to open the corresponding program.
-
 1
1 -
2
-
3
-
4
-
5
-
6
-
7
-
8
-
9
-
10
-
11
-
12
-
13
-
14
-
15
-
16
-
17
-
18
-
19
-
20
-
21
-
 22
22 -
 23
23 -
 24
24 -
 25
25 -
 26
26 -
 27
27 -
 28
28 -
 29
29 -
 30
30 -
 31
31 -
 32
32 -
33
-
34
-
35
-
36
-
37
-
38
-
39
-
40
-
41
-
42
-
43
-
44
-
45
-
46
-
47
-
48
-
49
-
50
-
51
-
52
-
53
-
54
-
55
-
56
-
57
-
58
-
59
-
60
-
61
-
62
-
63
-
64
-
65
-
66
-
67
-
68
-
69
-
70
-
71
-
72
-
73
-
74
-
75
-
76
-
77
-
78
-
79
-
80
-
81
-
82
-
83
-
84
-
85
-
86
-
87
-
88
-
89
-
90
-
91
-
92
-
93
-
94
-
95
-
96
-
97
-
98
-
99
-
100
-
101
-
102
-
103
-
104
-
105
-
106
-
107
-
108
-
109
-
110
-
111
-
112
-
113
-
114
-
115
-
116
-
117
-
118
-
119
-
120
-
121
-
122
-
123
-
124
-
125
-
126
-
127
-
128
-
129
-
130
-
131
-
132
-
133
-
134
-
135
-
136
-
137
-
138
-
139
-
140
-
141
-
142
-
143
-
144
-
145
-
146
-
147
-
148
-
149
-
150
-
151
-
152
-
153
-
154
 |
 |