HTC Verizon Wireless XV6900 User Manual - Page 76
Create and send MMS messages, To compose an MMS message - animated gif
 |
View all HTC Verizon Wireless XV6900 manuals
Add to My Manuals
Save this manual to your list of manuals |
Page 76 highlights
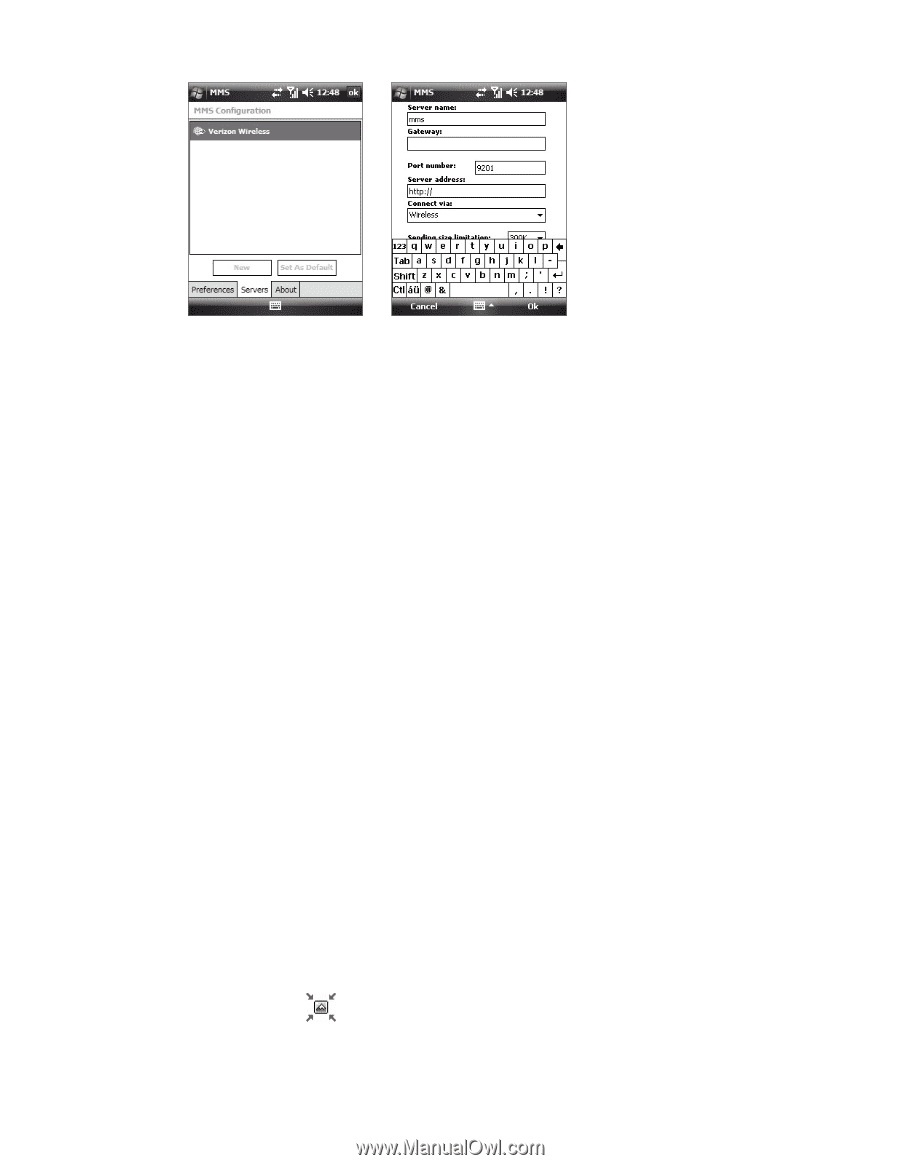
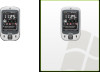
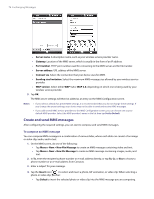
76 Exchanging Messages • Server name. A descriptive name, such as your wireless service provider name. • Gateway. Location of the MMS server, which is usually in the form of an IP address. • Port number. HTTP port number used for connecting to the MMS server and for file transfer. • Server address. URL address of the MMS server. • Connect via. Select the connection that your device uses for MMS. • Sending size limitation. Select the maximum MMS message size allowed by your wireless service provider. • WAP version. Select either WAP 1.2 or WAP 2.0, depending on which one is being used by your wireless service provider. 5. Tap OK. The MMS server settings will then be added as an entry on the MMS Configuration screen. Notes • If your device already has preset MMS settings, it is recommended that you do not change these settings. If you change the preset settings, your device may not be able to send and receive MMS messages. • If you add several MMS service providers to the MMS Configuration screen, you can choose one as your default MMS provider. Select the MMS provider's name in the list then tap Set As Default. Create and send MMS messages After configuring the required settings, you can start to compose and send MMS messages. To compose an MMS message You can compose MMS messages in a combination of various slides, where each slide can consist of an image or video clip, audio, and/or text. 1. On the MMS screen, do one of the following: • Tap Menu > New > New Flix Message to create an MMS message containing video and text. • Tap Menu > New > New Pix Message to create an MMS message containing images, audio, and text. 2. In To, enter the recipient's phone number or e-mail address directly, or tap To, Cc, or Bcc to choose a phone number or an e-mail address from Contacts. 3. Enter a subject for your message. 4. Tap the Insert icon ( ) to select and insert a photo, GIF animation, or video clip. When selecting a photo or video clip, you can: • Tap Select to insert the selected photo or video clip into the MMS message you are composing.
-
 1
1 -
2
-
3
-
4
-
5
-
6
-
7
-
8
-
9
-
10
-
11
-
12
-
13
-
14
-
15
-
16
-
17
-
18
-
19
-
20
-
21
-
22
-
23
-
24
-
25
-
26
-
27
-
28
-
29
-
30
-
31
-
32
-
33
-
34
-
35
-
36
-
37
-
38
-
39
-
40
-
41
-
42
-
43
-
44
-
45
-
46
-
47
-
48
-
49
-
50
-
51
-
52
-
53
-
54
-
55
-
56
-
57
-
58
-
59
-
60
-
61
-
62
-
63
-
64
-
65
-
66
-
67
-
68
-
69
-
70
-
 71
71 -
 72
72 -
 73
73 -
 74
74 -
 75
75 -
 76
76 -
 77
77 -
 78
78 -
 79
79 -
 80
80 -
 81
81 -
82
-
83
-
84
-
85
-
86
-
87
-
88
-
89
-
90
-
91
-
92
-
93
-
94
-
95
-
96
-
97
-
98
-
99
-
100
-
101
-
102
-
103
-
104
-
105
-
106
-
107
-
108
-
109
-
110
-
111
-
112
-
113
-
114
-
115
-
116
-
117
-
118
-
119
-
120
-
121
-
122
-
123
-
124
-
125
-
126
-
127
-
128
-
129
-
130
-
131
-
132
-
133
-
134
-
135
-
136
-
137
-
138
-
139
-
140
-
141
-
142
-
143
-
144
-
145
-
146
-
147
-
148
-
149
-
150
-
151
-
152
-
153
-
154
 |
 |