HP 3015 Service Manual - Page 206
Basic troubleshooting, Is Power-on successful?, Hewlett Packard
 |
View all HP 3015 manuals
Add to My Manuals
Save this manual to your list of manuals |
Page 206 highlights
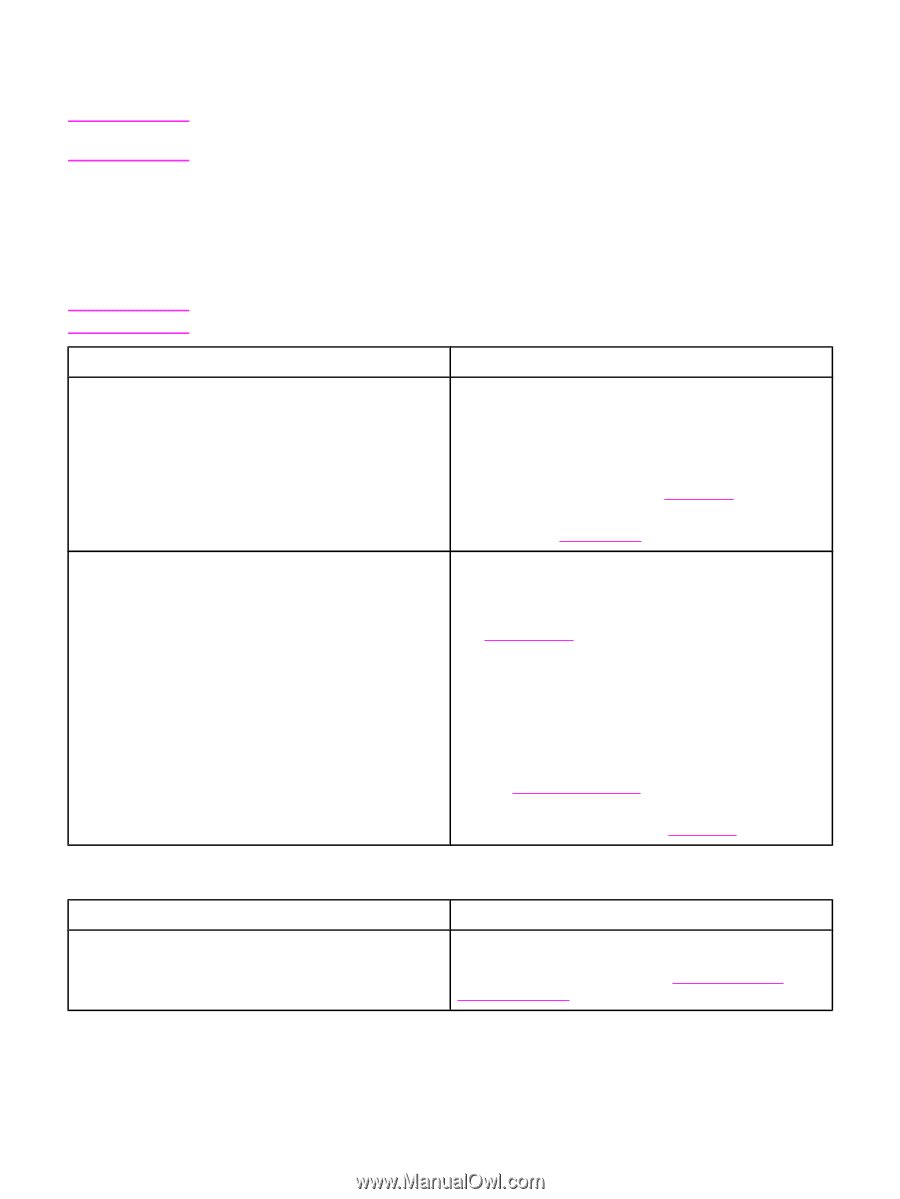
Basic troubleshooting Note The HP LaserJet 3015 and 3030 all-in-one products have faxing capabilities. The HP LaserJet 3020 all-in-one product does not operate as a faxing device. Is Power-on successful? When the product is connected to a grounded power source, the words Hewlett Packard appear with moving cursors to indicate that the firmware code is loading, and the printer motor rotates for approximately 5 seconds. Note The flashing wavy lines that appear on the control-panel display during this period are normal. Cause No power is available because of a failed power source, cable, switch. (No LEDs are lit and the display is blank.) Printer motor does not rotate. Does the product achieve the ready state? The motor rotates, but the lights are not on. Cause The formatter is damaged or has a loose connection. Solution 1. Verify that the product is plugged in to a functional power source. 2. Verify that the power cable is functional and that the power switch is on. 3. Verify that FU101 on the power supply is not open (also check FU102 if present). See Main wiring. 4. If all of these conditions are correct, replace the power supply. See Power supply. 1. Verify that the print cartridge is present. 2. Verify that the product doors are closed. 3. Verify that media is loaded in the paper input tray. See Loading media. 4. Verify that the printer-path-paper sensors are functional. 5. Verify that the wire-harness from the ECU is seated into the motor connector. 6. Verify that the motor is correctly mounted to the product chassis. 7. If all of these conditions are correct, replace the ECU. See Engine controller unit. 8. If, after replacing the ECU, the printer motor still does not rotate, replace the motor. See Main motor. Solution Verify that the formatter cables are properly connected. If all cables are undamaged and seated correctly but the problem persists, replace the formatter. See Formatter and line interface unit (LIU). 188 Chapter 6 Troubleshooting ENWW
-
 1
1 -
2
-
3
-
4
-
5
-
6
-
7
-
8
-
9
-
10
-
11
-
12
-
13
-
14
-
15
-
16
-
17
-
18
-
19
-
20
-
21
-
22
-
23
-
24
-
25
-
26
-
27
-
28
-
29
-
30
-
31
-
32
-
33
-
34
-
35
-
36
-
37
-
38
-
39
-
40
-
41
-
42
-
43
-
44
-
45
-
46
-
47
-
48
-
49
-
50
-
51
-
52
-
53
-
54
-
55
-
56
-
57
-
58
-
59
-
60
-
61
-
62
-
63
-
64
-
65
-
66
-
67
-
68
-
69
-
70
-
71
-
72
-
73
-
74
-
75
-
76
-
77
-
78
-
79
-
80
-
81
-
82
-
83
-
84
-
85
-
86
-
87
-
88
-
89
-
90
-
91
-
92
-
93
-
94
-
95
-
96
-
97
-
98
-
99
-
100
-
101
-
102
-
103
-
104
-
105
-
106
-
107
-
108
-
109
-
110
-
111
-
112
-
113
-
114
-
115
-
116
-
117
-
118
-
119
-
120
-
121
-
122
-
123
-
124
-
125
-
126
-
127
-
128
-
129
-
130
-
131
-
132
-
133
-
134
-
135
-
136
-
137
-
138
-
139
-
140
-
141
-
142
-
143
-
144
-
145
-
146
-
147
-
148
-
149
-
150
-
151
-
152
-
153
-
154
-
155
-
156
-
157
-
158
-
159
-
160
-
161
-
162
-
163
-
164
-
165
-
166
-
167
-
168
-
169
-
170
-
171
-
172
-
173
-
174
-
175
-
176
-
177
-
178
-
179
-
180
-
181
-
182
-
183
-
184
-
185
-
186
-
187
-
188
-
189
-
190
-
191
-
192
-
193
-
194
-
195
-
196
-
197
-
198
-
199
-
200
-
 201
201 -
 202
202 -
 203
203 -
 204
204 -
 205
205 -
 206
206 -
 207
207 -
 208
208 -
 209
209 -
 210
210 -
 211
211 -
212
-
213
-
214
-
215
-
216
-
217
-
218
-
219
-
220
-
221
-
222
-
223
-
224
-
225
-
226
-
227
-
228
-
229
-
230
-
231
-
232
-
233
-
234
-
235
-
236
-
237
-
238
-
239
-
240
-
241
-
242
-
243
-
244
-
245
-
246
-
247
-
248
-
249
-
250
-
251
-
252
-
253
-
254
-
255
-
256
-
257
-
258
-
259
-
260
-
261
-
262
-
263
-
264
-
265
-
266
-
267
-
268
-
269
-
270
-
271
-
272
-
273
-
274
-
275
-
276
-
277
-
278
-
279
-
280
-
281
-
282
-
283
-
284
-
285
-
286
-
287
-
288
-
289
-
290
-
291
-
292
-
293
-
294
-
295
-
296
-
297
-
298
-
299
-
300
-
301
-
302
-
303
-
304
-
305
-
306
-
307
-
308
-
309
-
310
-
311
-
312
-
313
-
314
-
315
-
316
-
317
-
318
-
319
-
320
-
321
-
322
-
323
-
324
-
325
-
326
-
327
-
328
-
329
-
330
-
331
-
332
-
333
-
334
-
335
-
336
-
337
-
338
-
339
-
340
-
341
-
342
-
343
-
344
-
345
-
346
-
347
-
348
-
349
-
350
-
351
-
352
-
353
-
354
-
355
-
356
-
357
-
358
-
359
-
360
-
361
-
362
-
363
-
364
-
365
-
366
 |
 |