HP C3916A HP LaserJet 5, 5M, and 5N Printer - User's Guide - Page 101
Harmonizing Print Density and REt Settings
 |
View all HP C3916A manuals
Add to My Manuals
Save this manual to your list of manuals |
Page 101 highlights
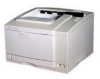
Adjusting Print 6 Quality Figure 6-2 Checking the Effect of a REt Setting You can check the effect of a REt setting by printing a self test at 600-dpi and examining the Resolution Enhancement block on the printout (see example of Menu Map printout, Figure 3-2, letter L). The Resolution Enhancement block does not appear on menu map printouts printed at 300 dpi. Figure 6-2 illustrates three REt settings. Set REt so that the REt block is a uniform gray with no vertical lines (B), or with vertical lines tending toward dark (C), rather than light (A). Harmonizing Print Density and REt Settings It is suggested that both print density and REt settings be adjusted at the same time since they affect each other. To harmonize print density and REt settings: 1 Make sure printer resolution is set to 600 dpi. 2 Select a print density setting. (A default setting of 3 usually produces a uniform gray REt block on the self test printout.) 3 Print a self test and examine the Resolution Enhancement block. 4 Set REt to produce a block as close to a uniform gray as possible (B), or with vertical lines tending toward dark (C), rather than light (A). EN Adjusting Print Quality 6-5
-
 1
1 -
2
-
3
-
4
-
5
-
6
-
7
-
8
-
9
-
10
-
11
-
12
-
13
-
14
-
15
-
16
-
17
-
18
-
19
-
20
-
21
-
22
-
23
-
24
-
25
-
26
-
27
-
28
-
29
-
30
-
31
-
32
-
33
-
34
-
35
-
36
-
37
-
38
-
39
-
40
-
41
-
42
-
43
-
44
-
45
-
46
-
47
-
48
-
49
-
50
-
51
-
52
-
53
-
54
-
55
-
56
-
57
-
58
-
59
-
60
-
61
-
62
-
63
-
64
-
65
-
66
-
67
-
68
-
69
-
70
-
71
-
72
-
73
-
74
-
75
-
76
-
77
-
78
-
79
-
80
-
81
-
82
-
83
-
84
-
85
-
86
-
87
-
88
-
89
-
90
-
91
-
92
-
93
-
94
-
95
-
 96
96 -
 97
97 -
 98
98 -
 99
99 -
 100
100 -
 101
101 -
 102
102 -
 103
103 -
 104
104 -
 105
105 -
 106
106 -
107
-
108
-
109
-
110
-
111
-
112
-
113
-
114
-
115
-
116
-
117
-
118
-
119
-
120
-
121
-
122
-
123
-
124
-
125
-
126
-
127
-
128
-
129
-
130
-
131
-
132
-
133
-
134
-
135
-
136
-
137
-
138
-
139
-
140
-
141
-
142
-
143
-
144
-
145
-
146
-
147
-
148
-
149
-
150
-
151
-
152
-
153
-
154
-
155
-
156
-
157
-
158
-
159
-
160
-
161
-
162
-
163
-
164
-
165
-
166
-
167
-
168
-
169
-
170
-
171
-
172
-
173
-
174
-
175
-
176
-
177
-
178
-
179
-
180
-
181
-
182
-
183
-
184
-
185
-
186
-
187
-
188
-
189
-
190
-
191
-
192
-
193
-
194
-
195
-
196
-
197
-
198
-
199
-
200
-
201
-
202
-
203
-
204
-
205
-
206
-
207
-
208
 |
 |
