HP C3916A HP LaserJet 5, 5M, and 5N Printer - User's Guide - Page 151
Fusing Assembly
 |
View all HP C3916A manuals
Add to My Manuals
Save this manual to your list of manuals |
Page 151 highlights
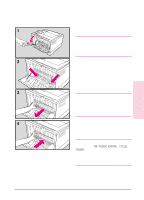
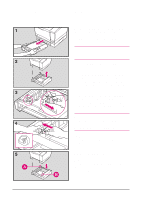
Fusing Assembly Before you begin these steps, turn the printer off and unplug the power cord. WARNING! The fusing area gets hot! After unplugging the power cord, allow the printer to cool for at least 30 minutes before continuing. 1 After the printer is cool, open the rear cover. 2 Remove the 2 screws that hold the fusing assembly to the printer. 3 See the Caution below, then gently lift the fusing assembly up and pull it straight out from the printer body. Caution Pull the fusing assembly straight out from the printer. Otherwise the sensor lever, located on the right rear of the fusing assembly, may catch on the inside of the printer. 4 Slide the new fusing assembly firmly into the printer until the screw holes align, then replace the screws, tightening until snug. Note If the message 50 FUSER ERROR, CYCLE POWER appears in the display, switch the printer off and wait 15 minutes. If the problem continues, check the fuser installation again. If the problem still continues, contact your authorized HP dealer. Maintaining and 8 Adjusting the EN Maintaining and Adjusting the Printer 8-13
-
 1
1 -
2
-
3
-
4
-
5
-
6
-
7
-
8
-
9
-
10
-
11
-
12
-
13
-
14
-
15
-
16
-
17
-
18
-
19
-
20
-
21
-
22
-
23
-
24
-
25
-
26
-
27
-
28
-
29
-
30
-
31
-
32
-
33
-
34
-
35
-
36
-
37
-
38
-
39
-
40
-
41
-
42
-
43
-
44
-
45
-
46
-
47
-
48
-
49
-
50
-
51
-
52
-
53
-
54
-
55
-
56
-
57
-
58
-
59
-
60
-
61
-
62
-
63
-
64
-
65
-
66
-
67
-
68
-
69
-
70
-
71
-
72
-
73
-
74
-
75
-
76
-
77
-
78
-
79
-
80
-
81
-
82
-
83
-
84
-
85
-
86
-
87
-
88
-
89
-
90
-
91
-
92
-
93
-
94
-
95
-
96
-
97
-
98
-
99
-
100
-
101
-
102
-
103
-
104
-
105
-
106
-
107
-
108
-
109
-
110
-
111
-
112
-
113
-
114
-
115
-
116
-
117
-
118
-
119
-
120
-
121
-
122
-
123
-
124
-
125
-
126
-
127
-
128
-
129
-
130
-
131
-
132
-
133
-
134
-
135
-
136
-
137
-
138
-
139
-
140
-
141
-
142
-
143
-
144
-
145
-
 146
146 -
 147
147 -
 148
148 -
 149
149 -
 150
150 -
 151
151 -
 152
152 -
 153
153 -
 154
154 -
 155
155 -
 156
156 -
157
-
158
-
159
-
160
-
161
-
162
-
163
-
164
-
165
-
166
-
167
-
168
-
169
-
170
-
171
-
172
-
173
-
174
-
175
-
176
-
177
-
178
-
179
-
180
-
181
-
182
-
183
-
184
-
185
-
186
-
187
-
188
-
189
-
190
-
191
-
192
-
193
-
194
-
195
-
196
-
197
-
198
-
199
-
200
-
201
-
202
-
203
-
204
-
205
-
206
-
207
-
208
 |
 |
