HP C3916A HP LaserJet 5, 5M, and 5N Printer - User's Guide - Page 150
Transfer Roller
 |
View all HP C3916A manuals
Add to My Manuals
Save this manual to your list of manuals |
Page 150 highlights
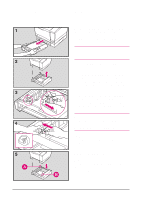
Transfer Roller Before you begin these steps, turn the printer off and unplug the power cord. 1 Open the top cover and remove the toner cartridge. 2 Remove the transfer roller hook tool, located near the left end of the inside front panel. 3 Lift up on the chrome shaft using the hook tool. 4 Lift the roller up and out of its retaining slots. Discard the used roller. Caution Be careful not to touch the black spongerubber on the new transfer roller. Finger oils on the roller can cause print quality problems. 5 Slide the right end of the new roller (the end without the gear) into the right slot. Press the gear end into the left slot until it clicks into place. Replace the transfer roller hook tool and toner cartridge. Close the top cover. Plug in the power cord and switch the printer on. 8-12 Maintaining and Adjusting the Printer EN
-
 1
1 -
2
-
3
-
4
-
5
-
6
-
7
-
8
-
9
-
10
-
11
-
12
-
13
-
14
-
15
-
16
-
17
-
18
-
19
-
20
-
21
-
22
-
23
-
24
-
25
-
26
-
27
-
28
-
29
-
30
-
31
-
32
-
33
-
34
-
35
-
36
-
37
-
38
-
39
-
40
-
41
-
42
-
43
-
44
-
45
-
46
-
47
-
48
-
49
-
50
-
51
-
52
-
53
-
54
-
55
-
56
-
57
-
58
-
59
-
60
-
61
-
62
-
63
-
64
-
65
-
66
-
67
-
68
-
69
-
70
-
71
-
72
-
73
-
74
-
75
-
76
-
77
-
78
-
79
-
80
-
81
-
82
-
83
-
84
-
85
-
86
-
87
-
88
-
89
-
90
-
91
-
92
-
93
-
94
-
95
-
96
-
97
-
98
-
99
-
100
-
101
-
102
-
103
-
104
-
105
-
106
-
107
-
108
-
109
-
110
-
111
-
112
-
113
-
114
-
115
-
116
-
117
-
118
-
119
-
120
-
121
-
122
-
123
-
124
-
125
-
126
-
127
-
128
-
129
-
130
-
131
-
132
-
133
-
134
-
135
-
136
-
137
-
138
-
139
-
140
-
141
-
142
-
143
-
144
-
 145
145 -
 146
146 -
 147
147 -
 148
148 -
 149
149 -
 150
150 -
 151
151 -
 152
152 -
 153
153 -
 154
154 -
 155
155 -
156
-
157
-
158
-
159
-
160
-
161
-
162
-
163
-
164
-
165
-
166
-
167
-
168
-
169
-
170
-
171
-
172
-
173
-
174
-
175
-
176
-
177
-
178
-
179
-
180
-
181
-
182
-
183
-
184
-
185
-
186
-
187
-
188
-
189
-
190
-
191
-
192
-
193
-
194
-
195
-
196
-
197
-
198
-
199
-
200
-
201
-
202
-
203
-
204
-
205
-
206
-
207
-
208
 |
 |
