HP C3916A HP LaserJet 5, 5M, and 5N Printer - User's Guide - Page 185
Testing a SIMM Board
 |
View all HP C3916A manuals
Add to My Manuals
Save this manual to your list of manuals |
Page 185 highlights
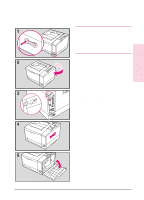
D Printer Memory Caution It is important to correctly align the right side panel and tighten the screw on the back panel before attempting to move the printer. Testing a SIMM Board Use the procedures below to print a self test to verify SIMM board installation. Procedures are given for both memory and PostScript SIMMs. Memory SIMM: running a self test printout 1 Plug in the power cord and switch the printer on. 2 After warm up, READY should appear in the control panel display. If a printer message appears, see "Troubleshooting a SIMM Board" on the following page. 3 Press [Menu] until TEST MENU appears in the display. 4 Press [Item] until PRINT SELF TEST appears in the display. 5 Press [Select] to print a self test. 6 Press [Go] to exit menus. Locate "RAM SIZE" on the self-test printout (see "Understanding the Self Test Printout" in Chapter 7 for more information). This is the amount of memory now installed in your printer. If the amount of memory has not increased since installing the SIMM, it may not be installed correctly (repeat installation procedure) or the SIMM may be defective (see "Troubleshooting a SIMM Board" on the following page). EN Printer Memory D-9
-
 1
1 -
2
-
3
-
4
-
5
-
6
-
7
-
8
-
9
-
10
-
11
-
12
-
13
-
14
-
15
-
16
-
17
-
18
-
19
-
20
-
21
-
22
-
23
-
24
-
25
-
26
-
27
-
28
-
29
-
30
-
31
-
32
-
33
-
34
-
35
-
36
-
37
-
38
-
39
-
40
-
41
-
42
-
43
-
44
-
45
-
46
-
47
-
48
-
49
-
50
-
51
-
52
-
53
-
54
-
55
-
56
-
57
-
58
-
59
-
60
-
61
-
62
-
63
-
64
-
65
-
66
-
67
-
68
-
69
-
70
-
71
-
72
-
73
-
74
-
75
-
76
-
77
-
78
-
79
-
80
-
81
-
82
-
83
-
84
-
85
-
86
-
87
-
88
-
89
-
90
-
91
-
92
-
93
-
94
-
95
-
96
-
97
-
98
-
99
-
100
-
101
-
102
-
103
-
104
-
105
-
106
-
107
-
108
-
109
-
110
-
111
-
112
-
113
-
114
-
115
-
116
-
117
-
118
-
119
-
120
-
121
-
122
-
123
-
124
-
125
-
126
-
127
-
128
-
129
-
130
-
131
-
132
-
133
-
134
-
135
-
136
-
137
-
138
-
139
-
140
-
141
-
142
-
143
-
144
-
145
-
146
-
147
-
148
-
149
-
150
-
151
-
152
-
153
-
154
-
155
-
156
-
157
-
158
-
159
-
160
-
161
-
162
-
163
-
164
-
165
-
166
-
167
-
168
-
169
-
170
-
171
-
172
-
173
-
174
-
175
-
176
-
177
-
178
-
179
-
 180
180 -
 181
181 -
 182
182 -
 183
183 -
 184
184 -
 185
185 -
 186
186 -
 187
187 -
 188
188 -
 189
189 -
 190
190 -
191
-
192
-
193
-
194
-
195
-
196
-
197
-
198
-
199
-
200
-
201
-
202
-
203
-
204
-
205
-
206
-
207
-
208
 |
 |
